Showing posts sorted by relevance for query lisbon. Sort by date Show all posts

Tuesday, May 3, 2016

Lisbon Cardigan by Itch to Stitch: A Pattern Review

This beauty is the Lisbon Cardigan by Itch to Stitch. Isn't she gorgeous?


When Kennis asked for pattern testers, I jumped on this. What a beautiful, classic design... I've actually searched for something similar, and been disappointed with what I've found. If you are a prolific knitter, your wardrobe is probably full of nice cardigans, but as slow and plodding knitter, this is a definite gap for me.

This version is made with doubleknit and ponte fabrics. The black is a wool doubleknit from Mood that has been in my stash for years. I fell in love with it and bought a ridiculous quantity. This was probably a mistake in how much space it takes up in my limited fabric storage area... but for something like this, it is the perfect fabric-- warm, durable, and with just a bit of stretch- 25 percent or so. 


The magenta striped fabric is a rayon ponte from Marcy Tilton (who has the most amazing collection of stripes). It is a 2 way stretch, which was a bit worrisome for this pattern since I had my heart set on vertical striping and the stretch goes with the stripes. So I got away with making the cuffs and bottom bands with very little stretch... there is enough ease that this worked for me. 


The neckline, however, was a bit of a disaster without stretch-- it is basically a rectangle and the shaping of the neckline comes from stretching it to fit the body of the sweater. After a total fail, I re-cut the neckline horizontally, with the stretch. In retrospect, I really like it this way.


The fit is perfect for me. I made a size 10 with no adjustments at all. I'm a 38 bust, 35 waist, and 41 hip, and 5'4".  Technically my waist would be a size 12, but the fit is boxy so I just ignored that fact. I have slightly larger than average biceps and sometimes feel the need to do a large biceps adjustment, but I didn't need to on this pattern (some testers narrowed the sleeves a bit). The sleeves might be just a tad long for me, but it doesn't bother me because the cuffs keep them in place. 


I know this sounds crazy, looking at this sweater now... but it totally didn't occur to me that I needed to pattern-match the two front bands (where the buttons and the buttonholes are). Thank goodness I ended up pattern-matching by accident, just by virtue of the fact that I was using the stripes as a cutting guide when I cut the pieces. I sort of thought they would totally overlap and you wouldn't see the bottom band, but looking at it now, it makes sense that it would peek out. It would have looked dorky if I hadn't managed to match it!

This is my first Itch to Stitch pattern, and I was impressed with Kennis's professional drafting and instructions. The seam allowances aren't shaped, so you do need to make sure you are matching the stitching lines, but this is pretty standard sewing technique. Her instructions are very well thought out and concise, there are no extra steps or fussiness, she just tells you what you need to do in a logical order. You don't need a serger, but she indicates where you can use one, and the seam allowances are 1/4 inch so there isn't a lot of wasted fabric.


The PDF is layered so that you can print out just the version you need, instead of all of the sizes, and she includes instructions on how to print out just the layers you need. FYI, if you are PDF challenged and ignore the instructions and print off all of the layers at once, that works too. As me how I know ;). The one piece I had to reprint with unnecessary layers turned off was the front band showing the buttonhole placement, but this was just 3 pages. 

I did made one significant change in construction. When sewing the front bands, she has you sew the band on and tack the seam allowances. This is a very reasonable, reliable way to sew the front bands on... but I like an enclosed front band on my cardigans since I tend to wear them unbuttoned. So I sewed the front band on like you would sew a waistband. I just finished a pair of Ginger Jeans by Closet Case Files, and Heather explains the technique very well in her sewalong. I'll do a tutorial for this when I sew my next Lisbon, but I basically treated the front band of the cardigan like the waistband of a pair of pants, using the topstitching to catch the seam allowance of the underside of the band. Since you are basically sewing blind, it helps to use wonder tape (double sided water soluable tape!). If you don't have wonder tape, use lots of pins. It is a little trickier to sew the front bands in this manner, but I love the result... if the wind catches my cardigan and flips it open, the inside is almost as beautiful as the outside.


Speaking of beautiful insides, Kennis includes instructions for a "hong kong" seam finish for knits. I think this is a super cool idea! I just serged this cardigan, but if I'm working with something super special in the future, it would be lovely to have a beautiful color or print enclosing the seams. You could also just use this technique on super obvious seams, such as the front band seam, if you aren't doing the "waistband" method of enclosing the seams. 


One other detail I added was underlining for the arms. I know from experience that I find this wool doubleknit a bit scratchy to have in direct contact with my skin, and I wanted to be able to wear this cardigan with sleeveless tops. So I underlined the sleeves with some Venezia knit lining from Emmaonesock. I love this stuff... super light, slightly slippery, and stretchy. I used the sleeve pattern pieces to cut out the lining, and basted the lining to the sleeve, wrong sides together. I then treated the sleeve and lining as a single piece for the rest of the construction of the cardigan. 


Let's just talk for one minute about the elephant in the room: buttonholes! For the full length version of this cardigan there are SEVEN of them. Ack. I was hoping for miracles when I bought my Janome 8077 last year, but I have to say, the automatic buttonhole feature is miles better than my old machine (which was scoring a ZERO, so that isn't saying much) but still rather finicky. If the buttonhole situation is PERFECT-- totally flat, even thickness of fabric, not too thick, not too thin, normal Gutterman thread (mara 100), perfectly stabilized (preferrably, woven), no seams in the vicinity-- the buttonhole function will still sometimes stop with inscrutable codes for no reason at all. 

After about 15 minutes or so of failures on test fabric, my machine and I came to a truce on these buttonholes. No fancy buttonhole thread-- just regular old Gutterman thread with the stretch needle that I had used for construction. No funny stuff, like going around twice. Tissue paper under the fabric. Then I pulled off 7 buttonholes in a row, and breathed a huge sigh of relief. 

One little hint... if you are using an automatic buttonholer where you put a button in the slot to get the right size buttonhole, you might want to trick it into making slightly smaller buttonholes for your knit fabric. I took out the button and clamped the little lever down another 1/8 inch.

The buttons are vintage buttons from my best friend's grandmother's button collection. They are basic black buttons, and I'm not sure what they are made of, but they have a bit more weight and a slightly cool touch. They feel nice to the touch. I machine sewed them, which went pretty smoothly on my Janome-- no broken needles and faster than hand sewing. 


Oh, and one more detail I added: topstitching. I was having trouble getting things to lie flat... these knits just didn't hold a press in a very satisfying way. So I added two lines of topstitching, at the top and bottom of the striped portion of the waistband, which served to add a bit of definition and hold the seam allowances in place. I also topstitched the neckline, on the black doubleknit just under the neckband, once again to hold the seam allowances in place and help everything lie nice and flat. 


This was actually my second Lisbon, and I sewed it up in one evening, minus the buttonholes and buttons. Kennis is totally right that you are going to want to make TONS of these, it is such a versatile wardrobe piece, and very fun in all sorts of fabrics. I'll blog my other Lisbon soon-- I used a drapey knit, and it has a totally different feel. I can't wait to sew another one!

Kennis is having a new release sale right now, so head over to her shop if you want to make your own Lisbon Cardigan. No code required to get 20% off. 


Tuesday, March 13, 2018

A handmade 10x10 wardrobe... for 7 weeks and counting!

Hello from Rome! I apologize for not posting for ages, but my excuse is that I've been a bit preoccupied with the joys and trials of living abroad. 

Since the focus of this blog is sewing and DIY projects, I don't talk very much about my daily life. However, you may have picked up on the fact that I'm an artist and a professor, and I primarily teach photography and video. This semester I'm teaching abroad in Rome, Italy. I'm about halfway through my four month stay. 

And that brings me to the topic of this post, a winter 10x10 wardrobe challenge. The 10x10 wardrobe challenge was the idea of Lee Vosburgh of Stylebee, and it's gotten a lot of attention in the sewing community. The idea behind the 10x10 challenge is to really take a close look at your wardrobe and to choose 10 pieces to live with for 10 days. In a commodity culture with easy cheap fashion all around us, the 10x10 is an exercise in minimalism and an opportunity to slow down.

Those of us that sew often invest an incredible amount of time, energy, and money into the pieces we make. There are many reasons to sew wardrobe items, but many of us are interested in sustainability and in creating pieces that fit our bodies and our personal style in ways that mass produced fashion is unable to do. 

This time I decided to really hone down my packing... I really wanted all of my clothes to fit into one carry-on size suitcase. And I had to pack for two seasons! That means I pretty much was unable to take more than 10 winter items. So far, I've been living with these 10 winter items for about 7 weeks!


Here are my 10 items. Most of these are unblogged... admittedly, I had a huge sewing spree right before I left!

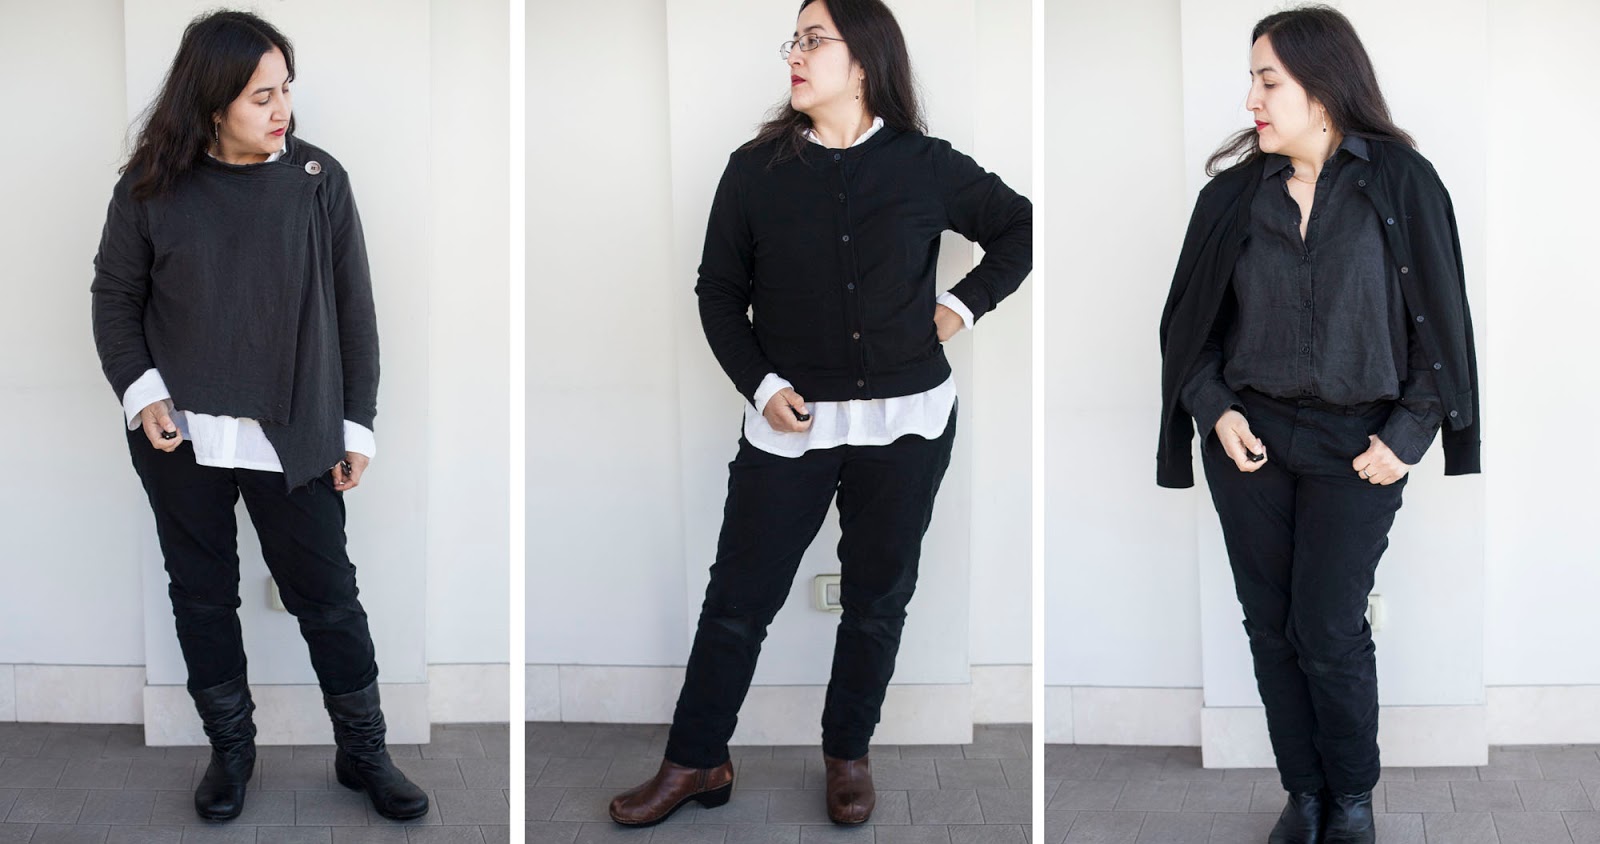
Black merino wool cardigan

The Lisbon Cardigan by Itch to Stitch in midweight merino wool from The Fabric Store. I love the Lisbon pattern, it is such a classic design, and it is beautifully drafted. You can seem my review and another version here.

I finally decided to try merino wool from The Fabric Store this fall-- it is of the highest quality, and sustainably produced. However, I can't wear it against my skin comfortably. I made a long sleeve t-shirt from the 180gsm Premium and it didn't make the cut because I'm just too sensitive to wear it without a silk undershirt. But it makes a lovely cardigan.

Gray cashmere asymmetric cardigan

This piece has been in my collection for at least 5 or 6 years, I think I probably made it in my first year of sewing for my wardrobe, before I started blogging regularly. It was a very long, drapey cardigan, but I refashioned it this fall to be a little more practical. The fabric is just incredible, I purchased it from Marcy Tilton and I've never seen anything like it since. It is a double-layer knit, with the two layers loosely sewn together. It is the warmest, softest fabric I've ever seen or felt.

Black fine linen shirt

My favorite shirt ever. Made with the Liesl Classic Shirt pattern in fine linen from The Fabrics-store, with jet black corozo buttons. My review of the Liesl Classic Shirt pattern is here. This is their "IC64" linen which is a medium weight but has a higher thread count. It is just a bit classier and has a lovely feel.

White fine linen shirt

The fact that I can in fact wear white is a revelation-- I always thought I would just spoil a white shirt on the first wearing. As it turns out, I wear this shirt once, sometimes twice a week and it has been just fine. I do try to avoid wearing it on days when there is a high likelihood of staining (like when I'm cooking, or when I'm with the kids all day). I also avoid anti-perspirant deodorants when wearing white to prevent yellowing- either I go with a natural brand or I go without.

There is just nothing like a crisp white shirt. As above, this is the Liesl Classic Shirt pattern in IC64 linen from The Fabrics-store, with extra thick shell buttons.

Black stretch twill Sasha Trouser/Ginger Jeans hybrid

These are my favorite pants ever. I like the classiness of the Sasha Trouser, but quite honestly, I hate those slash pockets, they just bag out on me in the dorkiest way no matter what I do. And I guess the reversed fly is classic, but I can't get used to it. So I used the front of the Ginger Jeans pattern for the curved pockets that lie nice and flat against my body and the unfussy fly, and the back of the Sasha Trouser pattern for the classy welt pockets and darts. If you are interested, this is my review of the Sasha Trouser and the Ginger Jeans (both by Closet Case Files). Since they are both drafted on the same block, they are pretty interchangable!

The stretch twill is from Elegant Fabrics in New York. I couldn't find a truly wonderful black stretch twill at any of my usual online shops, and that wasn't for any lack of trying (swatching, even ordering a few pieces). When I had to be in New York City to obtain my visa, I dropped into Elegant Fabrics and fingered their twills until I found this one. It is lovely-- beautifully stretchy, weighty but not heavy, and velvety soft. There was just enough on the roll to make one pair of pants!

Black tencel twill shirt

Same pattern- Liesl's Classic Shirt, in a gorgeous tencel twill from Threadbare Fabrics. This is the same fabric that I made my long sleeve Kalle in, but the fit on the Kalle is not quite right somehow. So glad I had another piece of this twill (it has sold out!), and in the Liesl pattern this shirt is amazing.

Cream tencel twill shirt

Yes, another Liesl Classic Shirt, in a creamy tencel twill from Emmaonesock. I love subtle color and the silk-like texture, but it is much easier to wear and wash than silk.

Black Ginger Jeans

Another new make! This is a denim from Mood Fabrics. I can't tell you much about it, I just went and fingered all of the denims until I found one that felt right, and since it was a classic off-black denim, I overdyed it with RIT. I added red bar tacks, just for fun. Ginger Jeans by Closet Case Files review here.

Black Dansko Aurora Boots

These are oddly perfect boots for my feet. I can't even wear the famous Dansko clogs-- I have a pair at home that I need to just sell, since they are basically unworn and I find them too stiff to wear. I can't really explain it, but I can walk miles in these boots, unlike any other shoe or boot I've tried. In Rome, where transportation can be spotty, one does literally end up walking miles. I think it might have to do with the toe box being unusually roomy, my feet love that, and the soles have just the right amount of stiffness and flexibility.  I don't love the slouchy style, but I can bear it if my feet are happy. I wore the first pair into the ground, this is my second pair, purchased on Ebay.

Brown Dansko Scout Boots

These are my back up boots. When I first got them I thought they were terribly uncomfortable, but they've broken in well and are my favorite boots when not in Rome. I love the warm reddish brown color. However, on days when I know I'll be hiking it, I wear the Auroras! Purchased like new on Ebay.

10 pieces, 10 looks


Style Notes

I love the simplicity of dressing with these 10 pieces. Everything goes with everything... really and truly. There is only one one real decision-- white shirt or black? If I'm spending the day with the kids, or it is that time of the month... black! If the sun is shining and there might be an opportunity to strut in a piazza with my jacket thrown over my shoulder-- white! Otherwise, it really doesn't matter.

Also, doing laundry is also incredibly simple. White wash, black wash. No special care needed, just wash cold and hang to dry, on hangers. The linen and tencel shirts mostly dry overnight. I keep oxyclean on hand for any accidents on the white shirts, and I have had to use it, to excellent effect.

Keeping the wash simple is especially important here since there are no DRYERS. Which is totally fine for my clothes, which I never dry anyway. However, this totally sucks for endless loads of kids clothes, towels, sheets, etc. I understand the energy savings of a city without dryers, etc, but was the person who decided on this policy a working mom?

In the interest of full disclosure, I do have two black linen shirts with me (both the same pattern), and two pairs black Ginger Jeans. This is does help make laundry a bit less stressful, especially since the jeans can take 2-3 days to dry completely. Also, I've had to alter one pair... the waistband on the newer pair of jeans stretched too much and I had to take it in an inch, by hand. That pair was out of commission for a good two weeks. (I miss my sewing machine-- I even considered talking it somewhere and having someone do it for me, but I couldn't quite bring myself to do that with my handmade jeans!) I also have a pair of cargos and a blue denim Kalle that I wear on weekends or evenings, for hanging out around the house or running errands in the neighborhood.

I am a total fan of the button down shirt. I love its versatility-- it looks great dressed up or down. I totally feel appropriate every day, whether I'm lecturing, chilling at a bar, or splurging on an aperativo in a classy location. I love that its cuffs and plackets allow for easy styling of totally different looks, and also provide instant temperature control.

I also think linen is the perfect fabric, summer and winter. Linen dries fast and stains come out with very little effort. The shirts have wonderful texture when hung to dry, but can also be pressed with steam for a crisp look. Linen is so incredibly cool in the heat, and I've found it to be surprisingly insulating in the winter, especially when paired with a wool cardigan or sweater. In really cold weather, I wear a silk undershirt for extra coziness. I do want to try making some shirts in a really lovely cotton which I might end up loving also, but I didn't quite get to that before I left.

I know for many people, my palette of white, black and gray would be too plain. For me, though, while I love looking at bright colors and patterns, I don't always feel the need to wear them. When I have a lot of patterns and colors in my wardrobe, I tire of them and want new colors and patterns. Also, I worry that people will notice if I wear the same pattern over and over again-- but if you wear a button down shirt every day, no one thinks you don't do your laundry. Oddly enough, I'm much LESS bored with my wardrobe this time than I was the last time I was abroad for a semester when I brought lots of patterned t-shirts.

My white/black shirts and black pants are a personal uniform, and at this time and place in my life, this is sort of liberating. It is sort of like a blank canvas, over which I can be myself.

Lately, if I feel the need for color or pattern, my favorite way to express myself is to wear a bright lipstick. I thought perhaps if I was bored I would buy some fun scarves or jewelry, but I haven't felt the need.

I love living with this smaller, simpler wardrobe... and now I'm wondering if I'll be able to translate that into reducing my wardrobe when I return home.


Friday, May 13, 2016

Lisbon Cardigan in a Drapey Jersey with Sequin Print Trim

To be truthful, this was my first Lisbon cardigan!


I was a pattern tester for this pattern, and I hadn't sewed an Itch to Stitch pattern before, so I decided to make up my first version in a black jersey that I had lots of so that I would not be sad to lose a precious fabric if changes had to be made.

I needn't have worried... the fit was spot on. After trying it on and realizing it was going to be a keeper, I decided I would jazz it up with a bit of sequin print trim. I've been hoarding this lovely sequin print jersey, but I figured I could spare just a bit for this purpose. From a distance, I think it is quite effective.


This is the 3/4 length sleeve which is an option on the pattern, and I believe shortening the 3/4 sleeve is the one change that Kennis made before releasing the pattern. Just so you know. It makes sense, since these sleeves on my version are sort of awkwardly in between a 3/4 and full length sleeve. It doesn't really bother me though.

In order to take best advantage of the drapey effect, I decided not to put buttons down the entire front. Quite honestly, I was also worried that the buttons would just look sort of saggy and sad since the front bands are quite soft, even with interfacing. Besides, I rarely ever button the front of my cardigans, and it was especially unlikely with such a think knit.


But I did want some sort of closure on the neckline. I thought a button would spoil the trompe l'oeil that I had created with the sequins, so I salvaged some sew-on snaps from an old sweater.


I pretty much followed the directions to the letter-- and they are very well written! I did make one change though-- when I sewed the front bands to the sweater, I sewed them on like you would sew a waistband onto a pair of pants, so that all of the seams are enclosed. I pretty much do this on all of my sewn cardigans, since I can't stand seams showing when the wind flips my sweater open. You basically sew the front side of the front band to the cardigan right sides together. To sew the back of the front band, you fold the seam allowance in and secure it with a lot of pressing and pins and/or wash away tape, then top stitch it from the right side, catching the fold.


I think I'll get a lot of wear out of this cardigan. Black with gray-toned trim goes with just about everything! Also, the sequin print trim makes it a little more dressy... but the fact that it is actually jersey means I can also wear it during the day.

Monday, August 21, 2017

Sewing wardrobe staples... the Tessuti Kate Top x 3... Summer of Basics

It is interesting how my sewing has changed over time. Only a few years ago, most of my sewing was pieces for special occasions and fancy showstopper wardrobe pieces. I still have and love most of these pieces. For example, my Missoni Sweater Coat, Striped Lisbon Cardigan and Asymmetric Wool Blazer get pulled out a few times each season. However, one can't wear these items too often, they're just too distinctive.

I haven't always thought it was worth my time to spend a lot of effort on basics, but the act of making beautiful basics has grown on me lately. There is a certain pleasure to making and wearing a simple, beautiful pieces that fit well and are made with quality materials with thoughtful details.

I find it harder to blog these quiet makes that I wear everyday. It seems much more exciting to post something eye-catching, made with a complex pattern and and exotic print. But I enjoy reading other people's posts on basics, so I should really be better about it. I've enjoyed reading the Summer of Basics posts by Fringe Association and their partners, and all of the other bloggers and instagrammers who have joined in to #summerofbasics . I think it is a much needed acknowledgement that simple, lovely basics are just as worthy of notice as the other creative projects we engage in. Perhaps more important!

On that note, my next few posts will be devoted to showing some of the wardrobe basics I've been sewing up this summer.

There are lots of woven tank patterns to choose from, but the one I've latched onto is the Tessuti Kate. I have a definite soft spot for Tessuti patterns. I love how they almost assume you are going to sew them up in linen or something similar, and in this day and age, I feel like a hand-drawn pattern is gutsy and cool. I've talked about the pattern quite a bit in this post, so I'll leave out the gritty details.


I made these three Kates in June, and they have been in heavy rotation ever since. The are all in linen from Emmaonesock, and the floral and denim were discounted roll-ends. The floral one doesn't get worn as much, it is almost too pretty for daily wear in my current rather minimal aesthetic, but the striped linen and the denim-y linen are what I've been living in.


I've modified the Kate slightly. I always make the view with the higher neckline, I just prefer this look right now. I skip the back closure-- while it is lovely, I don't need it, and if I have a button there, it just gets tangled up in my hair. I always add about an inch of length. The striped and the floral tops have been made more "swing-y" by grading out a size from under the arm to the hem, while the denim-y linen one keeps the original boxy shape. I really like the look of this silhouette but on certain days this just feels a bit too close on my belly.

The mitered side vent is a lovely detail on the Kate, and I love having this as an option, but I frequently improvise other hems. On the floral one, I cut the hem totally straight and did a narrow hem (to conserve fabric!). The striped one keeps the vent and mitered corners.


The denim-y one has a hi-lo hem, which was sort of an accident. I lengthened the top by two inches instead of one, which for some reason I thought would be a good idea, but after wearing it I realized that it was hitting my body at an awkward place. So I belatedly hemmed the front up higher than the back. 


The roll end that I made the floral linen top out of was not quite a yard. I probably should have passed on this, since I knew the pieces wouldn't fit, but it was such a lovely print that I wouldn't have bought if it wasn't on sale. To make it work, I ended up cutting a strip off-grain and adding it to the center back. 

I'm wearing the striped linen Kate right now! Dear readers, what are your favorite tops for summer? Do you have a TNT pattern or a favorite store-bought option?

Monday, March 13, 2017

Personalizing the Blackwood Cardigan by Helen's Closet

I know it's been a long time-- I have so many posts to write, and so little time! I'm hoping that life will calm down a little so that I can share more with you in the near future. Today I have an extra-special post with an exciting giveaway at the end!

I'm currently really enjoying the Blackwood Cardigan by Helen's Closet. To be truthful, I've been waiting for the right cardigan pattern to come along. I have a trusty cardigan pattern that I pull out when I need a new one, but it is basically a poor attempt tracing a favorite cardigan, and the fit has always been just a bit sloppy and I've been too lazy to fix it.


I was a pattern tester for the Blackwood. When Helen revealed that her new pattern was a cardigan, I was thrilled-- it's just what I was looking for!

I also have a few other favorites from Indie designers that fit certain needs. The Coppelia Cardigan by Papercut Patterns is a cozy wrap design (I've blogged that here and I have another one that I love even more in a simple merino knit that I apparently never blogged). For a classic button front cardigan there is the Lisbon Cardigan by Itch to Stitch (see mine here).

What's nice about the Blackwood is that it is a simple, no closure design. It is designed to fit closely, and has cuffs, a neck band and a bottom band, so you can sew the entire thing on a serger. This is the line drawing from the pattern, so you can see it is a pretty straightforward design, with a long and a short view.


My first version is View B, unaltered except to shorten the sleeves by one inch. It's a little longer on me than in the drawings, probably because I'm 5'4", but I like the extra length. I made this one in a stretchy wool knit. I can't recall the exact composition of this fabric, but it definitely has some spandex in it.


I just love the super-wide bottom band on this cardigan, it feels so decadent to make a band so wide, and it also gives the bottom of the cardigan a bit more weight and substance which improves the drape.

I interfaced the bands with a lightweight knit interfacing, just to give them a touch of structure and to encourage my very stretchy knit to behave properly. I also put a strip of interfacing in the shoulder seam to prevent stretching.

I followed the directions as written on this version, and everything worked out beautifully. I did have a bit of fun with this all black cardigan by binding the seams with a fun black and white lace print knit. I did all of the construction on the serger, except for the seam binding.


After wearing this cardigan a few times, I decided I wanted a bit more coverage in front-- my office is super drafty, so I like to be able to wrap the cardigan around me when I feel a bit of chill. I added about 1-inch in the center front, fading away to nothing at the neckline. The pink part is a sketch of the part that I added to the front pattern piece, and the gray is what I added to the bottom band.


I made my second Blackwood from another wool jersey knit. This is a wonderfully soft wool knit, but it has only mechanical stretch (no spandex). So I also decided to do a full biceps adjustment-- Jenny at Cashmerette has a nice description of how to do this on her blog. I used a lovely wool ribbing for the bands... I have a couple of roll-end pieces from Emmaonesock that have been in my stash for years, and this was the perfect application for one of those pieces.

To show off this lovely ribbing, and to maximize coziness, I made the neck band the same width as the bottom band. This simple change also really makes this cardigan look totally different from my first black cardigan.


Attaching neck bands to cardigans is always a bit of a dilemma for me. I just hate to have that seam exposed, it looks so unprofessional to me. So on this cardigan, I decided to fold under the raw edge and top stitch it down. This is sort of hard to do neatly since you need to top stitch from the front side and catch that folded edge on the underside. I've tried various methods to keep that back side in line, including using tons of pins and wash away tape. This time I tried hand basting.


The end result isn't perfect, but I still prefer it to a serged edge.

This has become the cardigan I reach for on chilly days. So cozy, but the ribbing gives it a bit of structure so it doesn't look sloppy. I especially love the wide bottom band done up in the rib, it really accentuates this design detail.


So, my next version I decided I needed to break up my black streak. I've had this lovely Missoni knit in my stash from Emmaonesock for awhile. It is really quite lovely, mostly viscose with a bit of brassy sparkle, in a bold color scheme from the height of Missoni's chevron craze. I was thinking I'd make it into a dress, but I think it will get much more wear as a cardigan.


This very special knit really needed a very special fabric for the bands. I definitely wanted a solid that would pull out and accentuate one of the colors in the fabric. Rayon ponte would be the obvious choice, but I've had some trouble with rayon pilling in hard wearing locations. Silk jersey would be decadent, but the price tag is pretty steep, and I'd also have to work out how to give it enough structure to not look floppy. I ended up going with a navy wool boucle from Emmaonesock. I just took a risk and ordered a yard, and the color was perfect but it was a bit thicker and a touch scratchier than I had expected.


In a flash of inspiration, I remembered that I had some black silk jersey scraps from a previous project. Instead of cutting the neck band and wrist bands in a single piece and folding, I cut the pattern piece into two pieces and added a seam allowance to each piece. This allowed me to use the silk jersey on the inside of the bands, and the wool boucle on the outside. The two are perfect together... the wool provides structure and a beautiful color and texture, while the silk jersey reduced bulk and is wonderfully soft on the neck and wrists.


For the bottom band, I just used the boucle folded over. On this sweater, I decided to make the bottom band and the wrist bands the same width as the neck bands, and made the body of the cardigan longer to compensate. I should have made the sleeves longer to compensate also, but I forgot to do this. It turns out though that this crazy loose knit wants to grow, and the sleeves are plenty long. 


I went up a size for this cardigan, from a large to an XL. The Missoni knit is considerably thicker than the fabrics this pattern calls for, and while it is a loose knit, it doesn't have the kind of stretch and recovery that a knit with spandex has. I kept the shoulder width of the L though, since I thought this was perfect on me, and I didn't want the drop-shoulder look.

However, I think there was also a bit of lateral growth when I was working with the pattern pieces, and I might have overcompensated, since it is a bit roomier than I expected. I may take it in a bit at some point, especially if it continues to stretch out, but a bit of extra room in a cardigan isn't such a bad thing.

Since this is a very loose knit, I fused strips of bias-cut weft interfacing in the shoulder seams and the armhole seams to prevent the sweater from stretching out of shape over time.

For finishing the bottom band and neck bands, I hand sewed the back of the band to the sweater. Hand sewing isn't my favorite thing, but I wanted a truly lovely finish on these somewhat fickle materials so I conceded gracefully.


While it's not perfect, it is a fun piece to wear and it is both practical and luxurious. In my mostly dark-colored wardrobe, I enjoy having a few quirky garments that I pull out a couple times each season, and this definitely fills that role.


There you have it, one pattern resulting in three very different cardigans. The possibilities are endless... and I haven't even cracked open view A!

Dear readers... how will you personalize your Blackwood? With special thanks to Helen, enter the Rafflecopter giveaway for the chance to win your very own PDF copy of the Blackwood Cardigan Pattern. The giveaway will be open until Sunday March 19th at 12am, and I'll contact the winner by email.


a Rafflecopter giveaway

Friday, May 13, 2016

Endless Combinations on Pattern Review


I've entered the Endless Combinations contest on Pattern Review. If you are a member, check it out... if not, it is free to join, and a great place to read pattern reviews and join forums about sewing.


Since I wanted to sew some new spring wardrobe pieces anyway, entering this contest didn't take me too far away from what I really wanted to be sewing, anyway.

So the way this contest works is that you sew at least 4 items (I sewed 5!) then you pair them up together A+B, B+C, etc. However, A doesn't have to go with C. Since every item doesn't have to go with every other item, it allows you to do things like make multiple tops.

All of the combinations are in the photos above, and here are the items with links so that you can read more about them:

A: Rainbow Floral Ruby Top
B: Ginger Jeans
C: Wool and Pink Striped Ponte Lisbon Cardigan
D: Tessuti Kate Top
E: Sequin Trim Cardigan (also the Lisbon Pattern).

Happy Sewing!


Monday, September 24, 2018

Striped Linen Dress: Liesl and Co + Closet Case Kalle Mashup

This is one of those projects which took far longer than I expected. It took the first taste of the fall chill to compel me to finish it, and I'm so glad I did. 


Actually, in the photos, I feel like it doesn't look like much. I suppose I could have freshened up the ironing, but this level of rumple is probably much more representative of the look. This linen doesn't hold a press like most linens I have worked with, it reverts to its textural state almost immediately. However, it feels wonderful on, the fabric is substantial and the fit is very easy. Perhaps most importantly, the details subtle details in the striping make me happy. 

For this particular make, I had a very specific idea in mind. While browsing for inspiration I came across this dress by Poetry Fashion. I just loved the use of stripes with the faux princess seams and yoke, in a loose fitting shirt dress. 


It is the most lovely shade of blue, but sadly I could not find any striped linen in just this shade. I did however find a lovely black-brown mini-stripe linen at Fabrics-store, so I went with that. Black is really my color anyway!

For a pattern, I merged my two favorite shirt patterns-- the Liesl and Co. classic shirt and the Closet Case Kalle. If you want to see previous versions, the Liesl is here, and the Kalle is here, here and here. While the Kalle does have a sleeve option, I have not yet been able to get the sleeved version to work as well for me as the sleeves on the Liesl, and I wanted a classic set in sleeve anyway. But the Liesl has no real options beyond the basic shirt, so I used the Kalle to determine the shaping of the dress.  I added a faux yoke and princess seams by drawing and cutting those lines on the resulting pattern and adding seam allowances. 


I used the hidden button placket from the Kalle. This was so fun to sew, I've never done a hidden placket before. The Kalle directions were impeccable as usual. Why doesn't the Liesl have this option?


I usually go with a tower placket on my shirt sleeves, but I decided to go a bit more informal on this one and do a bias bound sleeve placket. Neither of my patterns had this option so I relied on tutorials from several blogs. I also narrowed the cuff on the Liesl to make it a bit more elegant, and went with bracelet-length sleeves.


For the hem, I drafted a facing, and I went with a slightly curved shape with sharp points, longer in the back than the front. Lately I've been feeling the Kalle's exaggerated shirt tail is a bit too informal. The cropped Kalle was the first shirt pattern I ever saw with a faced hem, and while I didn't use that pattern piece, I love the idea of it. 


All seams are frenched, including the in-seam pockets.


The finished dress has two minor disappointments... first, the pockets are a little too low. Doh! I always have such a hard time figuring out where pockets should go. I pinned and basted and pinned again, but in the end they were still to low. By the time I figured this out, they were already french seamed into place, and I was not going back. They are not tragically too low, just a touch lower than I would like. At least they are in matching fabric... the white pocket bags are one of the main complaints about the inspiration dress. 


The second minor point of irritation is the finish on the slit. I still feel there must be a better way to transition between french seams and side slits. I clipped and tucked in all the raw ends, but I still feel it doesn't have the finish the rest of the garment has. Probably a facing for the slit would be the next step towards a cleaner finish. 


This is how I wore it today... with a Lisbon Cardigan and the cuffs turned up over the sleeves. It will be lovely with tights when it gets chillier!