Showing posts with label linen. Show all posts

Sunday, March 13, 2022

McCalls m7969 in linen

Okay, spring can come now, I'm ready!  


This is m7969, which is must be something of a blockbuster hit for McCalls, it is all over Instagram. With sweet sleeve shape and easy, flattering silhouette that seems to look good on everyone, I was smitten and had to give it a try. 

I purchased a paper pattern months ago, but the yellow tissue and newsprint directions were bringing up memories of frustration and disappointment from my youthful attempts at sewing. I also just really dislike working with that fragile, crinkly tissue paper. When Minerva made the PDF available with their newsletter, I finally felt empowered to move ahead.

Of course I made View A (like everyone else!) but I subbed in the skirt from the Closet Core Elodie wrap dress because I don't like gathered skirts. I can't really even say why, but every time I make a dress with a gathered skirt, I wear it once and it sits in my closet until I change it out.

After looking at other blogger's versions, I decided go for sewing to my measurements, which seemed likely to turn out pleasantly oversized. That put me at an M bust and L waist, which are in two different PDFs (or two different pattern envelopes!). I'm ALWAYS right in the middle of size splits, I hate it when companies don't overlap their sizes. So... I printed off the M and just guessed at where the waist would be on the L. 

The one mod that many bloggers have done that I think is very smart is making the front wrap a little more modest. I know if I do this, I'll get lots more wear out of the dress, rather than saving it for some rare (since covid, non-existent!) sexy date night occasion. I extended the front triangle 3.5 inches and drew a straight line to the shoulder, then extended the front bindings (by a totally arbitrary amount, and I just cut off the excess). I also shortened the sleeves by an inch at the shorten/lengthen line. 
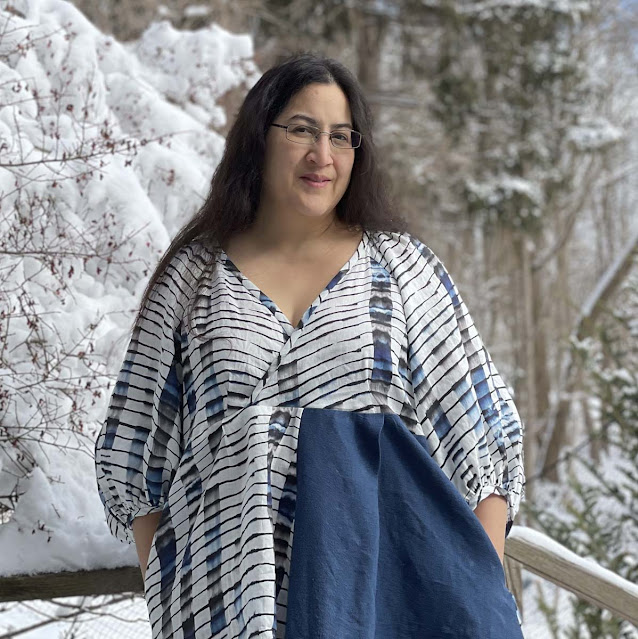
The linen print was a birthday purchase from Emmaonesock several years ago. I didn't have quite enough to cut out the quite full skirt of the Elodie, so I pulled out a remnant of navy linen to complete the skirt. 

Of course I added POCKETS-- having pockets in all of my clothing is one of the great advantages of sewing my own clothes. Designers, take heed-- us busy women need options for pockets. Since this pattern didn't include any pockets, I borrowed the divinely deep pockets from the Closet Core Amy jumpsuit and added them at the side seams. 

I started out blindly following the instructions-- but after considering it, I ripped those first seams and went with my own order of construction. With this fine linen I made french seams throughout, starting with the raglan seams and doing the underarm and side seams in one fell swoop. The instructions called for an inordinate amount of basting-- who does that, and why cut the neck binding on the bias, only to interface it on the grain? I didn't bother with the interfacing, I just treated it like any other bias bound neckline. I also didn't hand- slip stitch the bindings as suggested-- I might have if this was a solid or a slick fabric, but with a pattern and toothy linen, stitching in the ditch to secure the binding worked just fine. From taping the PDF to hemming, I had it done in a day. 

It seems that the binding was meant to be shorter than the neckline to have the effect of snugging in the wrap. Since I modified the front for more coverage, I sort of missed this effect, but ended up compensating when baste-fitting the front by pulling down on the bindings until the front laid flat with no gaping. I also sewed the waistline about an inch higher in the front, and added small pleats under the bust on the bodice and on the skirt. 

In terms the quality of the pattern-- I really think McCalls missed an opportunity to impress the sewing community. The PDF was sort of baffling-- wrong pagination, and how exactly were you supposed to put it together? No instructions on this that I could find, I didn't see any scale markings to check my printer scaling-- I eventually decided by trial and error that I was supposed to line up the little diamonds that I could hardly see through opaque printer paper, and I just had to trust that my printer was not scaling inappropriately. The PDF instructions did seem somewhat improved from what I remember of old McCalls patterns, but still not the kind of considered, tested construction that many Indie designers have perfected. 

Fortunately, it is a forgiving pattern in terms of fit and I have lots of experience sewing now so I can compensate for poor instructions, and the dress turned out beautifully. The sleeves are everything I was hoping for-- voluminous and elegant in this lightweight linen. It is just so cute and comfy, and I'm ready for spring as soon as Mother Nature is!

Thursday, March 4, 2021

Belatedly loving the Burnside Bibs in Telio Silky Noil

Y'all know by now that I overalls are my fave. If there was any holding back, the quarantine did that in... why dress to please anyone but myself? 

I've made a countless number of Closet Case Jenny Overalls (at least eight!) and a very well loved pair of Helen's Closet Yanta Overalls. With spring on my mind, if not yet in the weather (it snowed again this morning!) I was thinking about making a lighter weight, more jumpsuit-y pair of overalls. Enter the Burnside Bibs by Sew House Seven!


While I have long loved all of the gorgeous Burnside Bibs sewn by the many talented makers I follow, I've been skeptical of how much I would like the clever tie system that distinguishes the Burnside Bibs. Even in the more streamlined versions, it tends to produce gathers across the bum, which I don't care for on my own body. I also have a quiet dislike of dangly ties, which tend to end up in the most inconvenient places when utilizing the facilities in a rush. After careful consideration, I decided that both of these minor flaws could be avoided with a few minor changes. 


This was my first ever Sew House 7 pattern, and any flaunt with a new pattern company is a bit risky. However, I was pleasantly surprised to discover that the large format files were made for printing on a 36 inches wide printer rather than the usual 50 inches or so. The printers I have access to are 44 inches wide, so this worked out well.


The instructions, for the most part, were very clear and a joy to follow. The only bit of confusion I encountered was in the changing seam allowances, and there was one point where I seriously could not figure out from the instructions what the seam allowance was. However I persevered in wildly guessing and it seemed to all work out fine in the end. 

I didn't toile, I just sewed up my size via the measurements and made adjustments on the fly. I made the closer fitting view, with pleats in the back. I ended up raising the crotch half an inch and trimming an inch off the top of the bib, but other than that I made no changes. The invisible zipper went in without a hitch. The method of sewing the waistband and facing was very clever and left a very clean finish on the inside. 


I left the front of the straps as intended to keep the clean lines of the front bib, but instead of long ties through belt loops in the back, I sewed buttonholes into the straps and buttons to the inside back of the waistband. This makes the straps somewhat adjustable without the use of ties or other hardware. I don't need to unbutton a strap to get the overalls in and out, so this works out very well. 


To manage the extra ease that the pattern manages with the ties, I made side straps that cinch with d-rings. This generally works well, but it made slightly more awkward than it should be in that I was lazy and used the left over straps for the cinching, and I didn't have any D-rings smaller than 1 inch. Therefore the D-rings tend to twist annoying when you cinch them. I may at some point re-sew them with either smaller D-rings or wider straps, which would solve the problem. 

My fabric is a very drapey linen-viscose noil by Telio. Since I was going for a lighter, more flowy jumpsuit look, I think this achieved that look and feel, although I think I'd also really enjoy the burnside bibs in a slightly beefier fabric, perhaps a light denim or heavy linen.  

I'm wearing them here with a fushia linen Liesl Classic Shirt, but I'm going to be enjoying trying them out with all sorts of tops in my wardrobe, which is part of the fun of overalls! I definitely think there will be more Burnside Bibs in my sewing future, it was a quick and satisfying sew. 

Monday, May 4, 2020

Pinstripe Linen Jenny Overalls

Yes, I have made ANOTHER pair of overalls.


And they are DIVINE.


When all this work from home is finished, I am going to wear them to work and not give *#$%^ what anyone thinks. Pinstripes make them work appropriate, no?

They are Jenny Overalls in pinstripe linen. I bought this linen when it went on sale and I had loved using it to make this dress, but I had no idea what I was going to do with it. Then came lockdown, and my overall streak, and suddenly I knew EXACTLY what I needed to make. (It was from Fabrics-store.com, but they don't seem to have it anymore)

I'm out of overall hardware, so I went with the cute front tie thing I've seen on some other overalls. I just made a couple of rouleaux loops and sewed them into the top seam of the bib. 


The only other thing I did differently was to add a couple of darts to the top of the waistband to try to get it to lay a little flatter against my back. Really I need to just use a curved waistband piece for the back I think. But in this hack version, I added two 1/4 inch darts 6 inches apart on the center back waistband, and did the same for the waistband facing.


I once again did double side button closures. I'm running low on my stash, so I had to use the ones that say VIP jeanswear on them. I'll just disregard the jeanswear bit.


So that's about all I have to say about these. Don't be surprised if the next thing I make is more overalls!

Monday, March 2, 2020

Pietra gray Pietra pants from Closet Case Patterns, with modifications

Finally complete-- my Pietra Pants! As y'all probably know, I'm a huge fan of Closet Case Patterns, but these were a bit of a struggle for me. 

I have yet to meet an elastic waist pant that I like the look of, I've sewn up several that have ended up in the pajama drawer. But after seeing so many happy bloggers and instagrammers showing off elastic waist bums that looked just fine, I thought that perhaps Closet Case had perhaps worked some magic...


The pattern, as usual, was a pleasure to sew. Since I know Closet Case patterns tend to fit me right out of the envelope, I sewed these up without a muslin, to my measurements. My fabric was a stone gray (pietra!) medium-heavy weight linen from Fabrics-store.com. They came together quickly, with the neat construction typical of Closet Case, facilitated by their fantastic instructions.

The fit was perfect, as usual. The front view was gorgeous, love those pockets!

However, when I spun in front of the mirror, I was instantly horrified by the back view. The baggy butt was there, in all its fabric glory. Most likely the effect was intensified by my fabric choice... light gray moderately heavy linen (7 oz) certainly does not have a flattering gather. The thought of elephant skin jumped into my head, and would not leave. The pants got wadded up and buried in the bottom of my project bin.

I thought about taking a photo for before and after purposes, but could not muster the energy to wrangle a rear end selfie. And dear audience, no matter how much you might say that the rear view was really not that bad, the image of a pachyderm was not going to be easily dislodged.

After working my way through several other projects, glimpses of gray started taunting me, and this weekend I finally hauled the dreaded baggy butt pant out of the bin and went to work. Closet Case actually does have a tutorial addressing both the addition of a zipper and the removal of excess ease (on the side of the pant) for certain fabrics that don't play well with gathering, and I took these to heart and went even further in my hack-job modifications.

I unpicked the entire back of the pant, and took (very approximately) 1 inch out of each back side seam, 2 inches out of the center back, and made 1 inch darts over each buttock. I shortened the back waistband to fit the new dimensions of the rear of the pant. I added a side seam invisible zip. It was still was a little loose... so I added the elastic back into the rear waistband.

And the result...


I love the result, for me it is a good compromise between a bit of comfort ease in the back and a tidy rear end that I'm not going to be constantly hiding under untucked shirts and tunics. 


Now that my difficulties are behind me 😉, I love the taper of the leg and the huge front pockets. I might need more of these, especially with spring rolling around. I think if I try to sew these again, I might lay out the rear panel of the Pietra over the Jenny trouser pattern to see a hybrid of some sort might work. 


So happy to finally get my Pietra fix. These are on their way to become a favorite in my wardrobe (with modifications!)

Readers, how do you feel about elastic waist pants? I love the look of some of the RTW elastic waist pants out there, ES Florence pants come to mind, but I have no idea if I'd like wearing them. Do you like the look, or do you tolerate them for the comfort factor? 

Wednesday, January 15, 2020

Striped Jenny Overalls

My favorite, favorite black linen Jenny Overalls are in the mending pile... they are worn paper thin in some crucial areas, so they're candidates to try out invisible mending. I love these so much nothing can replace them. But in the meantime a girl needs some overalls...


I bought this striped stretch linen from Emmaonesock thinking I'd make pants. When I got it, it was not nearly as stretchy as I thought it would be, and I failed to commit on a pants pattern. The thought crossed my mind: "What lovely overalls this fabric would make." And the fact is, overalls don't take much more fabric than pants...

And then there are always overalls with removable bibs...!


So I don't have a lot more to say about making the Jenny Overalls. They are great. I make them with the grading between sizes established in my black linen overalls and the Frida Overalls, and vary the width of the side seam based on how I'm feeling about fit (the pattern has a generous 1 inch side seam). These also have a double side button fly that you can see in this tutorial.

Lots of pictures and not a lot of text follow.

Outside of bib and inside of pants, showing the buttons for attaching to the waistband, and the buttonholes through the inside of the waistband. The very last hole on each side is attached to the jeans button on the double button side button fly.

 
I drafted a front pocket stay for this version, since my fabric had stretch and wasn't quite as heavy as one could hope. I sort of love it! French seamed in the manner learned from Closet Case Patterns Ginger Jeans. 
Machine blind stiched hem. I guess this photo would be better rotated 180 degrees, sorry.

Button side fly. Buttons are from Amazon, a set that included 6 different kinds. I was loving these nautical themed ones for this project.

Front bib and pants front seen from the front side. The bib is cut on the bias.


 Straps are faced with white linen. 
Back view... front side of straps and back side of waistband.  

I forgot to mirror the angle on the back of the straps... doh! But one really can't tell when wearing, so sorry not sorry, and not fixing it! The horizontal buttonholes are for the straps. The vertical buttonholes and buttons on the waistband are for buttonhole elastic that has yet to be installed. Long story short, I've been inspired by my 7 year old's little girl jeans to try buttonhole elastic so that I can adjust the fit based on how I'm feeling, day to day, hour to hour. Anyhow I'll write a post on that if it ends up working.


Inside of straps and waistband. 


I just LOVE these. Not quite as versatile as my black linen ones, but very striking.

Worn here with a white Liesl Classic Shirt.

More overalls in the making...

Monday, December 30, 2019

Red Linen Wiksten Haori (formerly Wiksten Kimono)

I made a Wiksten Haori in red linen, and it has been the hot item this holiday!


This pattern is simple, but a lovely shape that works for many people. I made this one with no lining in a heavy red linen from my stash, a piece that I've had for many years. It has proven to be a bit too heavy for a dress, but was perfect for this pattern. It is wonderfully smooth and drapey with an attractive rustic weave.

I made it without a lining, instead I faux flat felled all of the seams, except the arm seams which were difficult to flat fell, so I french seamed them. I made a facing for the sleeves so that I could turn them up without the seams showing. I used my custom pockets, which are a curved slant that goes from the collar to the side seam in one clean sweep.

This was all made in a huge rush in time for a Fiddle Orchestra concert where we were instructed to wear red. Previously the only thing red in my wardrobe was underwear ;).

I love the way this turned out, and it has proven to be a wonderful item to have in my wardrobe for the holidays-- just throw it on over any other item and one can instantly assume that I have a healthy holiday spirit.

More photos...


Happy New Year!