I made trousers! Or, as us vulgar Americans would call them, PANTS. Classic and khaki.
These are, of course, the Sasha Trousers from Closet Case Patterns. I haven't owned a trouser for ages. I have a terrible track record trying to buy them... I'd try on a pair in the store, it would feel acceptable, then I'd wear it for a day and then it would never be worn again. I've perused various pants patterns, but the thought of going through fitting them was never very inviting.
When Heather from Closet Case Patterns released a trouser pattern based on the Ginger Jeans block, I knew this was the one for me, since I already have a customized Ginger Jeans pattern. It took me three tries to get my Ginger Jeans just how I like them, but my latest ones are the best fitting jeans I've ever owned. Soooo.... I just transferred over my changes to the Sasha Trousers pattern. BRILLIANT!
Just for the sake of all of you out there fitting pants or jeans, I'll just go through what has worked for me. First off, I took a HUGE wedge out of the center back top of the pant. This is, I think, basically a sway back adjustment, but might also be a bit of a large bum adjustment. I took out 2 inches. On my ginger jeans pattern, this comes mostly out of the yoke. On the Sasha Trousers pattern, I split the adjustment between the darts in the back and the center back.
I also scoop out the back crotch curve into a sharper J. Heather calls this her "low bum" adjustment.
To further make room for the bum, I add 1/2 inch to the back crotch curve, at the crotch. I also added 1/2 inch of height to the back of the pant... which also makes space for the bum.
I took 1/2 inch off of the front crotch curve, at the crotch.
I used the side seams to adjust the fit based on the stretch of the pant. My grand plan was to have 1 inch seams to play with, but I forgot to add extra to the front pocket pieces! So when I needed a bit of extra space for my hips, I had to steal it from the existing 5/8 inch seam allowance, making my side seams, at the hips, a scant 1/4 inch.
And that's it! I made no muslin, and went on faith, making all of the pockets, fly, etc, to get to the basting step. When I basted it all together, the fit on the bum was perfect, and there were only minor adjustments needed to the side seams.
Heather JUST posted a sewalong for the welt pockets, so lucky for all of you who are making the pattern now. While I do love sewalongs, I have to say her directions and diagrams were quite good, and they got me through the steps of the welts, front pockets, and fly with no frustration or unpicking to speak of. None of this is entirely new to me, though... although her welt pocket construction method was rather novel, I've never sewn one like it before. It all came together beautifully.
The interior finish on these is gorgeous... Heather has you french seam the pockets and put the good side out, so it all looks lovely. The twill tape waistband is really a lovely finish, and so easy to sew.
Do women's trousers really open the opposite of jeans? It feels wrong to me... but as I've said, it's been a loooong time since I've owned a pair of trousers. And even those weren't so nice.
I used a no-sew hook and eye... I like the clean look of it. I'm not sure why only the sew-on type is mentioned in the instructions, maybe there is some reason not to use the no sew type, but it hasn't posed a problem so far. Sewing the buttonhole on my machine was a bit dicey since my machine's automatic buttonhole feature like to just hang up if the surface isn't completely flat, but I've learned lately that I can sometimes aid it over the rough spots by pulling the fabric manually, and I just managed to squeak out an acceptable buttonhole. The button is just a plastic one from my stash.
I interfaced the waistband with Pro Weft Supreme Medium from Fashion Sewing Supply. It doesn't say this anywhere, but this interfacing is actually stretchy in one dimension, and I placed the interfacing in the direction of greatest stretch. I can't stand a constricting waistband, but at the same time, I hate it when the waistband stretches out by the end of the day.
I LOVE this fabric. It is the J. Crew Twill from Imaginegnats. I've been looking all over for great stretch twills, now that I have a trouser pattern, and this is some of the best stuff out there. I'm only telling you this because I already purchased more.
The fit is sort of relaxed on these... I think I prefer them that way, but I might have to take them in a bit if they stretch out too much with wear. So far so good though.
Having trousers that fit just like your favorite jeans is WONDERFUL. So if the Ginger Jeans pattern is your go-to jean pattern, you'll probably love the Sasha Trousers. If you don't have a favorite pants pattern yet, this wouldn't be a bad place to start since the directions are fantastic, and Heather's fitting guides are pretty comprehensive.
What's up next...? I actually thought I'd make another pair of Ginger Jeans, since I'm wearing my latest and greatest pair non-stop lately. I'd already be well into them, except that I had a bit of a sewing snafu. The denim I bought for them was narrow, and I didn't notice, so I only bought 2 yards. Lovely black Turkish denim from Threadbare fabrics, out of stock with no hope that there will ever be more. AND.... I even did a custom dye job on the fabric, making an off-black denim a true black, because I LOVE true black jeans.
So, I thought I'd just cut them out anyway, off-grain, and I did it.
Then clarity hit. What a stupid decision! Chances are, I'll spend hours and hours sewing jeans only to have twisty-legged jeans that will annoy me whenever I wear them.
Luckily, I just happened to be in NYC this week, so I picked myself up some pretty awesome denim, and some more dye. With a little luck, I'll be able to recut them this weekend, and do a proper job of it.
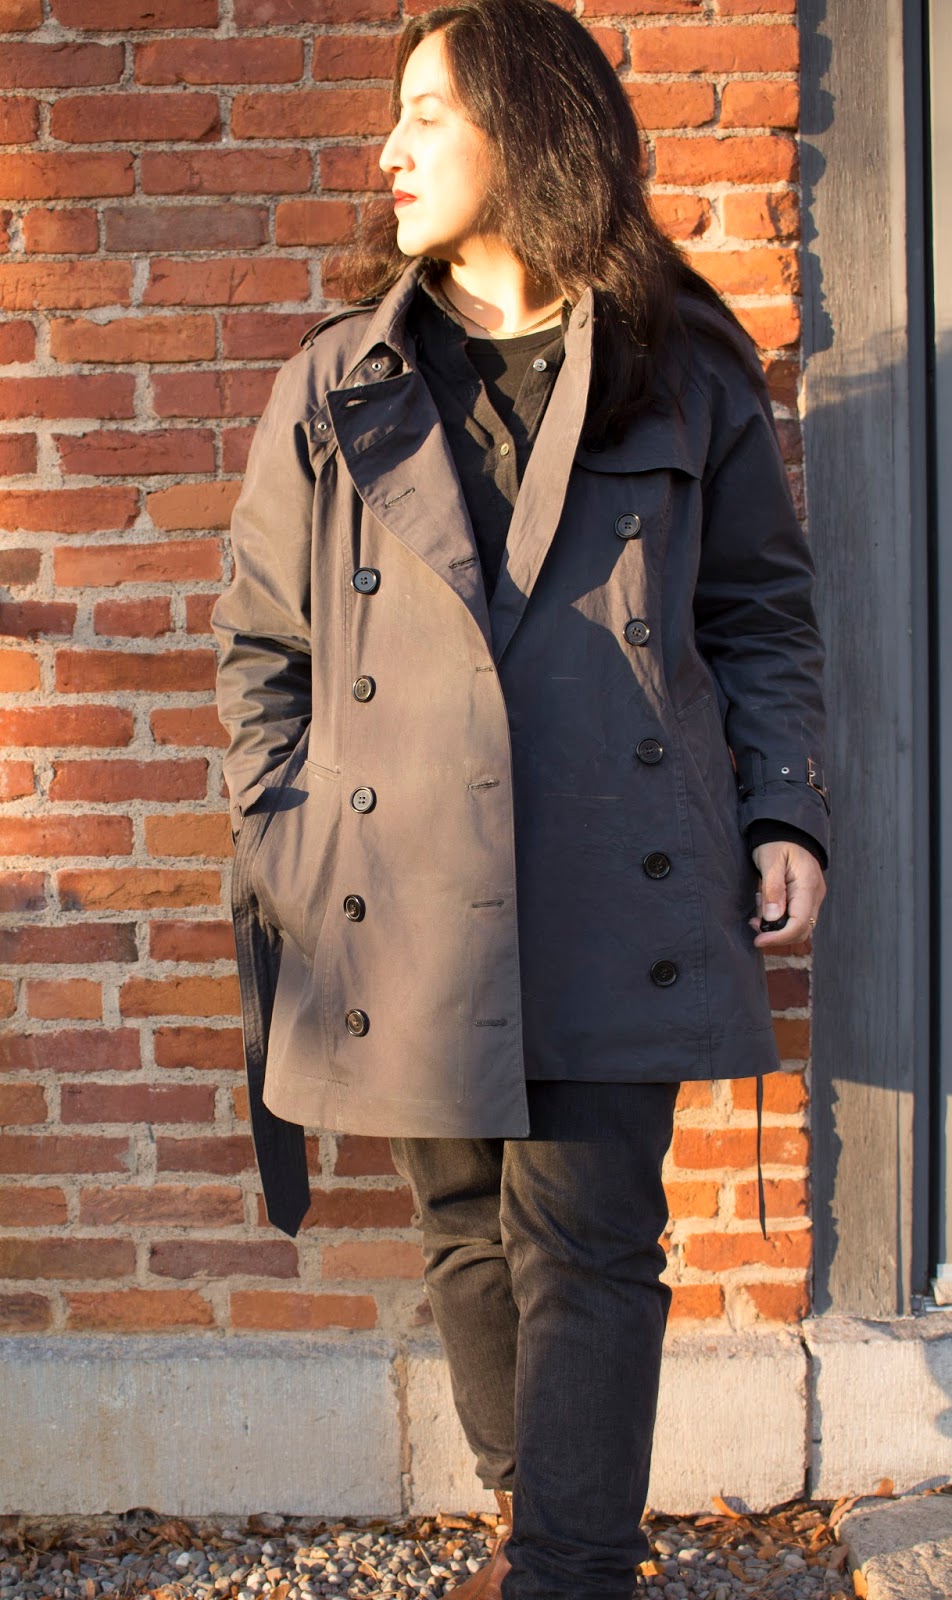
I am in love with trench coats... this is my second one this year!
I'm not sure how I managed without a trench coat all of these years, it is just such a versatile garment. As a maker, I am enamored with all of the functional, beautiful details.
That isn't to say that I don't LOVE my first trench, the Burberry Inspired Trench. I was wearing it constantly this fall, and enjoying it immensely.
However, the Burberry-esque trench doesn't quite satisfy all of my trench desires. For one, it is rather heavy due to all of the tailoring details, the quality of the twill, the full lining, and the length. This isn't really a problem... in fact, it gives it a sense of substantiality that feels luxurious. It is also warm, which is great for the cool climate that I live in. I noticed this sense of weight with my handmade winter coat too, and I think that in an age of fast fashion, we just aren't used to the weight of a garment made with quality materials and traditional tailoring. However, I was thinking about how wonderful it would be to have a trench on my trip to Italy this spring, and the thought of taking such a weighty coat to a mediterranean climate seemed like a poor match. Hence began the dream of an unlined, shorter trench.
Also, I wasn't truly happy with the "showerproofing" situation. I have to say the Nixwax Cotton Proof on the first trench is doing its job and water beads up on the Burberry Inspired Trench, but a proper trench should be truly showerproof. The gold standard for trenches seems to be very tightly woven cottons that expand when exposed to wet weather, becoming impermeable to water.
Ventile is the brandname of one such fabric, but calls to the UK mills and retailers of Ventile were fruitless... the manufacturer wouldn't acknowledge me, probably because they could tell I wasn't interested in wholesale, and UK retailers wouldn't ship to the US or wanted totally crazy shipping fees. Then I discovered Etaproof, which is is another very tightly woven cotton fabric with claims of weatherproofing. Extremetextile.de was more than happy to ship overseas. I had my 3 meters of Anthracite Ventile 2nds in about a week. It was beautifully boxed and they included care tags and "Etaproof" labels.
I took the summer off from coatmaking, but when the weather started to cool off, I started muslining up a new trench coat. I used McCalls 5525 for the front and the trench details, then pulled out Simplicity 2508 for the raglan sleeves. Raglan sleeves are common on early trench models, and I love the look. I also was inspired by the trenches designed by urban-outdoor brand W'lfg'ng that have all the classic trench details and are made with cotton showerproof fabrics.
My trench on the left, a trench by W'lf'g'ng on the right.
I added a third seam down the back of the raglan sleeve to allow the sleeve to hang better with the natural shape of the arm. I also narrowed the collars, and tried to make sure the lapels were shaped to allow the coat to be buttoned all the way to the top.
I made 4-5 muslins... I can't remember how many now. But I really wanted to work out all of the details before I started cutting and sewing.
Cutting was nerve wracking. I can't find my McCalls 5525 pattern envelope, but it must call for significantly more than 3 meters. It was a squeeze to get all of the pieces out of the fabric I had, and there was no way I was ordering more. The front facing is pieced together (down at the bottom, where it wouldn't show. The length was also somewhat determined by the fabric I had-- if I wasn't constrained, I probably could have gone with another inch or two. At the end of the project, all of the tiny scraps I have left wouldn't add up to a square foot.
Following the suggestions from the manufacturer, I sewed all of the major seams with a true flat fell seam and cotton wrapped poly core thread. A true flat fell seam is NOT the flat fell seam that we sewists commonly use as a seam finish on jeans and collared shirts. A true flat fell seam interlocks the two edges of the fabric, and each line of stitching goes through all 4 layers of fabric. It is hard to describe, but here is a good video demonstrating it:
It gets used a lot by people who work with outdoor fabrics or places where a seam needs superior strength, and I ended up using a technique demonstrated on the Men Who Sew blog. Following their suggestions, I used clear Elmers glue which worked surprisingly well and was much more cost effective than using something like washaway wonder tape. The only downside was that the coat looked terrible with bits of glue all over the place, but it all washed out without any trouble.
The thread I used was Coats and Clarks Dual Duty, which is a cotton coated poly core thread with a weight of Tex 40, which I ordered from Wawak. Excuse my language, but it was a total bitch. NOTHING I did made this stuff sew reliably, it would make little birdsnests on the bobbin side at totally unpredictable intervals. I tried all sorts of tension combinations in both the bobbin and top thread, tried switching needles, and wound and rewound bobbins to make sure I wasn't adding additional twists. My fights with the thread made me put the project away multiple times-- it just sucks to be sewing along and hear the machine snag-- there goes your perfect seam. In addition, on my machine, the top of the seam always looks a bit more perfect than the bobbin side, and this was exacerbated by this thread. I never truly solved the problem, I just ended up just muddling through. I sewed all major seams from the front side, which was a bit of a trick sometimes. I would cringe when I heard a snag but I would keep going, and after the seam was done I would fix the snags by pulling them straight and tying the ends. So the inside of the coat is just less perfect than I had hoped. On less major seams where watertightness wasn't a problem, I put regular poly in the bobbin and used the Dual Duty on top, which reduced but did not eliminate the problem. And for some seams where it didn't matter, I just used my usual thread.
If anyone has any insight into this, I'd be curious to figure it out. I've had some trouble with Guttermans Tex 40 topstitching thread-- the occasional snag-- but nothing like this. Unless someone has some really bright ideas, I'm probably NEVER going to use this thread again, at least in my Janome.
Inside of coat. It is unlined... the flat felled seams make it very clean looking!
Anyhow. So, while I'm getting things off of my chest, the other HUGE problem was that when I went to try on the mostly put together coat, the collar wouldn't close in front. How could this happen, after all of those muslins? I'm not sure what went wrong, but I ended up adding a piece to the collar and collar stand... I did it at the center back. I also ended up adding a piece to the tops of both lapel pieces (you can that piece clearly in the very first picture). I'm just going to call those spontaneous design details. In the picture below, you can also see the one piece I didn't manage to fit on my cutting layout. Instead, I used a piece of goretex left over from another project.
Inside showing facing and hanging chain.
After a lot of unpicking and re-sewing, my adjustments mostly fixed the problem.. here it is, buttoned up, and it isn't perfect, but it does the job of creating a respectable closure around the neck area.
All buttoned up.
So, another fun fact about designing with tightly woven showerproof cottons is that they are most waterproof when they have two layers. Having a full-on two layer garment would have gone against my desire for a lightweight garment, so I settled for an extension of the facings into areas that were most in need of rain protection... the shoulders. Fortunately, other areas of a trench already have multiple layers thoughtfully built in-- the little cape on the back, the gunflap, and the double breasted front.
Inside of the coat, showing the extended facing that adds additional rain protection to the shoulders.
I was a little unsure what to do for structure in an unlined trench made with cotton weatherproof fabric, and couldn't find much guidance out there on the issue, so I tested out a few options. Fusible horse hair canvas seemed to adhere okay, but I sort of don't trust it after struggling with the bond on my last trench coat. Pad stitching was totally visible. So I threw out both of those options! The collar stand and collar contain a layer of sew-in horse hair canvas. On the collar, I did my best to shape the layers together before basting them into place, but there is no pad stitching, the hair canvas is just held in place by the seams. After much debate, I decided to leave out any kind of interfacing in the lapels since I was afraid fusible would affect the performance of the fabric and the fabric seemed to have plenty of structure on its own.
Back strorm flap.
The back vent is a symmetrical pleat, to allow movement while still providing a bit of wetness protection.
Center back pleat, from the inside.
I also added all of the usual trench details: epaulettes, sleeve buckles. I debated adding a hook and eye as a throat latch, but decided instead to do a sewn on buckle. The hardware (buckles, metal eyelets and chain for hanging) are from pacific trimming. The buttons are genuine horn from Ebay.
The hand-warmer pockets are deep angled welt pockets. I think these are the most comfortable pockets on coats!
On the inside of the coat, the pocket bags of the welt pockets are somewhat hidden in the facing. However, all raw edges are finished with bias tape, and since I was short on fabric, there is a bit more of that gortex waterproof fabric for the inside pocket bag. I also added inside zippers, so the handwarmer pockets can function as pass-through pockets that allow access to the interior of the coat. The main thing I've used them for so far is to access the warm pockets on an inner layer. Also, the inside zippered pocket is wide enough to stash an ipad, kindle, or moleskine-style notebook.
Inside of welt pockets, also showing the etaproof tags and spare button.
As you can see, I went all secret-agent with the pockets. There are also four zippered lapel pockets, two on each side. The top left one is designed for my giant wallet, the bottom left one for a cell phone or glasses, the top right one is designed as a document pocket, and the right bottom one is another one sized for a cell phone or glasses case. That is, when they are not filled with high tech spy gear.
Zippered interior pockets in the front facing.
Inside out, front of coat.
The belt buckle on my previous trench was always clanging against things so I just removed it. I suppose a leather-wrapped buckle would have been wiser. Anyhow, on this one, I just did away with the buckle altogether, since it really is pretty impractical, and made this belt double pointed, channel stitched, and sized for tying.
The hem and sleeves are finished with facings. At first I tried just turning them up and stitching them, but it looked sort of cheap. The facing gives it a bit more structure, I think.
Sleeve detail.
I think I should have left off the last button near the hem, it feels a bit awkward there. Just today on Couture and Tricot Tany was talking about the placement of buttons on her self-drafted shirt and mentioned that "the last button should be more distant from the hem than the distance between buttons along the front, for a better visual effect." She is so right, I never really considered this before.
I tried to size this trench to allow layers underneath. Before it got super chilly, I was wearing it with a down vest. I was considering putting a zipper into to the trench to zip the vest in, but the Patagonia vest that I own uses a YKK 4VS zipper, which I can't find anywhere! Lots of 5s, no 4s in a plastic tooth. But just wearing the vest with the trench over it works too... in fact, I often take the trench off and huddle in the vest when my office is frosty (which is all the time in the winter!) At some point I'd love to get a long sleeve down sweater or make a quilted wool sweater, I think that would make this coat an option in even farther into the cold season.
Am I planning my next trench? I can't say I haven't given it some thought (but no, I haven't bought any fabric!) Don't you think a wool trench would be luscious? Either in a drapey wool twill, or a thin but dense lightweight coating.
However, I think my next coat project will be making a replacement for my gore-tex ski jacket. I think it is almost 20 years old! That makes me feel old. Anyhow, I was thinking about making a Kelly Anorak in 3-layer Goretex. I probably won't get to that project until this summer or next fall.
When I was a kid, I had a favorite aunt who sent me an advent calendar every year. They were wonderful and special, very cleverly made cards with little treats in them or little games behind tiny windows. But beyond the card, my family didn't really do anything formal for advent.
This is the 3rd year that we have done an advent calendar. It was such a hit with the kids the first time we did it that they look forward to it all year-- they talk about it more than Christmas itself. This is something of a victory, because our advent calendar is all about making things and doing things together.
Our first advent calendar was a cute little matchbox calendar, which worked really well for our small space. However, when I pulled it out of storage this year, it was looking a bit scruffy, so I decided to try a new format. These are little white favor envelopes clipped with tiny clothespins to twine hung around the window in front of our kitchen table. I generally start the advent calendar after my birthday in December, so that's why the numbers start at 5.
This year I stuck with some of our favorite activities... gingerbread houses, having a picnic dinner in a fort, and making cookies and ornaments. I also tried to add in a few more "generosity" prompts like "make a card for someone else" and "do something nice for someone else." Oh, and most days there is a little treat to sweeten the deal... stickers or an all-natural sweet treat.
Graham cracker gingerbread houses, dinner in a fort, sandwich cookies
Welcome back, this is the last day of the Velveteen Rabbit Sewalong. Today we will finish our Velveteen Rabbits!
Add the Eyes
The pattern suggests using 12mm safety eyes. A young child shouldn't be able to easily pull them out and swallow them, and they won't break like traditional glass eyes. I usually use brown eyes, but pink eyes could also work, especially if you are making a white bunny!
Here is a video showing you how to attach safety eyes to your rabbit. Or, scroll down for a description and pictures.
Decide where you want to place your eyes. Transfer the eye markings from the pattern, then lightly stuff the head and place pins with colored heads at the placement points. Adjust the location of the eyes as necessary.
When you are happy with placement, remove the stuffing and make a tiny hole where you want to place the eye. You can use your seam ripper to poke a hole or you can cut a very small X with small scissors.
Push the rounded portion of the eye into the hole, then turn the bunny inside out.
Place the washer portion of the eyes onto the post. Press it down firmly, and the eye should be secured.
Make the Weight Bags
Sew around the edges of the muslin bags, leaving an opening for stuffing. You don't need to turn them right side out.
Use a funnel to fill the weight bag with your weighting material (I'm using ground walnut shells, but you could also use poly pellets). Leave some space... they should feel sort of squishy like a bean bag, not hard and dense.
Close the weight bags by folding the edge over and machine stitching over the fold to secure it. Stuff the Head
Now it's time to stuff your bunny! We'll start with the head. Watch the video or follow along below...
If you are working with poly fill, there really isn't much of a trick... just stuff the head until you achieve a firm, but still huggable density.
If you are working with wool, then I have a few tips. If you just stuff wool in without any method, it can get sort of lumpy and have an inconsistent feel.
To get the wool to make a nice smooth, dense head, you want to make a tight ball from your wool. I usually start with a core, which can be either a dense ball of wool or a ball of cotton scrap fabric.
Then, tear your wool into strips and wrap them tightly around this core. Keep wrapping in multiple directions until you have a round or oblong ball about the size of the rabbit's head. Stuff the ball into the head of the rabbit. Use a little extra stuffing to pad out the nose.
Stuff the Body
Before you stuff the body, place the small weight bags into the rabbit's paws. You can add a little stuffing behind the weight bags, but leave the joint unstuffed so that the paws hang down a little at a natural angle.
Then, stuff the body. If you are using poly fill or something similar, just stuff it right in there. If you are using wool, make a fabric scrap core of about 4 inches by 2 inches, then wrap 6 inch strips of wool tightly around your core to make a cylinder. Keep wrapping until your wool cylinder is about 6-8 inches in diameter... or just small enough to compress down and fit into the hole you have left for stuffing. Use extra stuffing to fill in the belly and back and any soft spots. You want the rabbit to feel relatively firm because wool will compress over time.
Stuff the weight bag base into the very bottom of the rabbit. Fill out the feet and any gaps with more wool.
Hand stitch the opening closed with a ladder stitch.
Embroider the Nose
Use 2 or 4 strands of thread or embroidery floss to embroider the nose.
A simple suggestion of a nose works best.
I usually do the embroidery after the bunny is stuffed. To knot the tails, leave a tail when you make your first stitch, then finish close to this tail and tie the two strands together with a square knot. Take all of the ends and pull them back through the bunny and cut them. This will hide the ends inside the stuffing.
And... we're done!
Pat yourself on the back and enjoy your creation, or revel in the joy of giving a handmade toy to some very special young person.
Share your creations in Instagram with #unlikelyvelveteenrabbit. I always love seeing what you make!
Welcome back to the Velveteen Rabbit Sewalong. Today we will be assembling the body of the rabbit. This is an exciting day, since your rabbit will start looking like a "real" rabbit!
Sewing the Body
For all seams, use a 1/4 inch seam allowance unless otherwise indicated.
Start by getting your belly piece and sewing the dart on the belly of the rabbit. Fold the belly piece in half, right sides together, and mark the start and the finish of the dart onto your fabric piece. Sew from the wide part of the dart to the point. I usually sew just to the end of the dart, then tie the two sewing strands by hand to secure it.
If you have underlined your bunny, sew a line of basting down the center of the dart first. Then fold your belly piece and sew the dart as described above. This helps to make sure the two pieces of fabric stay together when you sew the dart.
For the next steps, make sure that you have marked points A and B on both the Belly and the two Body pieces.
Sew the Belly and one Body pieces, right sides together, from point A (the top of the shoulder) to the base of the rabbit's foot. Use a 1/4 inch seam allowance.
Then sew the second Body piece to the other side of the belly, also sewing from Point A to the base of the foot.
Next, you will sew the short distance from point A to point B. Clip the tight angles on one of the Body pieces just to the 1/4 inch seam allowance, which should allow you to lay it flat against the Belly. Then sew from A to B. Repeat for the other side.
Then sew the body pieces together from point B around the head and down the back.
Clip tight corners and curves just to the stitching. Turn right side out.
Attaching the Ears
You are now ready to attach the ears to the body. Watch the steps in the video, or follow the pictures below.
Cut holes for the ears in the body using the markings on the pattern pieces.
Turn the body right side out. Fold the ears, then insert into the holes from the outside of the bunny.
Turn the bunny back inside out, and sew across the top of the head, catching the bottoms of the ears and the edges of the ear holes. Baste first to check placement, then sew with a stronger stitch.
Turn right side out and admire your work! Your bunny should be starting to look like a bunny.
Add the Tail
To make the tail, sew together the two tail pieces right sides together. Clip the curve of the tail.
Turn right side out. Stuff with a bit of stuffing. Baste the tail into place on the rear of the bunny, centering the tail over the center back seam.
Sew the base
Clip the tight corners, just short of the 1/4 inch seam allowance.
Line up the base with the body/belly of the bunny. Make sure your pieces are right sides together. The notch on the back of the base lines up with the center back of the bunny.
Sew around the base, leaving a 5 inch gap for stuffing.
Okay, that's all for today. Tomorrow we will finish up our bunnies with stuffing and details like the eyes and nose.