Showing posts with label pattern review. Show all posts

Sunday, March 13, 2022

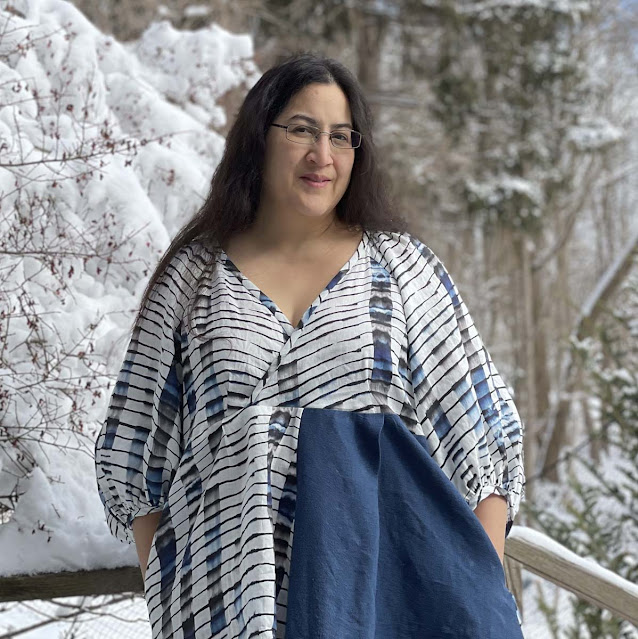
McCalls m7969 in linen

Okay, spring can come now, I'm ready!  


This is m7969, which is must be something of a blockbuster hit for McCalls, it is all over Instagram. With sweet sleeve shape and easy, flattering silhouette that seems to look good on everyone, I was smitten and had to give it a try. 

I purchased a paper pattern months ago, but the yellow tissue and newsprint directions were bringing up memories of frustration and disappointment from my youthful attempts at sewing. I also just really dislike working with that fragile, crinkly tissue paper. When Minerva made the PDF available with their newsletter, I finally felt empowered to move ahead.

Of course I made View A (like everyone else!) but I subbed in the skirt from the Closet Core Elodie wrap dress because I don't like gathered skirts. I can't really even say why, but every time I make a dress with a gathered skirt, I wear it once and it sits in my closet until I change it out.

After looking at other blogger's versions, I decided go for sewing to my measurements, which seemed likely to turn out pleasantly oversized. That put me at an M bust and L waist, which are in two different PDFs (or two different pattern envelopes!). I'm ALWAYS right in the middle of size splits, I hate it when companies don't overlap their sizes. So... I printed off the M and just guessed at where the waist would be on the L. 

The one mod that many bloggers have done that I think is very smart is making the front wrap a little more modest. I know if I do this, I'll get lots more wear out of the dress, rather than saving it for some rare (since covid, non-existent!) sexy date night occasion. I extended the front triangle 3.5 inches and drew a straight line to the shoulder, then extended the front bindings (by a totally arbitrary amount, and I just cut off the excess). I also shortened the sleeves by an inch at the shorten/lengthen line. 

The linen print was a birthday purchase from Emmaonesock several years ago. I didn't have quite enough to cut out the quite full skirt of the Elodie, so I pulled out a remnant of navy linen to complete the skirt. 

Of course I added POCKETS-- having pockets in all of my clothing is one of the great advantages of sewing my own clothes. Designers, take heed-- us busy women need options for pockets. Since this pattern didn't include any pockets, I borrowed the divinely deep pockets from the Closet Core Amy jumpsuit and added them at the side seams. 

I started out blindly following the instructions-- but after considering it, I ripped those first seams and went with my own order of construction. With this fine linen I made french seams throughout, starting with the raglan seams and doing the underarm and side seams in one fell swoop. The instructions called for an inordinate amount of basting-- who does that, and why cut the neck binding on the bias, only to interface it on the grain? I didn't bother with the interfacing, I just treated it like any other bias bound neckline. I also didn't hand- slip stitch the bindings as suggested-- I might have if this was a solid or a slick fabric, but with a pattern and toothy linen, stitching in the ditch to secure the binding worked just fine. From taping the PDF to hemming, I had it done in a day. 

It seems that the binding was meant to be shorter than the neckline to have the effect of snugging in the wrap. Since I modified the front for more coverage, I sort of missed this effect, but ended up compensating when baste-fitting the front by pulling down on the bindings until the front laid flat with no gaping. I also sewed the waistline about an inch higher in the front, and added small pleats under the bust on the bodice and on the skirt. 

In terms the quality of the pattern-- I really think McCalls missed an opportunity to impress the sewing community. The PDF was sort of baffling-- wrong pagination, and how exactly were you supposed to put it together? No instructions on this that I could find, I didn't see any scale markings to check my printer scaling-- I eventually decided by trial and error that I was supposed to line up the little diamonds that I could hardly see through opaque printer paper, and I just had to trust that my printer was not scaling inappropriately. The PDF instructions did seem somewhat improved from what I remember of old McCalls patterns, but still not the kind of considered, tested construction that many Indie designers have perfected. 

Fortunately, it is a forgiving pattern in terms of fit and I have lots of experience sewing now so I can compensate for poor instructions, and the dress turned out beautifully. The sleeves are everything I was hoping for-- voluminous and elegant in this lightweight linen. It is just so cute and comfy, and I'm ready for spring as soon as Mother Nature is!

Tuesday, January 14, 2020

Forest Green Twill Sienna Maker Jacket by Closet Case Patterns


I have a new favorite wardrobe item... please welcome my Sienna Maker Jacket.


This is yet another instance of Closet Case Patterns releasing a pattern for an item I had never even considered owning, but after making it, I don't know how I lived without it. I've worn it every day since finishing it.

While all of the samples were amazing and envy-worthy, as usual, the one that really struck me was Carolyn's. Not only did her version make forest green seem the most lovely shade in the world, but it also reminded me of a piece of orphaned fabric I had in my stash.

Orphaned, you ask? You see, I bought this stretch twill with every intention of making pants. It wasn't even an online purchase, it was bought locally, and I was convinced while in the store that it would all work out well. The first problem was the color-- it was an odd shade of medium green, and I had in mind a pair of black pants. So I purchased a couple of packs of Dylan black dye and threw the whole mess in the washer. This did not work out as planned... instead of black I got this dark green, which isn't bad at all, but if one was expecting black, it is rather disappointing. I have since read up about dying things black, and apparently it can be quite tricky to get a true black, especially with a cheap packaged dye. Dark green might not have been a deal breaker, except for the fact that when washed, the twill ended up weighty and without the kind of recovery one hopes for in stretchy pants. I worried that for the pattern I had in mind, they would just bag out and be saggy. That was a couple years ago, and it has sat in the stash ever since, causing me a bit of consternation every time I looked at it and wondered what in the world I would do with it.

Then came Carolyn's Sienna, and I knew just what I had to do.

Out came the dark green twill, and I laid it out with concern... could I fit the pattern pieces on my 2.25 yards? I had my heart set on the mid-length, with sleeve pockets and the very cool wrap tie-belt, which calls for 3.25 yards, not including the sleeve pockets. While all logic and the pattern envelope asserted that this would not be possible my pattern layout intuition thought it might be possible... and it somehow was. I didn't measure, but it must have been an especially wide fabric. The facings were cut from a piece of scrap linen, and the belt was pieced together. It is a touch shorter than the pattern called for, but I'm only 5'4" so this worked out fine. After cutting, I only had a handful of tiny scraps left.


Concerning sizing, I merely graded between sizes based on my measurements. If memory serves, I decided on a 14 shoulder, 18 waist, and 16 hip, and 16 arms. I made no muslin. With the intended fit being fairly loose, I figured that precise fitting would not be necessary.


For a relaxed fit jacket, the fit is perfection!

The directions were superb as usual. I followed them step by step just because it was fun.

Since the coat is unlined, clean seam finishes are called for. Having previously sewed a rain coat using true flat-felled seams for strength and waterproof-ness, I would call their version of a flat felled seam a "faux flat felled seam." And their faux flat-felled seam, where one serges and stitches down the seams, might be a faux-faux flat felled seam? However, in this case, since all was needed was a nice seam finish, I used what I would call a faux flat fell, where one trims one seam allowance and wraps the other seam allowance over it and stitches it down. There were a couple of exceptions... for the second sleeve seam I used a french seam, which is easier to do on a closed tube. And I serged the armhole seams, since I was feeling too lazy to fuss with binding or flat felling on the curve. Carolyn serged hers so I felt in good company.


The facing edges are bias bound with bias made from my striped linen. The way the inside pocket is stitched down under the facing is an unusual detail, but it works!


Stretch is not suggested for this pattern, and this twill is very stretchy. To balance this, I interfaced pockets edges with strips of interfacing, and I also was very careful not to stretch when sewing. There was sometimes a bit of a wave after sewing a seam which was fixed with a bit of steam from the iron.

Hanging look loop interferes with my personal brand tag... didn't notice this until I took pictures. Might have to move that tag down. 

I had a bit of fun with hardware. The rectangular rings I found at Joannes, I wish they had an antique brass finish but since I didn't think ahead, I had to take what I could get. The antique snaps I had in stash from a previous project. I accidentally added the snap to the wrong side of the collar, so I had to add another to the correct side. The rivets were from a leather project and were too long for riveting fabric, but after snipping the ends they were perfect.

Sleeve pocket detail.

Not perfect. Not apologizing.


I haven't yet figured out what to do with sleeve pockets, but I'm enjoying the detail anyway. They strike me as a good way for someone to sneak up behind you and play a little prank... but anyway.

The patch pockets in the front are HUGE. 

Facing on the front patch pocket. The pattern has cut-on facings, I drafted this facing on the fly due to lack of fabric. 


As I said, it's been hard to take it off since finishing it. It is also very satisfying to have made it from a piece of stash fabric that had been a disappointment for its original purpose, but is very satisfactory for this jacket. I actually sort of hope the cheap dye I used will continue to wash out and add to the aged look. 

I'm already dreaming up other versions. The collar has definite trench-coat vibes, maybe a long wool version with a shoulder flap and back vent? Or a short (view C) version with repurposed denim....

Tuesday, November 19, 2019

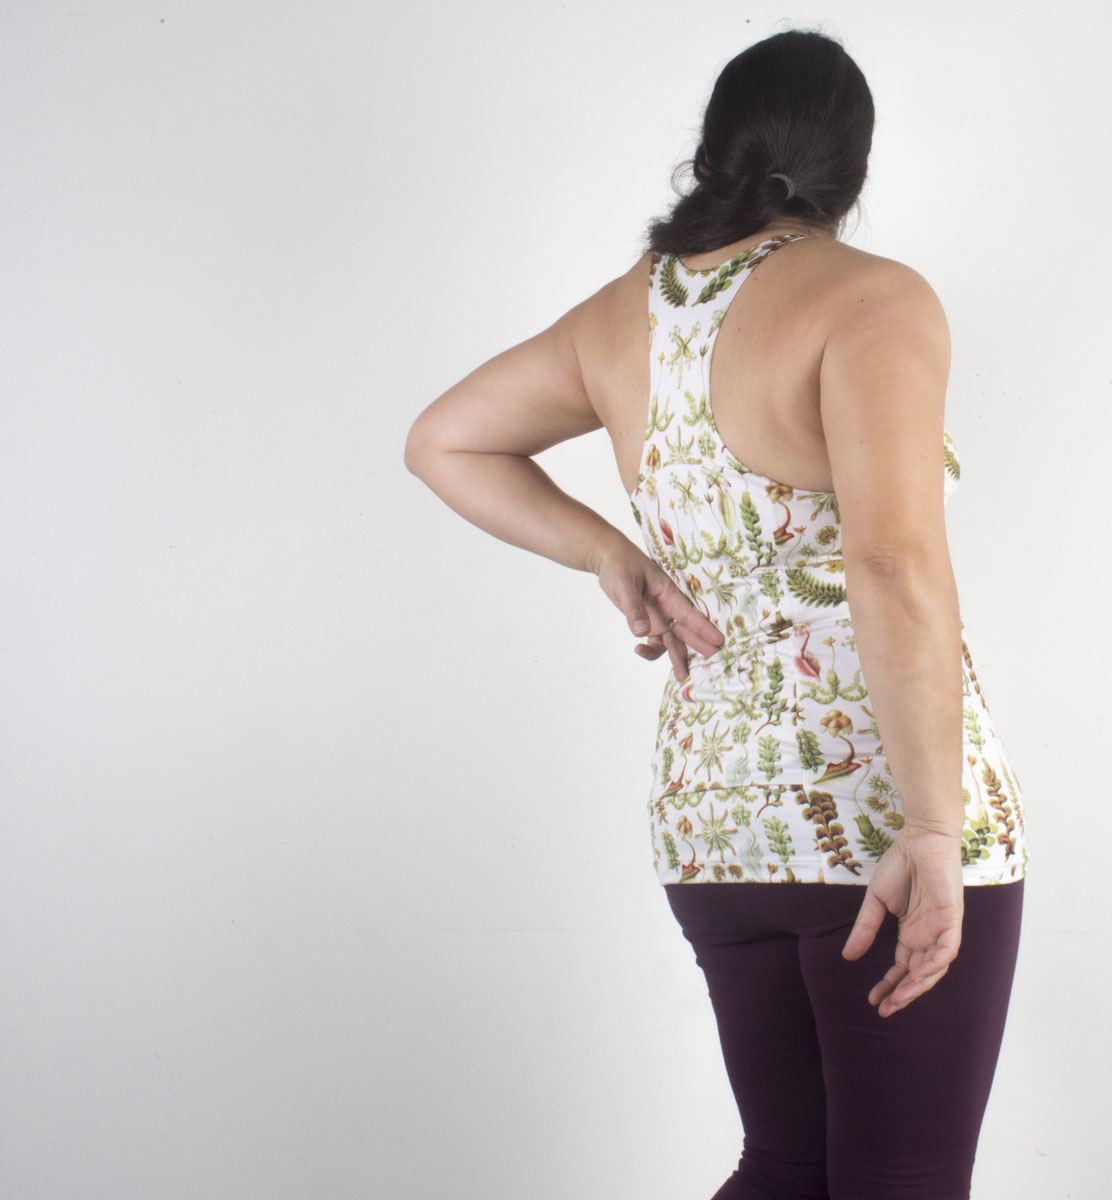
What Workout Dreams are Made Of, or the Jalie Anne-Marie 3463

I decided this summer that the workout top situation was becoming sort of desperate. My stash of pre-sewing workout wear had been quite large, but it's been over 10 years since I stopped buying clothes, and even the best of workout wear wears out.

I primarily run and bike, so the natural choice seemed to be the Fehr Trade XYT which is marketed as a running and biking style top. I gave this a try about three years ago. I blogged it, and it's funny that I labeled that Fehr Trade XYT top a success... because making it was such a traumatic experience that I did not attempt any workout tops for another 3 years.

The fit was all wrong, and trying to get a binding that looked like my favorite RTW self-fabric bound tops was unpleasantly challenging with only a standard sewing machine. I think fold-over elastic is suggested, but I don't like the look or feel of FOE. I did end up making it work with a ton of unpicking and fussing, but the resulting top has turned out to be rather annoying to wear... the built in bra is soooo tight, even after adjusting to add additional room, that it is a struggle to get in and out of, so it sits sadly in the back of my drawer.

When I went looking for a new workout top to try, I ended up considering the Jalie Anne-Marie. It wasn't immediately apparent that this would be a good style for me, as it appears at first glance to be primarily a tennis top/skirt. But that third view, without the cutesy skirt elements, looked like it had possibilities. There were also some very promising reviews, so I decided to give it a try.


I rashly jumped in with no muslin, grading between sizes as indicated by my measurements. Whatever the pattern, I pretty much always need to go up a size or two for my hips, and take out any waist shaping, and I did that here. I also added a few inches in length, since I truly detest workout tops that don't have plentiful coverage in the midriff area. I think I also joined the two side panel pieces... I didn't need that extra bit of color blocking, and one less seam to sew.


The fit is PERFECT. Just the right amount of ease without being baggy. The neckline is modest but still attractive. The built in sports bra is also just right. Just the right amount of support for cycling and gym workouts, without being a struggle to get off afterward. For the first couple of times I ran in these tops, I wore a sports bra underneath, but then one time I forgot and I didn't miss it at all. So for me, it's also fine support for running.


The best part is the clever finishing techniques. Rather than binding, this top uses elastic sewn to the inside seam allowance. The length of the elastic is indicated by a chart, like Jalie bathing suit patterns. Brilliant! Just the right amount of support, and no fussing with messy bindings. Also, it's super smooth, so no worry about chafing. In typical Jalie style, the instructions are terse but complete and well thought out.

The built in bra is finished by wrapping the fabric around regular elastic, so no special notions needed. Although I did have plush backed 1-inch elastic, so I used that in the botanical bra top.


The blue color-blocked top uses the supposed Lululemon fabric that Peak Fabric sells. It is lovely stuff, I'm still working through a huge order I placed years ago. The botanical print is from Zenith and Quasar. The bra top in the blue one is made with self-fabric, and the bra top and lining on the botanical top is white mesh. The one lined with mesh is noticeably lighter, I tend to wear that on super hot days.

And I can't tell you how much I love that pocket. Simple to sew, and fits the design beautifully. Huge enough to stuff your windbreaker into! I might devise a second pocket though... I typically take my phone and my keys, and it is nice to have two pockets so they don't jingle against each other.

The leggings are the Helen's Closet Avery Leggings. They aren't the sportiest, but the fit is so good on my body. Someday soon I might hack them to have sporty style lines or pockets. The fabric is Pinecrest Supplex either from Zenith and Quasar (listed there as "heavyweight supplex") or Fabric.com.

These two tops are in constant rotation ever since I made them this summer. I really need to make a couple more!

Tuesday, November 27, 2018

Midnight Blue Sequin Amy Jumpsuit for #sewfrosting

When Heather and Kelli announced their #sewfrosting challenge, the first thing that jumped into my head was a holiday-worthy Amy Jumpsuit. 


The Closet Case Amy Jumpsuit is sort of the perfect simple silhouette to sew try out a wild fabric. In this case... midnight blue sequins. I've never sewn sequins before-- in fact, I've never owned an all-over sequin garment.

I bought this fabric when I was in NYC for other reasons and just happened to find 30 minutes to swing by the Garment District. I can't remember the name of the shop I bought this in, but it was filled with sequin fabrics and very close to Mood.


I did make one tiny modification to the pattern this time around. The straps on my previous versions sit a bit wide on my shoulders and tend to slide down, so I moved the shoulder straps in by 1/4 of an inch in both the front and the back. You can see my previous Amy here, btw.

Apparently, under all those sequins, most sequin fabrics are mesh. Who knew? So instead of sewing the facings, I made a full lining by cutting a second copy of the pattern pieces in navy rayon bemberg.

I cut out the sequin fabric with my rotary cutter. I didn't bother engaging in any sequin heroics like removing them all from the seam allowances-- I just sewed right over them. Neither the sequins nor my machine seemed bothered by this, no broken needles or skipped stitches. Other than their being sequin bits all over my sewing area, no harm done.


Otherwise, I kept things super simple. I skipped the zipper and pockets. I hemmed the lining by machine, and the sequins with hem tape, by hand.

For the straps, I made double rouleau straps from my lining fabric, spaced the width of the wide straps that come with the pattern.


With all of those sequins and the full lining, the jumpsuit feels delightfully swishy. It is a lot of fun to move around in.


However, despite the full lining, the sequins are still sort of scratchy under the arms and even where they press on the lining. I guess one does not wear sequins for the comfort factor!


Friday, September 7, 2018

Closet Case Amy Jumpsuit in Italian Cotton: A Pattern Review

Hello all! I've been a bad blogger lately. We're renovating our bathroom, and it has caused all kinds of chaos around here, not to mention the usual juggling act that is my life. Quite honestly, if I have a few minutes, I'd rather sew than blog right now!

However, something came along that I just had to share. One of my colleagues showed up in the most amazing jumpsuit the other day. I've been ignoring the jumpsuit trend-- no adult onesies for me, thank you very much. But hers was elegantly loose, totally unstructured waist, just a bit strappy... so perfect. All the sudden I was browsing the available jumpsuit patterns, and drawing a complete blank. The closest was the Peppermint Magazine Jumpsuit by In the Folds. It's free! But I'm not sure how I felt about that narrow leg, I thought maybe I'd hack it and widen it.

And then, what jumps into my inbox, but Closet Case Patterns' Amy Jumpsuit announcement. Heather Lou is psychic. Just what I wanted!

That was Wednesday-- bought, printed, assembled. Thursday, late late, it was done. Friday pics.


Having sewn many other Closet Case Patterns, I was pretty sure it would fit. So I made no muslin, and jumped right into a precious piece of fabric.

I was going to go for a nice sedate black linen. But... then I remembered I had a gorgeous and special fabric in my stash from my first trip to Italy, nearly six years ago. It's a light weight cotton, finer than a quilting cotton, but with just a bit of cotton crispness.

I had 2 meters, minus a small chunk that I had used to make a shirt yoke, so it was a bit of a struggle to fit the HUGE pattern pieces onto my fabric. I decided to cut off-grain. I know-- sewing sinfulness. Well, I thought I might just get away with it in this case.

All other pieces (facings, pockets, straps, ties) are cut from black linen.

Everything is french seamed. Sewing inseam pockets with french seams is something I've always avoided, but I used the various online tutorials and it went beautifully. I don't know why I have always avoided this technique.


Construction went beautifully. Having the straps as separate pieces makes sewing the facing a breeze. And I skipped the zipper.


Basically I didn't try this on until I finished it... and it fits beautifully. My only reservation is that the straps feel like they are going to slide off my shoulders. I'd love to find a way to cross them in back on my next version.


I plan to wear it dancing, tonight!

Happy Sewing!

Tuesday, July 19, 2016

Shibori Underwire Swimsuit: a pattern review of the Closet Case Files Sophie Swimsuit

This is the hottest summer I can remember! When I'm home with the kids, we swim every day... and all of our vacation plans this summer involve beaches. When Heather at Closet Case Files announced her new Sophie Swimsuit Pattern earlier this summer, I knew I had to sew it up in a hurry!


A swimsuit with built in support... sign me up for that. I don't have a huge bust, but my post-baby chest definitely needs extra support and shaping. The Closet Case Files Bombshell swimsuit is the suit that I reach for most often in my swimming wardrobe, in part because I hacked it and created support by sewing an old bra into the front of the suit. This works pretty well, but it's not nearly as elegant as having a built in foam cup and underwire bra. That's top notch support! Of course, this means you basically are learning to make a bra... which is something I was intending to do in the near future anyway. 

I also love the lines of the Sophie... totally ideal for fun combinations of color and patterns, and perfect for creating figure enhancing illusions.

After measuring and re-measuring, I decided to make a size 10 bust, with a number 4 cup. I graded out to a 12 at the hips, but kept the length of the 10. I didn't make a muslin, although I did follow the suggestion to sew the foam cups first and try them on before cutting the rest of the pattern out. 


I looked all over the place for the perfect fabric, and finally settled on a black and white shibori-look print from Spandex World. The black fabric is their black milliskin. The lining is basic white swimsuit lining from my stash, I can't remember where I originally got it from. White lining makes the colors of the spandex more intense when the suit is wet. 

Once I had collected all of the notions and fabrics (more on that later!), the swimsuit came together quickly. I've sewn many swimsuits before, so I didn't need much hand-holding, and the instructions that came with the pattern were excellent. I didn't purchase the video tutorial, although I'm sure it is great. I'd really like to see it, just for fun, but I did fine without it. If you are new to swimsuit making, the sew-along for the Bombshell is also a great resource for basic techniques. 


I found making the foam bra to be surprisingly easy and satisfying. At first I wasn't careful about which piece needed to go where, and I ended up sewing the wrong pieces together and having to seam rip it and start over. But once I got things in the right order, they came together nicely. I used strips of bra lining folded in thirds to hide and reinforce the seams on the foam cups, as shown in Cloth Habits tutorial on making foam bra cups


I didn't have trouble sewing in the underwire casing until it came to the second line of top stitching, which is supposed to be a scant 1/4 inch from your first line of stitching so that you catch the edge of the casing, which you can't see since you need to top stitch from the outside. On one cup, I ended up having to redo a small section, and on the other, I hand stitched a small section that didn't get properly caught. 


I sewed most seams on my serger with wooly nylon in the loopers. I did quite a bit of switching back and forth between white and black thread, since I didn't want white to show through the seams of the black panels, and my lining was white. 


When sewing the elastic to the leg holes and back of the swimsuit, I serged the elastic into place with the serger knife retracted, then after folding the elastic to the inside, I used the twin needle for a nice finish. I also like the way the twin needle stitching echoes the double line of stitching for the underwire casing.

The strap loop on the back of the swimsuit, made with white plush bra strapping elastic.

The fussiest part of the whole swimsuit was the straps! My biggest problem was with the little fabric loops that you are supposed to sew in for the strap hooks. The first time I made the fabric loops with the specified 3/8 inch seam allowance, they were too narrow (1/4 inch rather than 3/8) and too fat, and they were really hard to get onto the hooks and slid around annoyingly when I did get them on. 

You can see the loop that I made for the hook with black plush bra strapping elastic.

So I tried again, sewing with a 1/4 inch seam allowance, and the loops were the right width but still really hard to get onto my hooks, which have a really narrow opening. I had visions of myself at the beach, struggling with the stupid hooks... not how I want to spend my beach time! I nearly just did away with them altogether since they are sort of unnecessary, but then I had the brilliant idea to use a little piece of 3/8" bra strapping. Problem solved! They hooks are made to be used for bra strapping, anyway. 

Adjustable swimsuit straps... the front is a lycra and swimsuit elastic strap, the adjustable part is plush bra strap elastic. They are joined with a ring, and the adjustable part has a slider.

I also was worried that the straps would stretch out during wear, so I added an adjustable section using bra strapping and a slider in the back, attached to the main strap with a ring. 


I love the method of making elasticized straps shown in the pattern-- I'm totally using this technique on other swimsuits and camis. But the straps turned out too bulky to fit through the hook hardware easily. Having no other option (other than abandoning the hooks) I just worked at it until I was able to force the fat strap through the narrow hole. 

These problems are probably due to the hooks I ended up finding and using. They are Sew Sassy's nylon-coated metal 3/8 inch hooks, and they were the only ones I found in stock anywhere. Another possible cause is the thickness of my lycra (the black milliskin is the thickest swimsuit lycra I've found) or my elastic (Sew Sassy's natural swimsuit elastic). I wonder if using rubber elastic might help with the thickness problem?


If I make another Sophie, I'm probably not going to go through all this rigamarole with the straps. The fact is, I NEVER remove my straps... I don't care in the least if I get tan lines or anything like that. You might think, why how nice it is to be able to cross or uncross the straps, but I will ALWAYS wear they crossed-- I have the world's most sloped shoulders, and straps never stay up for me unless they are crossed. Even so, I still think it is super cool to have adjustable, removable straps... go figure. 


The fit is... pretty darn spot on. I might add a bit of length on the outer thigh... I think it would be a touch more flattering just a bit lower there. I also see what Heather says about the full body suit as being less supportive than the bikini top-- the underwires ride a little away from my chest wall without the support of a full bra band.


Overall though, I couldn't be more pleased. The suit feels supportive, comfortable, and looks great!


So, a bit about the materials and cost. Since you are basically engaging in bra-making, the Sophie (with the underwired cup option) requires quite a few specialty notions. Closet Case Files thoughtfully provides kits (which are sold out!), but I was hoping to make mine a little more cheaply and was interested in adding to my bra-making stash, so I decided to forego the easy option. 

I really wanted to use the right underwires, so I went to Bra-Makers Supply, as instructed, which sends their US customers to Sweet Cups Bra Supply. I plugged in my order there, then freaked out at the shipping cost and went in search of other options. I actually just revisited their site and read their shipping policy... and they say that shipping calculations are often high and they will refund shipping if it can be sent more cheaply. They also will send orders under $30 via First Class if possible, if you put that in a comment. This info is even on a banner on their site right now... maybe I'm not the only one that missed that info. Well, that would have been nice to know, I'll keep them in mind for next time!

But, the shipping cost freak out happened, so I did a little more research and landed at the Tailor Made online shop. I did a quick check-- and yes, shipping costs were quite reasonable. In addition, they sell underwires that look just like the ones at Bra-Makers Supply, so I ended up purchasing my wires here. I also bought bra lining fabric to use to line the bridge and to finish the cup seams. But they didn't have any 3/8 inch hooks of the sort required for the removable straps, so I ended up having to place a second order to Sew Sassy. Since I was interested in gearing up for more bra making, I used the opportunity to stock up on some different underwires, elastics, and notions.

If you're interested, here's what I calculate my approximate costs were:

2 yards swimwear-appropriate spandex (Spandex World): $20 
Underwires (Tailor Made): $2
Bra lining (Tailor Made): $6
Foam (Sew Sassy): $9
Hooks (Sew Sassy): $1.40 (for 12!)
Underwire channeling (Sew Sassy): $1.25
Swimwear Elastic (Sew Sassy): $2.25 (5 yards)

(the following were not called for in the pattern, but I added them:)
Bra strapping (Sew Sassy): $.75
Rings (Sew Sassy): $1.40 (12)
Slides (Sew Sassy: $1.40 (12)

Swimsuit Lining (stash)

Total: $45.45

Shipping: Tailor Made, $6; Sew Sassy $10, Spandex World, $10

Overall, not cheap, but probably cheaper than buying a quality swimsuit, which would be anywhere from $70-$200. Also, probably a bit cheaper than buying a kit, but the kits come out to a pretty good deal, especially if you aren't interested in shopping in multiple online stores to get what you need! But I am also happy to have lots left over of just about everything... which will equal more swimsuits and bras sewn just from stashed items. 

In fact, while I was waiting for things to arrive, I made a muslin for a bra-- my first ever. It just so happens to be a foam cup balconette bra, just like the Sophie (the Makebra DL03) If the Sophie gets me past the bra-making hump, then that is a truly incredible outcome. 

I have a bit of Sophie-fever-- now I really want to make the bikini version! I'm not sure about midriff-baring post-baby, but perhaps I might be able to get away with high-cut briefs...