Thursday, March 5, 2015

Tiny Waldorf Baby Doll

On my list of things to make before the new baby comes was something special for my 3 year old, to be given to her shortly after the baby was born. She is already obsessed with dolls and is constantly labeling them babies and mamas, so I thought a tiny waldorf baby doll, a doll for a doll, would be perfect for her.


Strangely, there seem to be very few of these around. The most popular ones are heads with little pillow bodies, and I really wanted to make something that was more doll-like.


I ended up adapting the pattern for the button baby doll that I had made in the 16-inch size previously. It took a number of tries to get the proportions right... just scaling down the pattern resulted in what looked like a disturbingly malnourished premie!


I ended up with a doll that is about 6 inches. The head size is pretty realistic in proportion to the body... about 1/3 of the height, which I think I've decided that I like. The other alternative would to be to make the head more like 1/2 of the height of the doll, which would have resulted in a more cartoony, perhaps "cuter" doll... but I didn't go this route, at least this time!

For the hair, I usually crochet a cap, but that looked out of proportion on this doll, so I ended up embroidering the head with mohair wool yarn.


Making the clothes for the doll was really difficult... the proportions were difficult, and I just couldn't convince my machine to sew such tiny seams. I had to hand sew, and I never hand sew! But it came out pretty cute. I used a tiny bit of leftover Birch Organic knit fabric along with some matching cotton knit for the top, and bamboo interlock with velcro closures for the diaper.


I deliberately left the gender a bit ambiguous. I wanted to let my daughter choose... she could see the doll as a representation of her new brother, or she could choose to read herself as a baby into the doll. I sort of can't help seeing it as a girl though, but I think that is just my bias.


I also created a sling for the doll, to be worn by her full-size Waldorf doll that she already calls "the Mommy doll." It is just a tube of woven fabric. There is 1/4 inch elastic sewn in a circle to create a depression for the baby doll, and 1 inch elastic sewn into the back of the sling to fit over the larger doll's shoulders.


Tuesday, March 3, 2015

Zippered Baby Sleepers

Please allow me a little rant. I hate snaps. I despise installing them, and find them slow and clumsy to use on a squirmy baby. Admittedly they are sometimes the best answer to a closure, but I fail to see how it is necessary to have snaps all down the front of a baby sleeper. They are also ridiculously expensive at the local chain sewing store-- I just paid $3.00 for 7 silly snaps (the kind you install with a pressure tool). Assuming you destroy at least one, which always happens to me, that is $0.50 per snap. Ridiculous. (I really must get my act together and order some online!).

Zippers, on the other hand, are fast to use, and not too difficult to install once you get the hang of it. They also are ridiculously overpriced at local chain sewing stores, but usually obtainable for about $3.00 each also. (Another case where I really should stock up online!)


I couldn't find a pattern for a zip sleeper like this anywhere! So I traced a favorite and made my own pattern. The cuffs on the bottom were sort of an afterthought-- the legs seemed a bit short and I thought I'd get a bit more use out of them if there was a cuff there. If they had been part of the original plan I would have made the zippers go all the way down. I've since put a sew-on snap there to hold them in place (sometimes a snap is the thing for the job...!).


The main fabrics are from Fabric Worm: Blue School and Bugs by Birch Organics. The trim on the Bugs sleeper is a bit of aqua bamboo knit from Nature's Fabrics and the trim on the Blue School is rust cotton/spandex from Fabrics Universe on Etsy. The zippers are lightweight separating zippers from Joannes.

I just adore these fabrics! Boy prints can be rather unimaginative... and these are very fun. They are rather expensive though-- baby clothes are the perfect excuse to enjoy them, since these were made up with 1/2 a yard with room to spare.


They look cute... we'll have to see how they work on a real live baby boy!


Sunday, March 1, 2015

Bamboo Baby Blanket with Crochet Edge

Another project inspired by Purl Soho, this time it is their Flannel Receiving Blanket. I love the look of the flannel they used, but they are out of it and I couldn't find it anywhere. Which is a shame, because I have such a hard time finding a good flannel... they stuff they sell at Joanne's gets rough and almost pill-like after a few washings, and the times I've ventured to buy flannel online have not gone much better. The one exception is bamboo flannel, and I already have a bamboo flannel receiving blanket. 


However, I am in love with the bamboo fleece I used to make the Purl baby sleeper. My local store was out, so I ordered online from Vancouver Bamboo on Etsy. It was a good price and just like the stuff I used for the sleeper. For the edging yarn, I used Cascade Superwash Merino Sock yarn from their Heritage Paints series. Such an expensive yarn... $17 a skein! But I thought machine-washable would be an advantage in a baby blanket, and I totally fell in love with the colors.

The fabric was plenty thick and I love both the knit and the fleecy sides, so I didn't double it like the pattern suggests, but rather just folded over an edge and sewed it down.

I used a 2.35mm steel crochet hook to do the crochet, and a 1.5mm steel hook to punch the holes. At the corners I punched an extra hole near the edge, and crocheted a loop. Not sure why, I just thought it would be cute!


Tuesday, February 10, 2015

Lillian Rose DeMello Chin's Birth Story

I was sooooo large at 8 months that we were sure I would be early. But thinking back, neither the midwife nor our backup doctor would even speculate on the date other than the assigned one. My due date had come from my last known period and I had tested about a week ahead on the 7 month ultrasound, so David and I felt earliness would be justified.
However, my due date (December 26th) came and passed, and not even the slightest indication of labor to come. Even my Braxton Hicks contractions did not seem very strong to me. I was so, so large, my feet would swell as soon as I got out of bed in the morning, and my wrists had what seemed to be permanent swelling, since I had carpal tunnel symptoms around the clock. Fortunately not pain, just numbness in my middle fingers and weakness in my hands and wrists. I was really, really tired of cleaning up broken glasses every time I washed dishes. I was also at the point where no position was comfortable. Despite all sorts of pillow combinations and a super nice foam topper on our bed, my hips would ache.

(the rest of this was written 3 years later... sort of got away from me in my drafts box...)

I went for lots of long walks and ate spicy food-- no contractions. Of the long list of natural induction methods and myths, I decided to go for acupuncture. I went on Wednesday, then again on Friday. I sort of hated it... she burned sticks of herbs and put them in my little toes, ouch. The baby did move a lot during the treatments though.

One way or the other, I started to have contractions on Friday night. Of course, this made me so excited that it was hard to sleep, not to mention that I hated the sensation of having a contraction lying down. So I was up most of the night, pacing around, sitting on my birthing ball, etc. My husband was excited too, so he finished preparing things and followed me around. I think he tried to go back to sleep, but he was excited too.

Saturday I had contractions all day. They were starting to get more painful, so our midwife came over around 8pm. She checked me and I was 3cm. I moved around a lot... I tried the birthing ball, standing and holding onto my partner, pacing the house, squatting, kneeling and leaning over the bed or the ball, etc. I was trying to use hypnobirthing techniques, but I didn't get much past the basic breathing techniques.

I got in the pool not long after the midwife arrived. I loved being in the pool, it was very soothing.

Our midwife really wanted me to rest, and suggested I take Benadryl. I refused... I was afraid that taking Benadryl wouldn't really allow me to sleep, and would just make me groggy. I have bad memories of days spent in a drug induced daze the first spring I discovered that I had allergies and didn't know anything was available other than drowsiness inducing OTC allergy medications. Lying down was just out of the question, I hated having a contraction in that position. So instead I tried to relax as much as possible leaning over the edge of the pool. I was able to doze off a bit in between contractions.

By the time morning came around, I was really, really exhausted, not having really slept since Thursday night. The contractions were more intense, and I was really feeling that I couldn't take much more. I asked to be checked at 5:15am, and I was 8cm, which was probably good, but I was so hoping that I was there and I could start pushing.

Around 8 or 9 I thought maybe I was starting to feel pushy, or perhaps I just wanted to push, I was in so much pain from the contractions. My midwife said I should push if I wanted to, so I started trying to push. I wasn't really sure what I should be doing, or what it should feel like. So much of what I had read to prepare for the birth had suggested that pushing was unnecessary, suggesting that you could just breathe a baby down the birth canal... and none had really discussed how to push. I tried pushing on the toilet, while squatting down, and on the birthing stool. After about an hour of this and not feeling like I was getting anywhere, she checked and said there was a lip. She said that she would try to hold it out of the way while I pushed. I was pretty desperate at this point, exhausted and ready for the pain to be over, so I agreed, even though it was super painful to be on my back during a contraction.

I'm not sure when exactly this came up, but I was seriously afraid I couldn't do it, and I think my midwife was a bit afraid too since I was so exhausted. But the thought of trying to get in a car, drive somewhere, and go through an emergency room check in was just so daunting that it made me all the more determined to try to stick it out.

She started to coach me on how and where to push, which I really needed. She would put her finger in a position and direct me to push there, which gave me a focus. I was on my back, which wasn't where I wanted to be, but I really needed the direction and encouragement, since I felt like I wasn't getting anywhere with my other efforts.

I was sort of in an exhausted daze at this point. The midwife said I should be able to feel the baby coming down the canal, but all I could really feel was pain. Finally the baby was crowning, and she had me reach down and feel him, and I was hoping it would just be another push or two... but she just wouldn't come out, no matter how hard I pushed. They had me move off the bed and onto the birth stool, and I tried pushing there, and she still wouldn't come out. She was crowning for 20 minutes or so, and she finally suggested an episiotomy, something she almost never does. I just wanted it to be over. I got back on the bed, on my back, and an episiotomy and couple more desperate pushes and she finally came out.

From the midwife's notes, I had been pushing for 4 hours 45 minutes.

They put her on my chest, and it was pure euphoria. Suddenly the pain ended, and there was this beautiful baby on my chest. I just didn't know what to say... I was saying "my baby, my baby" over and over again, so happy that I had done it and that she was finally there with me, and we had both made it. Little Bug was totally calm when she was born, just looking around at all of us. She didn't cry at all.

I was in such a state of joy that I didn't really feel how weak I was... I enthusiastically stood up to deliver the placenta and fainted, which was quite an experience, since I never, ever faint.

I lost a lot of blood and had to have a pitocin shot. I had to have stitches in the episiotomy and also another tear. I also had numbness in my hands and up my arms from grasping things so tightly with my hands while pushing, and this numbness lasted for months afterwards (but finally did go away!).

But little Bug was just perfect. She scored 9 and 9 on her Apgars. She had a huge, hard head... it was very cone shaped when she was born, and still measured 15 inches. She never did have a soft spot on her head, but a ridge where the plates of her skull overlapped (she grew out of this).

It was also really fantastic to be home. After the fainting incident I pretty much stayed in bed for the next 48 hours, except to very carefully make my way to the bathroom (which is only a few steps from the bed). After the midwives left, my husband and I cuddled up in bed, admiring our amazing little girl.


Born January 8th, 2012
1:55pm
(Due date Dec 26th)

9lb 11.5 oz
15 in head
15 in chest
13 in abdomen
21.75 in long
apgars 9 and 9

22 hour labor (by the midwife's count), 4hr 45 min pushing stage


Friday, January 30, 2015

Baby Sleeper- Purl Bee Fleece Baby Jumpsuit

I'm on a bit of a a Purl Bee Soho kick... their free patterns are just so sweet and have such a lovely aesthetic.

As the start of my home-made baby layette, I decided to make their Fleece Baby Jumpsuit. I found a fantastic bamboo fleece at our local sewing store, Homespun, and it is just the perfect cozy fabric for a new baby.

It is sort of an unconventional pattern, but very cleverly thought out. I especially love how they use both sides of the fabric to provide subtle contrast and texture.


Thursday, January 22, 2015

Turtle Stuffies- Purl Bee Turtle Pattern


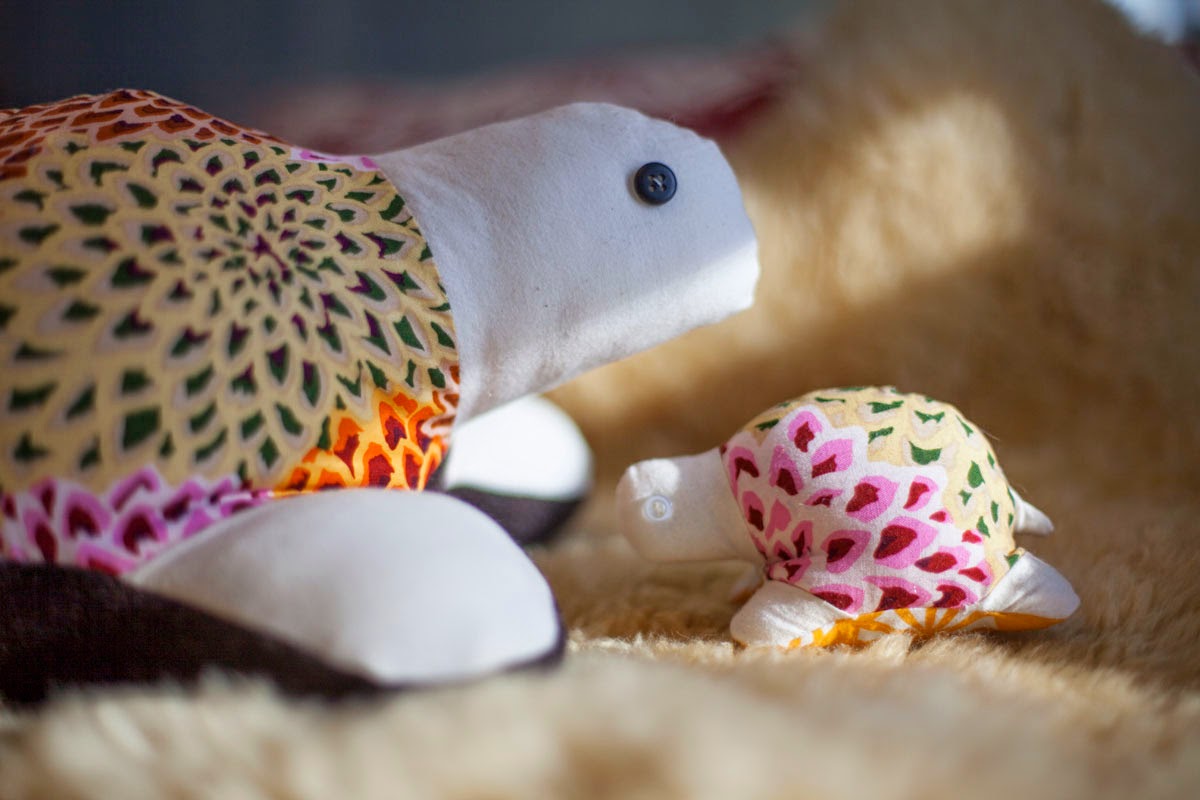
Little Bug is soooooo into Mommies and babies, so for her birthday I decided to make her Mommy and Baby stuffies. I came across the Purl Bee turtle pattern, and which is totally free and just super cute.


I used materials I had on hand... some quilting fabric in a fun print, plain washed muslin for the head and feet, and some felt made from felted sweaters for the underside.


For the baby, I just had to sort of wing it. I sized down the pattern as best I could, trying to keep the proportions baby-ish.


It is a super easy pattern, so it came together very quickly!

Sunday, January 18, 2015

First Waldorf Doll


I was going for a mostly home-made Christmas, so I decided to make a Waldorf baby doll for my 3-year old. It was a totally fun project, and I'm so proud of the end result!


I ordered all of the supplies from A Child's Dream. It probably would have been cheaper to order a kit, but I wanted to have some extra supplies for fixing little Bug's 2 year old Waldorf doll and also making more dolls if I so felt the need!


I used the pattern for the 16-inch Button Baby. Little Bug's current Waldorf doll (purchased from Etsy) is a traditional doll, and I thought that with a baby brother on the way she might appreciate a "baby" doll Waldorf doll. It is also pretty neat that the doll can sit up on its own.


The instructions and pattern for the doll were excellent and anything that wasn't clear was pretty easy to look up online. The instructions for the button joints were somewhat confusing though, and I spent some time puzzling over them and looking up ways that other people had done button-jointing. In the end I don't think it matters a whole lot how it is done, as long as the button is placed to take the stress of the joint and the cord holding the joint is pulled nice and tight.


I could only work late at night or during naptime and I was working full-time until a week before Christmas, so it was slow going-- it took me several weeks to complete the doll! I was a little afraid I wouldn't finish in time, but in the end it all came together.


The doll pattern comes with a pattern for clothes and a diaper, which is nice, but I actually thought this part of the pattern could have used some improvement. The "diaper" doesn't fit very well, it could use better coverage in the back. I used the provided "sleeper" pattern to make a 2 piece PJ outfit hoping the pattern would save time, but actually I had to spend so much time adjusting the fit through the shoulders and over the butt.... I think I would have done better drafting my own.


Overall, the doll came out great! And it was so much fun to make. And Little Bug was very excited to receive it on Christmas day. 

Friday, January 16, 2015

"I'm a good dancer"

My little bug (now 3!) gets soooooo frustrated when I don't understand her. We were leaving the house this weekend, and she was trying to tell me something. Four words. I could not figure out what she was saying. Halfway down the steps she threw a frustration tantrum, screaming and crying and refusing to budge. I was trying to think of what she wanted, what we had left behind, where she wanted to go, etc...

After 10 minutes of this, I finally convinced her that we could not stand on the steps all day, that she should get in the car. She was still crying and screaming tears of frustration and repeating the same four words as I pulled out of the driveway and started on our way. A couple minutes down the road it finally hit me: she was saying "I'm a good dancer." We had just been dancing to the music before we left the house.

The minute I uttered those words and she was finally understood and affirmed, the tears dried up and everything was fine again.


A blogging break apology, and a short rant about working while pregnant!

Sorry I haven't blogged in ages! This fall was just consuming: commuting (1 hour each way), working full time, minding a toddler whenever I wasn't working, and being very, very pregnant. My main symptom was exhaustion, which is probably a combination of all of the above.

By the end, I was eating breakfast and lunch in the car, and getting home in time to climb into bed with my toddler, only wake up at 6:30am to do it again.

I sort of think the expectation in our society that pregnant moms are able to work right up to their due dates is crazy. Or, perhaps other women are just stronger than I am. While I like to deny it as much as every other woman who can hold up her head and continue on as if everything was normal, let me admit it right now: being pregnant is hard work. Don't even get me started on the 6 weeks maternity leave in New York State. Yes, we should be thankful that we get even that, since in the US maternity leave of any sort is a grand privilege. Most of Europe is much more civilized about it... a year in the UK, with 90 percent wages, is much more like it!

Actually, I am very fortunate to work at a college that gives a semester leave, and since the holidays, I have been home. So really, I am not complaining. But I feel for all of you other pregnant working women out there.

Anyway, despite the lack of blogging activity, making things did not completely stop. I have a whole bunch of projects to share! Maternity clothes will be upcoming... I didn't buy one item of maternity clothing this time around, I just can't bear to look at the stuff available in stores, it is just so ugly and unflattering. I also tried for a mostly home-made christmas, so I have some cute homemade christmas and birthday presents to show.

Monday, October 27, 2014

Max Wild Things Costume- Simplicity 2506

This is my first real Halloween costume. I feel like such a mom!

My mom always used to make our costumes. Actually, I remember it as being really stressful for her... it was always last minute, and her sewing machine had this quirky problem where the tension would go batty and there was nothing you could do about it. It was sure to happen when she was desperate to finish the costumes, early in the morning on the 31st of October! Years later when I learned to sew on that machine, I struggled with the same thing, and I tried everything to fix it with no avail. She eventually just bought a new machine!

The stress of the experience (my stress of watching her struggle!) made me promise myself that I would just go buy costumes for my kids. You only wear them for one night anyway! But she would have none of that-- never, ever did she allow us to go out in some plastic K-mart concoction. Now that I have my own daughter, I can't imagine sending her out in one of those plasticky things either!

So for Lilly's first two Halloweens, I found costumes at the great used kids stores in town, or made them up from easy materials that required minimal sewing (last year she was a black cat and a zombie, for different events). But this year I just sort of wanted to make her a costume. She is 2.75 years old, almost 3, so I figure it is probably the only year where she is going to get lots of opportunities to wear her costume and still doesn't have much opinion on what it is... so I get to choose!

I also wanted to make a costume that would have great dress-up potential and would have a life beyond Halloween. Somehow Max from the Wild Things came into my head, and there was no going back!


After the initial idea, things just started to fall in place. Any fleece sleeper or animal costume pattern could potentially work, so I ended up with Simplicity 2506 since my Joanne's had Simplicity patterns on sale for $1. In retrospect I can't say it was the ideal pattern, but I'll go into details on that later. I also found almost everything else I needed in a single trip to Joanne's, which is practically unheard of for any of my other sewing projects! I guess making costumes is a strength of such chain stores. I used a sheep-fleece "fur" for the outer fabric, and a microfleece for the lining. There is an 18 inch zipper up the front, and big oversized wooden buttons just for show (they were sort of a splurge, $3.50 each for 3 of them!). The claws are made from the microfleece, and the ears from the sheep-fleece. 


I made a bunch of alterations to the pattern. The pattern had cuffs on the arms and feet, and I ditched the cuffs and added length instead. The feet have elastic to keep them in place. 


The pattern had the zipper in the back, and I moved it to the front so that she could get in and out of it by herself. The pattern had a separate hood, but I attached it at the back of the neck.


The sizing of the pattern seemed off to me. I made the 3T size since that seemed closest to her measurements, and the 4T seemed much to large from the printed measurements on the pattern envelope. But the torso seems to just fit... I would have made the 4T if I had realized how short it was. And she isn't even in diapers, I don't think it would fit if she was! In fact, I added a "gusset" to the crotch to give it 2 more inches of room. 


The hood was sized S-M-L and I chose the Large, and it is also rather small. This might be due to my alterations though... the hood pattern is a 3 piece pattern, and the two side pieces had darts in them. I sewed up the darts and hated the look... it would be great for a mouse (which is one of the animals on the pattern envelope!) but was overly round for a good Max costume, which should look more like a cozy hood in my opinion. So I taped the darts closed and cut out some new side pieces, which gave a much better shape to the hood, but I suppose also caused it to lose volume. Anyway, it just fits, but I had to rig a closure for the under-chin part with elastic around an over-sized button. 


I also ran into trouble attaching the hood to the body. Naively, I just sewed the back of the hood to the back of the bodice, and as might be expected, this made the hood barely fit over her head. So I added a gusset, a sort of oval of fabric that gave an extra 2 inches to the back of the neck. This seems to have solved the problem. 

The back of the costume. You can sort of see the gusset I added between the costume and the hood, to give more room to move hear head around!

The original pattern didn't call for a lining. I can see why it might be practical not to line something that is meant just as a costume, but the sheep-fur fabric had a yucky poly back that I wasn't fond of. Also, I meant this costume to be more than just a one-time Halloween costume... I am hoping she'll play in it, and maybe snuggle up and sleep in it on a cold winter evening. So I made a lining by cutting all of the pattern pieces from the fleece. I used techniques I learned in lining a jacket (bagging the jacket lining) to attach the lining mostly by machine. I ended up hand-sewing the lining to one side of the zipper, everything else was machine-sewn.


 The claws were pretty easy. For the hands I just made some mitten-like pouches and sewed on some stuffed triangles. There is velcro to hold them out of the way while playing or eating.


For the feet I made a detachable claw that sits above her feet. It velcros in the back. There is an extra piece of velcro that attaches to a piece of velcro on the back of the leg of the costume to hold it in place. 


For the tail, Joannes had this amazing fur that was just the perfect racoon-y looking stuff, luxuriously furry. I drew out a simple tail, slightly wider in the middle than at the ends, sewed both sides, and stuffed it very lightly. I sewed a loop of 1/4 inch elastic to the top of the tail. 


On the costume, I made a slit in the seam where I wanted the tail to go, and sewed around it to reinforce it and prevent further unraveling. I sewed a button to the seam allowance just above the hole. The idea is that if I want to wash the costume, I can remove the tail, which might not hold up so well to the rough handling. The hardest part of making the tail was all of the bits of fur all over the place, and that was even after trying really hard not to cut too many of the fur strands (I cut the fur from the back, with my rotary, trying to cut mostly through just the backing).

The button on the inside of the costume where the elastic for the tail attaches.

For the crown, I drew a crown pattern on paper to match the circumference of head, then cut it out of the fabric with a seam allowance. The fabric is a gold poly-brocade with dragonflies on it... when I saw it, I knew it was perfect (and it was on sale, too!). 


Once sewn and lightly stuffed, I traced the points and circumference with another line of stitching, to "quilt" the stuffing in place. The back has a bit of elastic in it, but I neglected to leave extra fabric to allow the elastic to stretch, so it didn't end up being adjustable. 


But it fits her well, and she loves it... she'll wear it around the house for hours. The fur trim is hand sewn onto the bottom of the crown. I also sewed velcro to the inside of the crown and to the costume, so it will stay in place over her "ears" when she wears the costume. 


I had a hard time deciding what to make the whiskers out of. Pipe-cleaners seemed the obvious choice, but seemed too thick and quite honestly, a bit dangerous floating around at eye level among other toddlers. I think I would rather no whiskers! Someone online mentioned using bits of a plastic broom. None of our brooms were black plastic... but in keeping my eyes open, I found a broom in one of the places I frequent that had just the right plastic "straw" and I pilfered a few strands. I washed them up well with soap and water. To stabilize them in the costume I poked them through the hood in between the outer fabric and the lining, then tied a knot in the plastic. After closing the seam, they seem relatively secure.


The whole costume cost $50 in supplies from one Joanne's trip, and took perhaps 8 hours or so to make. That's just a guess, it might have been longer. It took up my sewing time for the past 3 weekends, but that isn't saying much since one of those weekends had almost no sewing time, and minding a toddler generally doesn't leave a whole lot of uninterrupted project time. There is someone on Etsy who makes amazing Max costumes, and her design was an inspiration to my own Max costume, but rather out of reach at $275. 


I'm actually surprised at how much I enjoyed making the costume! It helps that my sewing machine, while not fancy, is predictable and reliable (it was a gift from my mom!). I think it also helps that after 2 years of making all of my own clothes, I'm rather comfortable sewing with all sorts of materials and making linings for jackets and dresses. 


Also, it occurs to me that when sewing for my work/play/formal wardrobe, I feel pressure to make things look "finished" in a way that is professional, so it is sort of refreshing to make something that is whimsical and where flaws might be seen as adorable rather than embarrassing. And finally, I left myself enough time-- here I am blogging it a week before the 31st! (Okay, so we had a toddler Halloween party to attend last Saturday, but no I wasn't up all night the night before). 


Of course the greatest joy is seeing Lilly wear it! She told me straight out that she really likes it. However a bit of shyness is creeping in... we had a hard time getting it on her for the party, she just wanted to be herself and play all the games without the encumbrance of a costume. In her defense, the costume is rather warm for indoor play. This would actually be a good year for seasonally cool weather for trick-or-treating!