Friday, July 16, 2010

Inherited plants

The previous owners of our house weren't avid gardeners, but they made a couple of botanical choices that are very much appreciated now!

There are two mature Rose of Sharon bushes nestled in between the deck and the house. Protected from deer and sheltered from the weather, they have flourished. The only drawback is that unlike new hybrids, they have extremely fertile seeds that create a forest of young trees if left unchecked. But in July, their blooms are abundant and gorgeous.

One of the Rose of Sharon bushes has pure white blooms, which I love, because they are so unusual. And there is one branch of pink/purple blooms mixed in among the predominately white blooms.

Under the Rose of Sharon bushes there are several hostas. Nearly overtaken by Rose of Sharon volunteers, weeds, snails, slugs, and ground hogs, they have persisted and even bloomed. I have high hopes that they will flourish next year, with a little pampering.

Thursday, July 15, 2010

Meet the Kitties


This is Flo, the cat we inherited with the house. Here she is showing her soft side, lounging on the deck. But don't even think about picking her up-- even petting is suspicious.

This is Dala. She likes this picture because it makes her look thin, and it shows her in one of her favorite stances-- figuring out how to get outside. She's an indoor-only kitty, and is fascinated by a house with so many portals that lead directly outdoors (as opposed to, say, a 2nd or 3rd floor apartment!) She is so sure she can take on the great outdoors, but the truth is, she is unbelievably clueless when she gets outside. In one particularly memorable escape incident, instead of rolling the grass or romping in the nearby forested areas, she proceeded to run down the sidewalk and right up the middle of the busy road we live on.

Tuesday, July 13, 2010

Fresh Sour Cherry Pie


Fresh, tart cherries and sugar-- what could be better? I love this simple recipe- no cornstarch gooeyness to get in the way of the fresh, tart cherries, with just a touch of light citrous flavor. And these are all ingredients I have in the pantry... I can pull out a bag of cherries from the freezer and have a pie in the oven in 15 minutes. The shortbread crust isn't traditional, but it's great if you're short on time and counter space, and the sweetness is perfect for the tart cherry filling.

Fresh Sour Cherry Pie with Shortbread Crust

Crust:
1 cup butter, softened
1/2 cup confectioners' sugar
2 cups flour
1/4 tsp baking powder
pinch of salt
(350 degree oven, 7-10 minutes)

Filling:
2 1/2 cups pitted sour cherries
3/4 cup white sugar
zest of one lemon
3 tablespoons flour
(400 degree oven, 45 minutes)


If you're using frozen cherries, start by defrosting a quart bag in a bowl of warm water.


Place the softened butter and confectioners sugar in the food processor.

Process until creamy- about 30 seconds, if your butter is soft.


Add the flour, baking powder, and salt.


Pulse until crumbly and just barely combined. I tapped the pulse button 10 times. It's okay if there is a bit of flour that isn't quite mixed it, it will disappear when you press it into the pan. If you overmix it, it will get tough.


Dump the crumbles into your pie pan (9 inch or so... this one is handmade, so it's not exact!)


Press into the pan with your fingers so it is about 1/4 inch on all sides. It helps to dust your fingers with a little extra flour.

Bake in the oven at 350 for about 7-10 minutes, or until you just start to see a bit of color. Cool slightly.


While the crust is cooking, make your filling. Put your (mostly) defrosted cherries in a bowl.


Add the sugar, lemon zest, lemon juice, and flour. Mix to combine.


Pour the filling into the pre-cooked pie crust.


Cover the edges of the crust with tin foil strips, to prevent premature browning. Bake at 400 degrees for 45 minutes.


Remove from the oven when the filling is bubbly. Allow to cool before cutting so that the filling sets up firmly. (Or, if you can't wait... eat right away, and enjoy the runny warm filling with cold vanilla ice cream!)

Sour Cherries


There is so much to do around the house... but sour cherry season was not to be missed! We swept into Grisamore Farms at 4:15 (they close at 5!) and had 2.5 gallons of cherries in only 30 minutes. Such easy picking. So fabulous eating them right off the trees!


My mom always talked about sour cherries, but we never had fresh ones in the suburbia I grew up in. But they are a presence in June in upstate NY on roadside stands, and I fell instantly in love!


Pitting sour cherries is so much more pleasant than sweet cherries. The seeds come out with little coaxing, and your fingers are only sticky, not stained for days afterward!


We pitted enough to fill 8 quart bags!

Friday, July 9, 2010

Planting Seeds


So far, germination on coffee filters has been going along fabulously. In 5 days, I've had sprouts from Yarrow (Cerise and Colorado Mix), Salvia (Merleau Blue and Rose), Blue Globe Thistle, and Echinacea (basic Purpurea and Magnus). Still no signs of life from hardy Geranium or Balloon Flower. Frozen seeds from Yarrow, Salvia, and Thistle have done well... but so have unfrozen ones, so freezing might not be necessary.

As soon as they germinate, I plant them in little starter cells. For tiny ones, I wait for the first leaves... but there is a tradeoff, since you don't want the root to grow into the coffee filter such that you damage it when you pull it off.

To make the cells, I put some seed-starter mix into a bowl and pre-moisten it. This is much easier than trying to wet it later... the dry mix repels water.


Then I put the moist seed-starter mix into trays. I decided to use some egg cartons I had around, rather than buying peat pots or something like that.


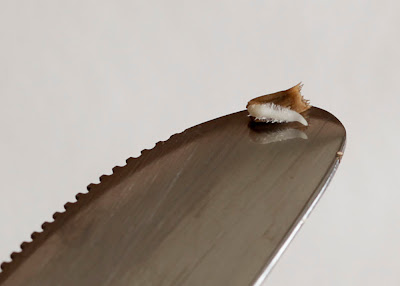
Very carefully, I pick up a sprouting seed on the tip of a knife, and put it into a cell, root side down. This is a sprouting Echinacea Magnus seed-- the first!


Right away, I put in a label. Eventually I'll probably find something more durable, but cardboard strips were easy in a pinch.

Wednesday, July 7, 2010

Yarrow Sprouting!

Just a few-- from the ice-cube tray batch! I might be a fan of freezing perennial seeds...

Salvia Sprouting!

My frozen salvia seeds are sprouting! After 48 hours in the cold and 24 hours on a coffee filter on our sunny, warm porch, both varieties of Salvia are sprouting. This is a lot faster than the suggested 3 weeks cold treatment and 10-14 day germination that is reported.

The salvia race is over... I'm going to pull the salvia seeds from the fridge and put them on the porch and see what happens. If they don't sprout in a few days, they're going into the freezer!

Tuesday, July 6, 2010

Seed Race


I have a secret: I have silently scoffed at those that start plants from seeds. Why waste the time, just buy a few plants at the garden store and be done with it! But that was before I had a whole yard at my disposal, and after only 6 weeks of glorious summer I am bored to tears of the myrtle monoculture I have acquired. Now, I secretly long for lush, tall borders of easy care, deer-resistant perennials. But at $15 a plant, all I can hope for is a tiny postage stamp of a garden.

Enter seeds. I don't have a great history with seeds. I'm haunted by childhood memories of molding peat pots, with nary a green spec to lighten the mood. And those were tried and tested varieties from the Burpee catalogs that my parents favored. Whatever am I doing with tough perennial seeds, where the jargon is tinted with unfamiliar vocabulary like "scarification" and "stratification?"

Not to mention the fact that it is midsummer! But, there may be hope. There are some in the blogosphere that sing the praises of starting perennials in June and July, with the thought that ample light and a half season head start will make for successful beds next summer.

So I ordered a sampling from Swallowtail Seeds, chosen for their excellent selection of deer-resistant perennials. Echinacea in 3 varieties (including the most common), Echinops (blue globe thistle), Salvia in Rose and Merleau, hardy Geranium, Balloon Flower, Foxglove (poisonous Digitalus!) and several varieties of Yarrow. And, just for kicks- Basil seeds-- I know, either perennial nor a flower. I just wanted some Basil, and I needed to make $30 to get free shipping!

I decided to go for the coffee-filter method of germination, for two reasons: 1) the possibly irrational fear of moldy peat pots (see above) and 2) the immediate gratification of seeing seeds sprouting!

I also happened to have a bunch of unbleached coffee filters just sitting around, so they were perfect for the task. Plastic baggies and a permanent marker (for keeping track of varieties, methods, and dates) were also readily available. Shown above: tiny balloon flower seeds (Platycodon grandiflorus, "Astra Blue").


The method is simple. Moisten the coffee filter (wring out any excess water). Sprinkle seeds on half of the filter. Fold into quarters, so the damp paper is in contact with the seeds. Place in a labeled baggie. (Above: Echinacea Purpurea, Purple Coneflower).

And then, there is the question of stratification or scarification. Basically, the idea is that perennial seeds expect to lay on the ground through winter, then come up in the spring. Stratification simulates the cold of winter. Scarification simulates the beating the seed coat might take over the course of a winter. The seed packets did not specify either... so either the vendor has taken care of this, or they think it is unnecessary. I suppose I could call and ask for clarification (none is given on their website)-- but I haven't done this. There is no clear consensus from any source I have found on the web, although I really like this database of seed information from "The Backyard Herbalist."

I'm conducting my own little experiment. Some seeds go right out onto the porch, where it is warm and they get lots of indirect light. These are the seeds I'm pretty sure won't need any extra help-- the Basil and the Globe Thistle (Echinops), and a few Hardy Geranium seeds (I have no idea what to do with these). Samples of almost all seeds have gone into the back of the fridge-- I figure I'll leave them there for at least 2 weeks. And some, I have frozen in ice cube trays for 48 hours.

These will either be a great success, or a dismal failure! Most sources say you will kill your seeds if you freeze them. Logically, though-- what better way to simulate winter, than a bit of ice? Stratification and scarification all in one. Anyhow, it's only a few seeds of each variety. After their 48 hour deep freeze, I put them on coffee filters in baggies on the warm porch.

I don't know how keen I am on the ice-cube tray thing overall... some of the seeds were very hard to handle, and I ended up spending a bunch of time fishing out little tiny seeds, one by one, from melting ice cubes. The Salvia seeds had the added challenge of producing a slippery, gelatinous coating... beautiful though!


I started my seeds 2 days ago... and my basil is already sprouting! There were signs of life after 24 hours. Incredible. I'm waiting for the first pair of leaves, then I'll transplant, carefully, to soil.

And after 48 hours, a single sprouting Globe Thistle (Echinops) seed. Which is also remarkable... germination times are listed as 15-30 days! But this is not so surprising... the thistle is like a weed, it makes sense that it is quick to sprout.

Incidentally, I am reserving a portion of my seeds for an experiment in winter sowing. All of the Foxglove is on hold... from what I've read, foxglove can behave sort of like an annual, and is very easy to start from seed with winter sowing. I also plan to try winter sowing the rest of the Echinacea and Echinops. And anything else left over!

The great seed race is on!

Monday, June 21, 2010

A Forest in the Bedroom


This was my first ever stencil project, but it worked out beautifully. It sort of looks like wallpaper... but I can't afford the wallpapers I love, and I cringe a little at the thought of taking it down again when I get tired of it. It just seemed a lot simpler to paint what I wanted.

This Ansel Adams print of aspens has stuck in my mind since the first time I saw it. I think it would be incredibly calming to wake up to a forest every morning.

This is a doodle I did in my sketchpad during a long, drawn-out faculty meeting.


There are a couple readymade stencils out there. This is one by Cutting Edge Stencils has a bit too much detail for my taste... and it is only 48 inches high, so I was afraid there would be an obvious line in the middle of my wall. And, I wanted to paint the negative spaces between the trees, not the trees themselves. The Stencil Library has one that is larger and paints the negative spaces, but once again, it is too busy, I wanted a simpler design. And, the wall size size stencil... which is enormous... is 140 euros.


I decided to make my own. I found this plastic posterboard at the local craft store, and it is just the perfect material for making a stencil. Blank stencils only came in a tiny 10x10 sheet, but the plastic posterboard is 22x28 inches. I taped a couple sheets together with packing tape to make a 44x28 inch sheet.


I drew with a dry erase marker, so that I could just rub away a line and redraw it. I drew the lines freehand, without a ruler, so that they would have an organic character.

I cut out the space between the trees with a small boxcutter knife.


So there are my supplies... a 4 inch foam roller, a regular paint tray, paint stirrer and an opener for the paint can.

I decided to use Sherwin Williams Translucent Metallic Technique Finish. They're actually discontinuing this paint, so I got it on clearance for $5!! But they say they have a replacement metallic paint, so if they are out of this one they can probably still help you out. Lowes also carries a metallic paint, but they wouldn't give me a sample, and there is all this oddness about the fact that their metallics need to be paired with other colors... so I decided to pass on $20 for a little can that I wasn't sure would work.

Since this is the first time I've ever stenciled, I decided to try it out on a piece of brown craft paper.


When you're stenciling with a foam roller, you want to load it up so that the entire roller gets an even coating, then squeeze most of the paint out of the roller by rolling it back and forth along the ridges of the paint tray. You roller should be almost dry.


Peel the stencil away, and there it is! Perfect!

I'm glad I did a test, because I ended up changing a few things. My initial idea was to stencil the bottom of the wall, then the top. But I decided there was no way that was going to look seamless. So I made my stencil twice as large. I used 4 sheets of plastic posterboard, and my finished stencil was 88 inches tall and 28 inches wide. The wall is actually about 102 inches high.


But it actually worked out that the stencil was smaller than the wall for two reasons. First, there was a radiator in the way along part of the wall. And more importantly, the extra room at the top of the wall gave me space to use lots of painters tape to hold the stencil in place. I had planned to use Scotch Repositionable Adhesive, but my stencil was just to large and heavy for that to work. Instead, I used lots of painter's tape, and the tape actually became extensions of the trees at the top and bottom of the stencil. Sometimes I even made an extra branch with tape.

BTW, I painted the wall a few days ago with two coats of Behr Premium Plus Ultra, in a gray-blue color ("Windsurf"), in Eggshell finish.

Here is the finished wall. I even went over the doorframe.

Okay, so it is a little frivolous to stencil a closet... but isn't it romantic to have a forest behind your clothes? It reminds me of the C.S. Lewis's wardobe that lead to Narnia. And I was on a roll, it only took another 45 minutes to complete.