Saturday, July 31, 2010

Seedlings


I've decided that egg cartons sort of suck for starting seeds. They are fine for germinating seeds-- but I found that I had to transplant my seedlings pretty much as soon as they sprouted. They're just not deep enough for seedlings to develop a proper root. Since I germinated most of my seed in baggies, the egg cartons were sort of a waste of time. Everything I started in egg cartons has been transplanted. Above, I have 6 inch high extra-large party cups with a drainage hole in the bottom. I've been using these for anything that develops a tap root... like Echinacea and Echinops. I can fit 18 of these in a standard size drainage tray (purchased at the garden store). The only drawback is that they tend to fall over when you move them.


For new starts, especially things that germinate easily or have tiny seeds that make baggy-starting inefficient, I've bought some commercial seed-starting trays. They're pretty cheap, and I've found a few places that stock they year-round (unlike the big-box garden stores which look at you like you're crazy when you ask for seed-starting trays in the middle of the summer).


I started these Yarrow seeds in plastic mushroom trays. The Yarrow "Cloth of Gold" seeds are ridiculously vigorous... they started in 24 hours, and I obviously sowed too densely. On the other hand, the Yarrow "Mia" seeds were a lot less vigorous.

Sunday, July 25, 2010

Tale of an Overflowing Washer

We installed a brand new washer and dryer in the 2nd floor apartment. They're the first appliances I've ever bought! Much nicer than our washer/dryer, I might add.

We tested the input and output before installing them... everything seemed to be fine...

Nearly one week after the trial load of laundry, our ceiling started to drip. Sorry I didn't have enough wits to grab a video camera to capture the drama... about all us adults could do was stare in disbelief, the 6-year old had to suggest that maybe we wanted to get a bucket? Of course, he was also the only one who was filled with excited energy at the prospect of water coming from the ceiling.
We were fortunate that the drain overhangs our hallway... just beyond the leak is our newly painted bedroom! Whew!

It seems that lots of people have problems with 2nd floor washers overflowing, for various reasons. People especially seem to have trouble with new washers, which use less water but apparently pump that water at an unforgiving rate for 2-inch plumbing. But there don't seem to be any ready-made solutions for anyone in our situation. The most popular solution for an occasionally slow drain seems to be to use a laundry sink as an overflow mechanism, but there isn't any room for such things in a 2nd floor laundry closet.

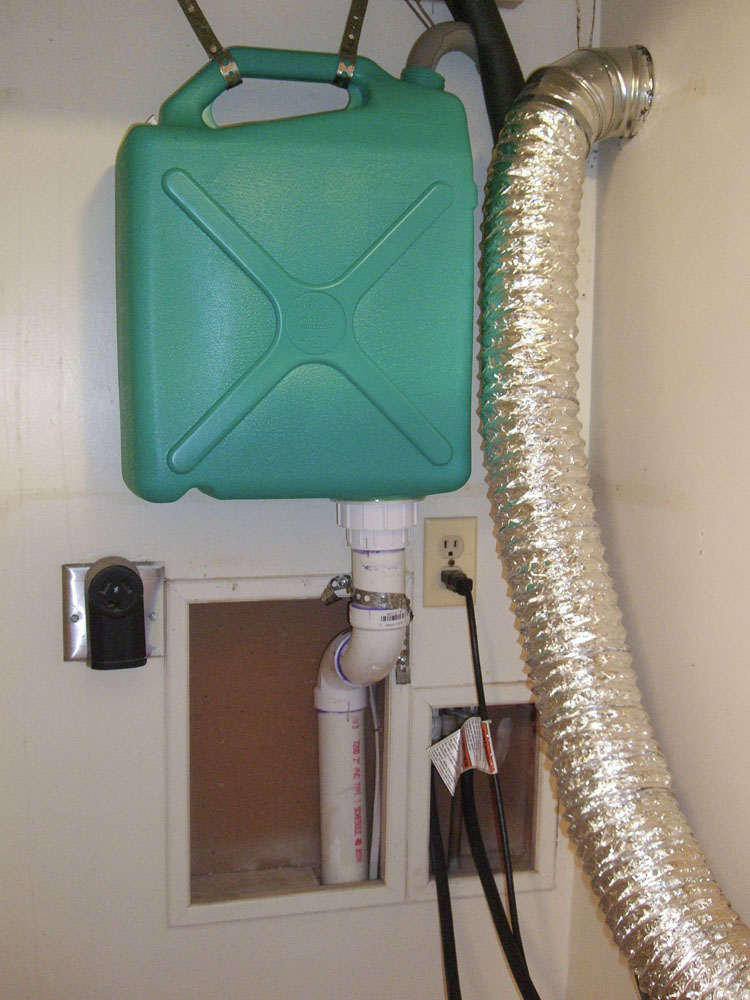
So David invented this contraption. It's a 6 gallon water jug mounted onto the drain pipe. We considered recessing it into the wall, but it sticks out only a tiny bit further than the dryer vent hose. We extended the outflow hose on the washer so that it reaches into the top of the 6 gallon jug. If there should be any slowness in the pipes, hopefully this will buy the pipes enough time to drain before ending up in our ceiling! Alternatively, if there was a problem, the water would spill onto the floor. Which would be a big mess to clean up, but is preferable to trapping the water between the floor and ceiling, where the only place for it to go is soaking into the drywall.

We hope it will work! We tried really hard to make the washer overflow... but we couldn't even come close, there was no indication that there was any slowness at all. Which is good!

Path Lighting- Before and After


Before...

After!!


The view up the path... it's really hard to see in picture. It's not usually quite this dark... depends on how well adjusted your eyes are the the darkness.

And here it is with the lights... it's really pretty, and much less of a guessing game to find the steps.

Saturday, July 24, 2010

Installing Path/Deck lighting


After researching various kits online and in stores, I ended up choosing this kit by Lowe's store brand for lighting: Portfolio. It was a pretty cost effective kit-- $60 for 6 lights, including the transformer. I ended up using two 6-light kits and a one stand alone bollard for the one place where there wasn't anything to attach a light to. The photo above is the contents of one of the 6 light kits.

The lights were pretty easy to install... just mark where you want them, level, and screw them into place.


The lights attach to the main power cable from the transformer. They pierce the cable with little prongs. Here you can see the wire guide, and I'm about to screw on the cap that will clamp the wire down onto the sharp prongs.


On the deck, I installed the lights onto posts, and ran the main cable under the deck. I secured everything with nail-in cable guides and zip ties. On the path, I installed the lights on the ends of the railroad ties that line the path, and buried the cable in the dirt alongside the railroad ties.

The transformer has a photo-sensitive cell, so the lights come on when it gets dark and turn off when it gets light. They can also be set to turn off 4, 6, or 8 hours after dark.

Friday, July 16, 2010

Inherited plants

The previous owners of our house weren't avid gardeners, but they made a couple of botanical choices that are very much appreciated now!

There are two mature Rose of Sharon bushes nestled in between the deck and the house. Protected from deer and sheltered from the weather, they have flourished. The only drawback is that unlike new hybrids, they have extremely fertile seeds that create a forest of young trees if left unchecked. But in July, their blooms are abundant and gorgeous.

One of the Rose of Sharon bushes has pure white blooms, which I love, because they are so unusual. And there is one branch of pink/purple blooms mixed in among the predominately white blooms.

Under the Rose of Sharon bushes there are several hostas. Nearly overtaken by Rose of Sharon volunteers, weeds, snails, slugs, and ground hogs, they have persisted and even bloomed. I have high hopes that they will flourish next year, with a little pampering.

Thursday, July 15, 2010

Meet the Kitties


This is Flo, the cat we inherited with the house. Here she is showing her soft side, lounging on the deck. But don't even think about picking her up-- even petting is suspicious.

This is Dala. She likes this picture because it makes her look thin, and it shows her in one of her favorite stances-- figuring out how to get outside. She's an indoor-only kitty, and is fascinated by a house with so many portals that lead directly outdoors (as opposed to, say, a 2nd or 3rd floor apartment!) She is so sure she can take on the great outdoors, but the truth is, she is unbelievably clueless when she gets outside. In one particularly memorable escape incident, instead of rolling the grass or romping in the nearby forested areas, she proceeded to run down the sidewalk and right up the middle of the busy road we live on.

Tuesday, July 13, 2010

Fresh Sour Cherry Pie


Fresh, tart cherries and sugar-- what could be better? I love this simple recipe- no cornstarch gooeyness to get in the way of the fresh, tart cherries, with just a touch of light citrous flavor. And these are all ingredients I have in the pantry... I can pull out a bag of cherries from the freezer and have a pie in the oven in 15 minutes. The shortbread crust isn't traditional, but it's great if you're short on time and counter space, and the sweetness is perfect for the tart cherry filling.

Fresh Sour Cherry Pie with Shortbread Crust

Crust:
1 cup butter, softened
1/2 cup confectioners' sugar
2 cups flour
1/4 tsp baking powder
pinch of salt
(350 degree oven, 7-10 minutes)

Filling:
2 1/2 cups pitted sour cherries
3/4 cup white sugar
zest of one lemon
3 tablespoons flour
(400 degree oven, 45 minutes)


If you're using frozen cherries, start by defrosting a quart bag in a bowl of warm water.


Place the softened butter and confectioners sugar in the food processor.

Process until creamy- about 30 seconds, if your butter is soft.


Add the flour, baking powder, and salt.


Pulse until crumbly and just barely combined. I tapped the pulse button 10 times. It's okay if there is a bit of flour that isn't quite mixed it, it will disappear when you press it into the pan. If you overmix it, it will get tough.


Dump the crumbles into your pie pan (9 inch or so... this one is handmade, so it's not exact!)


Press into the pan with your fingers so it is about 1/4 inch on all sides. It helps to dust your fingers with a little extra flour.

Bake in the oven at 350 for about 7-10 minutes, or until you just start to see a bit of color. Cool slightly.


While the crust is cooking, make your filling. Put your (mostly) defrosted cherries in a bowl.


Add the sugar, lemon zest, lemon juice, and flour. Mix to combine.


Pour the filling into the pre-cooked pie crust.


Cover the edges of the crust with tin foil strips, to prevent premature browning. Bake at 400 degrees for 45 minutes.


Remove from the oven when the filling is bubbly. Allow to cool before cutting so that the filling sets up firmly. (Or, if you can't wait... eat right away, and enjoy the runny warm filling with cold vanilla ice cream!)