Showing posts with label anna allen. Show all posts

Monday, February 10, 2020

Stretch Persephone Jeans, with a little help from Ginger

It's taken me awhile to warm to the high-waisted silhouette. My body and mind are adjusting, as slow as ever, to the inevitable creep of fashion. 


The Persephone by Anna Allen is the most high-waisted silhouette in my pattern library. My first pair, made over a year ago in linen, languished because they would stretch out during the course of a day and end up sagging. I fixed that recently with a length of buttonhole elastic, and now that they stay up, I love wearing them. So I decided to make another pair.


This pair is made in Cone Mills 12 oz S-gene denim. Or at least, that's what I think it is... I got it as part of a kit back when Closet Case Patterns was selling Cone Mill kits, which was a long time ago! The kit came with 9 oz and a 12 oz jeans-sized pre cut pieces, and I used the 9 oz and have reordered it multiple times. But the 12 oz has just sat in my stash, until now. Very satisfying to reclaim this stash space!


The Persephone pants pattern calls for non-stretch, and has a note that testers have used up to 5% stretch. If I'm not mistaken, Cone Mills denim usually is said to have at least 10% stretch. I thought it might work just fine for me. I've never been one for non-stretch pants... I have no tolerance for things that squish my midsection, they make me cranky. And, it worked for isewthereforeiam, and I LOVE everything she makes, so I thought it might work for me too. 


I made them one size smaller than my non-stretch linen pants. If I recall correctly, that would be a 12 graded to between a 14 and 16 at the waist. Then I sewed them up in an order that allowed the most efficient path towards fitting: Sew the inseam on each pant leg, then baste the crotch seam and back darts. Gotta love pants with no side seam! Then, try on, which allowed me to determine that an extra 3 inches removed from the waist would be ideal. I distributed that 3 inches across 2 darts and the back seam, removing 1 inch at each location. Re-tryon-- perfect!


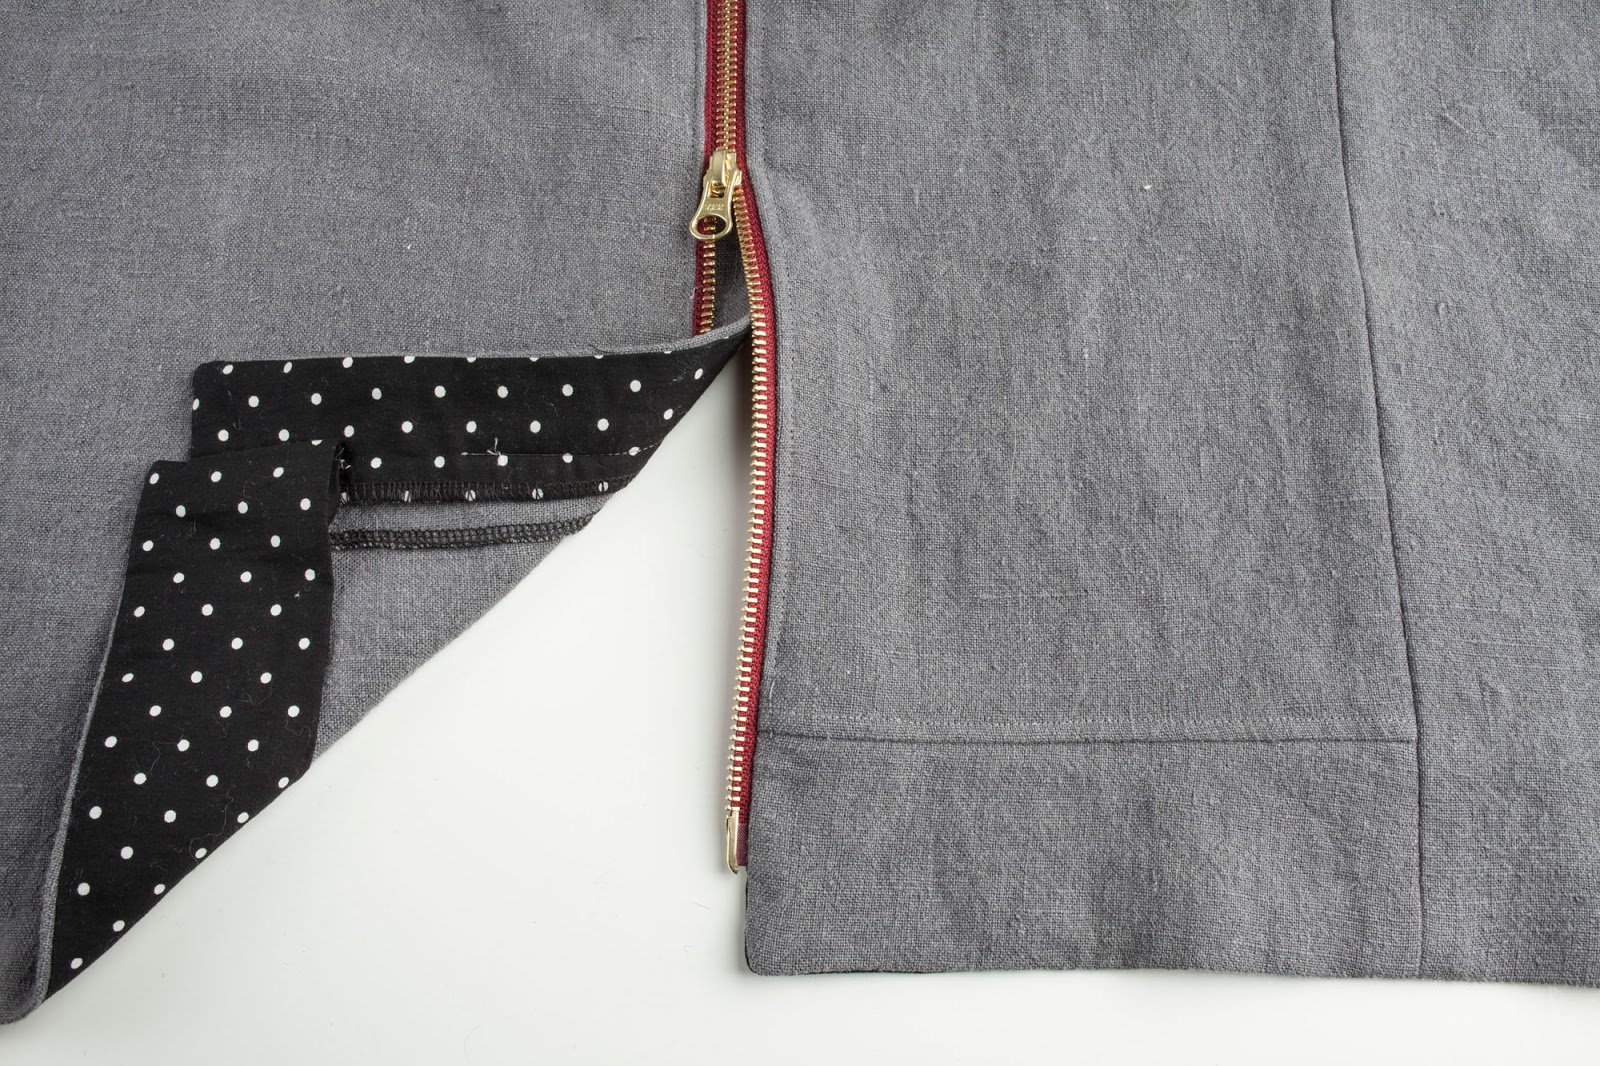
As before, I substituted the Ginger Jeans zip fly for the button fly. I just don't see the point of a hidden button fly, somebody enlighten me on why I should go through the trouble? To use the Ginger Jeans zip fly, all that is needed is to add the fly extension onto both sides when cutting (I just held up my ginger jeans pattern to the Persephone and traced it on, extending for the longer waist of the Persephone). I used the fly extension piece from the Ginger Jeans, also lengthened. Then I followed the trusty Ginger Jeans sew along that never lets me down. 


Since I had my Ginger Jeans pattern out already, I went with the Ginger Jeans curved waistband. I'm not sure it matters, but anything that might help keep my pants up is worthwhile in my book. I cut it in the stretchy direction of the Cone Mills denim, and faced it with quilting cotton. I also added my favorite medium weight interfacing. This interfacing is mildly stretchy in one direction, and I cut the waistband interfacing in the stretchy direction which I then fused to the Cone Mills. 

When it came time to add the waistband, I basted it in first. Sometimes I find that tugging slightly on the waistband helps the fit of the jeans and keeps the waistband on a stretch jean from bagging out... not so here, my first basted version messed up all of the good fit previously obtained. So I ripped it off and tried again with no attempt at easing any of the waist in... and the fit was perfect. 

I went with the cute and barely useful pockets that come with the Persephone. I'm not in love with them, but having a pocket is better than no pocket, and it do love the minimalism of the look. They also sew up very quickly, with minimum fuss!


I hemmed them up 4 inches for a fashionably cropped look. I'm 5'4" and I think Anna Allen drafts for 5'7", so I guess I should have thought about using the shorten lines. 

All in all I think this might have been the quickest pair of pants I've ever made. I cut them out one weekend morning in about an hour, and sewed them up over the course of another weekend day, and with lots of interruptions for kids, housework, napping, etc, I still managed to finish. 

I loving them so far. Might even require the creation of truly cropped top... that would also be a first for me... 


Wearing them today with my plaid long sleeve Cielo top, Black linen Wiksten Haori, and a silk-wool black checkered scarf (just a square of fabric with fringed edges).


Thursday, February 6, 2020

Three Cielo tops and a Persphone Pant

I've been admiring all of the boxy tees that seem to have taken the sewing world by storm lately. Several of the ones I most admired only come in larger bust sizes-- for example the Torrens Top really caught my eye, but alas, I'm several inches below the smallest bust measurement. 

There are of course dozens of other boxy tops out there, and as I was searching through them, it occurred to me that I might already have a perfectly suitable pattern: the Cielo top by Closet Case Patterns. Somehow the dress version took precedence in my mind, and I had forgotten there was also a shirt version. 


There was one small catch... I really wanted a long sleeve top. While the fancy "statement" sleeve on the Cielo is lovely, I really was looking for a more basic sleeve. So I lengthened the short sleeve into a long sleeve using a tutorial from Grainline on lengthening the sleeve of the scout tee.

This is what my sleeve pattern looked like. I took my best guess at a 3/4 sleeve legnth by measuring my arm, and drafted a wide hem or cut-on cuff, depending how I folded it. 


The first one I made was the burgandy top, which sewn from a light weight wool-cotton blend fabric I found at Homespun Trumansburg, my favorite local fabric shop. I just love the soft wooliness of it, it is so light and warm.


I added about 4 inches to the longest shirt length on the pattern, then made a deep hem (1.5 -2 inches?). For me, this make sit long enough that I can wear it out or tuck it in to a mid-high waisted pant.


I made the 14 shoulders, then graded out to the largest hip size, which is a size larger than my measurements... I wanted it to have a little extra ease around the belly and hips. 


The pants in these pics are white bull-denim Ginger jeans that are my favorite jeans right now.


The second is made from Atelier Brunette viscose crepe in Chestnut from Imaginegnats. I got the end of this roll, sorry! This fabric feels like a substantial silk crepe, but without the static. The drape is divine!


The pants are black linen Persephone pants (by Anna Allen). I made these over a year ago, but they are just now becoming one of my favorites. I made them from a non-stretch linen, but I find that they stretch out considerably over the course of a day, and by the end of the day they'd be down on my hips.

I recently solved this by adding buttonhole elastic to the back waistband. When they start to fall down halfway through the day, I can tighten in the elastic and then they stay up where they're supposed to. Now they are a go-to pant for me, and I want to make more!


The width of the neckline on the Cielo tends to show my bra straps, since I tend to wear cross back bras. I think that to narrow the neckline I'd have to add a closure, and I'm not sure I'm into that right now.


And finally, plaid. I haven't been a plaid person... but now I sort of can't get enough. I saw this fabric at Homespun when I bought the burgandy wool, and I couldn't stop thinking about it, so I went back for it.


I don't usually pick cottons, but this one is so soft, almost brushed like a very lightweight flannel.


The shoulder yokes on the back are cut on the bias, for fun and to avoid matching!


These tees have added some new life to my wardrobe, they are great under blazers and cardigans that I haven't worn for years. They've been the perfect project for a quick and satisfying sew in between the demands of work and home life.


Saturday, February 2, 2019

Convertible Pant to Skirt with Zipper Panels-- Anna Allen Persephone Pants

I'm still sort of surprised this crazy idea worked out. But yes, I have succeeded in making a pair of pants that converts into a skirt using zipper panels.

When he saw it, my three year old sons said... "that's so cool!"


The idea is actually pretty simple. There are four full length zips, two in the front and two in the back. When you unzip them all you can remove the crotch panel of the pants and insert skirt panels. 

Why would this even occur to me? Well, in my brain, it was the confluence of two things: the #sewfancypants challenge, that has me thinking about and looking at the cool pants that everyone has been sewing this month. And two, the Patternreview Sewing Bee, whose challenge this week was "zippers!" 


As I was thinking about zippers, my first thought was that this could go so terribly wrong! Think-- the infamous zipper dress! Sort of cool, actually, but who really wants to wear that, unless you are seeking attention... of all sorts. No offense if you have one, or want one... really, I'm sure you could make a very cool zipper dress that isn't sleezy at all. Okay, maybe I'm just digging myself into a hole here, I'm going to stop now. 

There are, of course millions of very cool things that one can do with zippers. In fact, the possibilities are sort of staggering. But I could find no examples of zipper pants that convert to a dress... therefore, I decided that was what I should make. 


Since I knew I'd be adding vertical seams, it occurred to me that the Persephone pants would be perfect for this design, since they have no side seam. Besides, I really wanted an excuse to get the pattern anyway, since so many people of all shapes seem to have success with them. 

So I bought and assembled the Persephone pant pattern from Anna Allen. I graded between a 14 hip and an 18 waist, based on my size in her chart (note: there's an error in my Patternreview review, where I say I made the 12-- thinking back, I'm pretty sure it was the 14). I made a muslin and the fit was pretty good. The backside was a bit overly form fitting, so I added 1/2 inch to the crotch curve and made more of a deeper J shaped curve for the back crotch curve. It is still pretty form fitting, but I think in a good way!


I probably did not need to grade up to the 18, because I actually ended up pinching out a good inch, perhaps more, when making final adjustments... but that also depends on the the give of your fabric. Linen is pretty stretchy for a woven. Speaking of adjustments, one of my hesitations with the pattern was how does one adjust pants without a side seam? But actually, since my adjustments weren't too drastic, pinching out at the back dart and center front worked pretty well for me. 


To add the zippers, I drew additional seam lines on my muslin where I wanted the zippers. In the back, I used the location of the darts as my guide, extending the dart into a straight line and taking its width into the seam allowance. In the front, I just eyeballed it. When I cut my fabric, I was careful to add seam allowances to my new style lines. 

The front zippers are two way zippers, so that they can be used instead of a front fly, but also function as a leg vent. The back zippers are separating one-way zippers, installed upside down (closed end at the top. This is so that there would be no wardrobe malfunctions in the back (zippers should stay closed at the top) and so that I wouldn't be leaning back against zipper pulls. 

To make the skirt panels, I extended the straight line of the crotch curve to the hem length that I wanted. The best tutorial I found is by Blueprints for Sewing, where she is converting the Ginger jeans into a skirt. 


I used a 7 oz (heavy weight) linen. This is a bit lighter than the 10 oz fabrics suggested by the designer. To compensate, I added a front stay across the belly/front crotch and underlined the upper portion of the side panels with a lightweight cotton. I added the zipper welt pockets (my addition, this is not in the Persephone pattern) before I added the underlining... so the underling also serves to cover up the inside of the welts and pocket bags.

When fitting my pants mid-way through, I was feeling that the rise was too high for me. They're supposed to be high-waisted, but on me they were nearly up to my bra band and I'm not comfortable with that, at least right now. The pants without the waistband were hitting at just the right point for me... so I ended up turning the waistband into a waistband facing. I actually sort of love the clean look of this, and it worked well to enclose the top portion of the zippers. When I make the persephone again I might make it this way again... or if I want the waistband, I'll lower the rise 1 inch.


I also used a facing for the hem. I did this in part because I didn't have enough fabric to make a nice deep hem, so the facing allowed me to use a scant 3/8 inch in some places. In fact, I was so short on fabric that I had to piece together scraps to add length to some of the panels. The hem facing also allowed a clean finish to the bottom of the zippers, and it serves as a cool peek of dot pattern when the skirt swishes around.


It was quite the project, especially on a timeline, crammed into a busy week. There might have been an all-nighter involved...! But I do love the end result. I'm wearing this as a skirt today. If you can believe it, I haven't worn a skirt in YEARS, it just hasn't been part of my wardrobe, but I think there may have to be more skirts in my future, they are actually rather practical for winter with tights underneath and a big sweater on top.

You can read my Sewing Bee entry at Patternreview here.