Showing posts with label #wikstenkimono. Show all posts

Monday, February 10, 2020

Stretch Persephone Jeans, with a little help from Ginger

It's taken me awhile to warm to the high-waisted silhouette. My body and mind are adjusting, as slow as ever, to the inevitable creep of fashion. 


The Persephone by Anna Allen is the most high-waisted silhouette in my pattern library. My first pair, made over a year ago in linen, languished because they would stretch out during the course of a day and end up sagging. I fixed that recently with a length of buttonhole elastic, and now that they stay up, I love wearing them. So I decided to make another pair.


This pair is made in Cone Mills 12 oz S-gene denim. Or at least, that's what I think it is... I got it as part of a kit back when Closet Case Patterns was selling Cone Mill kits, which was a long time ago! The kit came with 9 oz and a 12 oz jeans-sized pre cut pieces, and I used the 9 oz and have reordered it multiple times. But the 12 oz has just sat in my stash, until now. Very satisfying to reclaim this stash space!


The Persephone pants pattern calls for non-stretch, and has a note that testers have used up to 5% stretch. If I'm not mistaken, Cone Mills denim usually is said to have at least 10% stretch. I thought it might work just fine for me. I've never been one for non-stretch pants... I have no tolerance for things that squish my midsection, they make me cranky. And, it worked for isewthereforeiam, and I LOVE everything she makes, so I thought it might work for me too. 


I made them one size smaller than my non-stretch linen pants. If I recall correctly, that would be a 12 graded to between a 14 and 16 at the waist. Then I sewed them up in an order that allowed the most efficient path towards fitting: Sew the inseam on each pant leg, then baste the crotch seam and back darts. Gotta love pants with no side seam! Then, try on, which allowed me to determine that an extra 3 inches removed from the waist would be ideal. I distributed that 3 inches across 2 darts and the back seam, removing 1 inch at each location. Re-tryon-- perfect!


As before, I substituted the Ginger Jeans zip fly for the button fly. I just don't see the point of a hidden button fly, somebody enlighten me on why I should go through the trouble? To use the Ginger Jeans zip fly, all that is needed is to add the fly extension onto both sides when cutting (I just held up my ginger jeans pattern to the Persephone and traced it on, extending for the longer waist of the Persephone). I used the fly extension piece from the Ginger Jeans, also lengthened. Then I followed the trusty Ginger Jeans sew along that never lets me down. 


Since I had my Ginger Jeans pattern out already, I went with the Ginger Jeans curved waistband. I'm not sure it matters, but anything that might help keep my pants up is worthwhile in my book. I cut it in the stretchy direction of the Cone Mills denim, and faced it with quilting cotton. I also added my favorite medium weight interfacing. This interfacing is mildly stretchy in one direction, and I cut the waistband interfacing in the stretchy direction which I then fused to the Cone Mills. 

When it came time to add the waistband, I basted it in first. Sometimes I find that tugging slightly on the waistband helps the fit of the jeans and keeps the waistband on a stretch jean from bagging out... not so here, my first basted version messed up all of the good fit previously obtained. So I ripped it off and tried again with no attempt at easing any of the waist in... and the fit was perfect. 

I went with the cute and barely useful pockets that come with the Persephone. I'm not in love with them, but having a pocket is better than no pocket, and it do love the minimalism of the look. They also sew up very quickly, with minimum fuss!


I hemmed them up 4 inches for a fashionably cropped look. I'm 5'4" and I think Anna Allen drafts for 5'7", so I guess I should have thought about using the shorten lines. 

All in all I think this might have been the quickest pair of pants I've ever made. I cut them out one weekend morning in about an hour, and sewed them up over the course of another weekend day, and with lots of interruptions for kids, housework, napping, etc, I still managed to finish. 

I loving them so far. Might even require the creation of truly cropped top... that would also be a first for me... 


Wearing them today with my plaid long sleeve Cielo top, Black linen Wiksten Haori, and a silk-wool black checkered scarf (just a square of fabric with fringed edges).


Monday, December 30, 2019

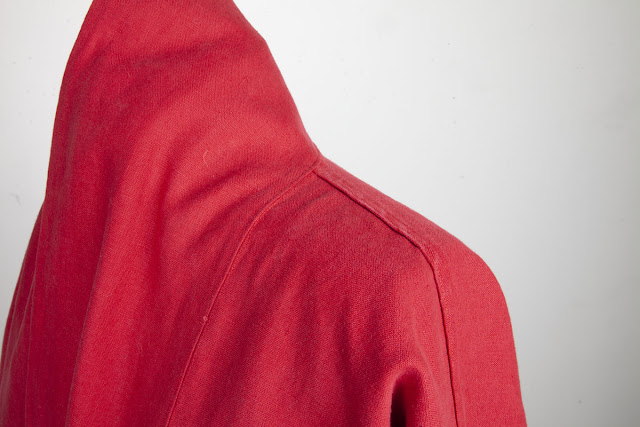
Red Linen Wiksten Haori (formerly Wiksten Kimono)

I made a Wiksten Haori in red linen, and it has been the hot item this holiday!


This pattern is simple, but a lovely shape that works for many people. I made this one with no lining in a heavy red linen from my stash, a piece that I've had for many years. It has proven to be a bit too heavy for a dress, but was perfect for this pattern. It is wonderfully smooth and drapey with an attractive rustic weave.

I made it without a lining, instead I faux flat felled all of the seams, except the arm seams which were difficult to flat fell, so I french seamed them. I made a facing for the sleeves so that I could turn them up without the seams showing. I used my custom pockets, which are a curved slant that goes from the collar to the side seam in one clean sweep.

This was all made in a huge rush in time for a Fiddle Orchestra concert where we were instructed to wear red. Previously the only thing red in my wardrobe was underwear ;).

I love the way this turned out, and it has proven to be a wonderful item to have in my wardrobe for the holidays-- just throw it on over any other item and one can instantly assume that I have a healthy holiday spirit.

More photos...


Happy New Year!

Monday, September 24, 2018

Wiksten Kimono in doublecloth linen

I am in love with the Wiksten Kimono pattern. I can't stop dreaming them up. 

This one is in an incredible doublecloth linen from Fabrics-store.com. I've never even heard of a double cloth linen, but when I saw this one I knew it would be perfect for another kimono jacket. 


In this one, I sewed the Medium instead of the Small, thinking that it would be more of a layer to be worn over shirts, possibly even a light sweater. 


I was loving the feel of the collar on my last one, so I stuck with a weft interfacing rather than the medium weight interfacing that would be the rational choice. Since the layers were puffing out a bit, I decided to "quilt" them together with lines of parallel stitching. One of the Wiksten samples looks like it was done this way. 


ON this version I drafted yet another pocket. I decided I wanted a curved pocket that went from the collar to the sideseam. The top of the curve is finished with a facing, the bottom is serged, turned under, and stitched down. 


For the sleeve and bottom hems, I separated the layers of the doublecloth, turned each side in one inch, then topstitched the edge, creating a hem that looks the same on both sides. I could have used a similar technique for other seams, but I decided just to faux flat fell them, since this also looks lovely on both sides. 


And thus, it is reversible.


Wearing it here, I have the sleeve cuffs turned up for contrast. Both sides of the collar are the darker side of the fabric.


Now that the mornings are cooler, I reach for this all the time. It is just so soft and cozy. 

I have more kimonos planned. I think I need one in an Italian wool that I've been hoarding. Can one have too many kimono jackets? Am I going to tire of this silhouette and wonder how I ended up with so many kimono jackets?

In other concerns, does the untucked shirt tail look silly? My husband criticized me for the front tuck, but then said he had noticed that other women were wearing their shirts that way too. Traditional dressing would say your jacket should cover your shirt, but I break this rule all the time, do you?

Tuesday, September 18, 2018

Wiksten Kimono + Amy Jumpsuit in Black Linen

The Amy Jumpsuit is such a quick, fun sew that I had to make another, ASAP. I loved wearing my first one dancing, and I'm not totally opposed to wearing it to work, but such a distinctive pattern is more of an occasional wear item in my wardrobe.

This one is in black linen. I just love black linen... I want to make EVERYTHING out of black linen. Especially this lovely smooth fine-weave linen. I was also hoping that I'd feel that this jumpsuit was more work appropriate, since it is so comfy that I want to wear it every day!

However, I don't feel quite comfortable with the narrow straps and bare shoulders at work these days. I just want a bit more coverage, for modesty and also for chilly AC. Fortunately, I had just obtained the Wiksten Kimono pattern, so I sewed up a quick sample with some leftover pieces of black linen. 


I wasn't really sure that I needed another kimono pattern, but there is something about the proportions of the Wiksten Kimono that are quite elegant and feel very "now." There is a version of this pattern that you can download from Making Magazine, but I decided to go with the newer version from the Wiksten blog and store. By all accounts, the shape is just a bit more refined, and the sizing is a touch less oversized. My scraps amounted to a little over a yard in pieces, so I sewed a small (I measure a Medium), no lining, with shorter sleeves. 

Since I wasn't lining it, I faux flat felled all of the seams. I only realized after cutting that the seam allowance was only 3/8 inch, so I borrowed an extra 1/8 inch from each seam and made narrow seams. Next time I'll add another 3/8 if I intend to flat fell. 

For the collar, I would have used a medium weight interfacing... but I didn't have enough in my stash. So I used the heavier weft interfacing that I usually use on coats and blazers. I actually rather like the structure it adds to the collar. 


To get a clean finish on the collar, I pressed the seam allowance on the collar and topstitched from the front, catching the pressed edge. The sleeves and hem are just turned up and stitched.


I drafted a new pocket just for fun, adding a curve to the upper edge and finishing it with a facing.


The Amy Jumpsuit is the same black linen. I added 1/2 inch to the back crotch curve, to give a bit more bum room. I also ended up shortening the straps 2 inches... somehow this jumpsuit ended up hanging lower on the bust than the last one, and I also wanted a little tiny bit of extra coverage for work-appropriateness. All seams are frenched, including the side pockets. 

All said and done, this one is a bit of a wiggle to get into, and I fear stretching out the neckline when I do it. Sort of wishing I had gone with the zipper-- but not so much that I will go back and add one. Maybe on the next one? 

I did fuss around a bit with trying to cross the straps... but as I feared, such a modification is not trivial since the design relies on drape. On the plus side, though, the straps as drafted mostly stay on my shoulders, which is actually quite remarkable. 


It's been ages since I wore anything to work other than collared shirts and shirt dresses, so it is very fun to have a new silhouette to play with.