Showing posts with label completed sewing projects. Show all posts

Sunday, March 13, 2022

McCalls m7969 in linen

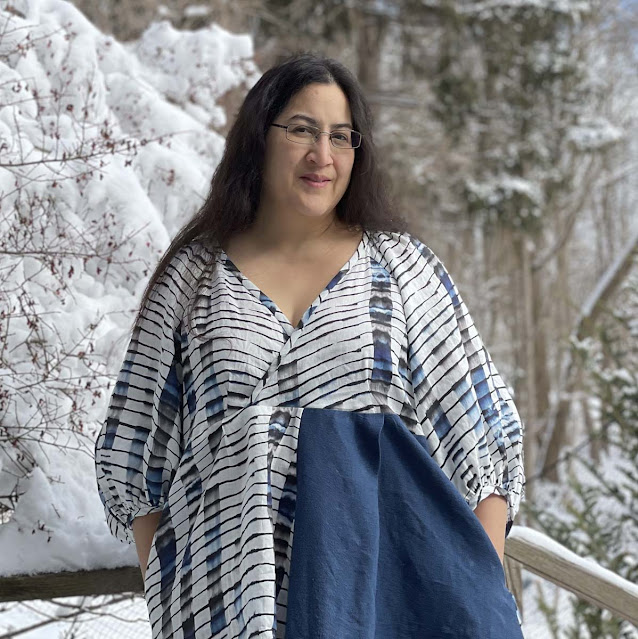
Okay, spring can come now, I'm ready!  


This is m7969, which is must be something of a blockbuster hit for McCalls, it is all over Instagram. With sweet sleeve shape and easy, flattering silhouette that seems to look good on everyone, I was smitten and had to give it a try. 

I purchased a paper pattern months ago, but the yellow tissue and newsprint directions were bringing up memories of frustration and disappointment from my youthful attempts at sewing. I also just really dislike working with that fragile, crinkly tissue paper. When Minerva made the PDF available with their newsletter, I finally felt empowered to move ahead.

Of course I made View A (like everyone else!) but I subbed in the skirt from the Closet Core Elodie wrap dress because I don't like gathered skirts. I can't really even say why, but every time I make a dress with a gathered skirt, I wear it once and it sits in my closet until I change it out.

After looking at other blogger's versions, I decided go for sewing to my measurements, which seemed likely to turn out pleasantly oversized. That put me at an M bust and L waist, which are in two different PDFs (or two different pattern envelopes!). I'm ALWAYS right in the middle of size splits, I hate it when companies don't overlap their sizes. So... I printed off the M and just guessed at where the waist would be on the L. 

The one mod that many bloggers have done that I think is very smart is making the front wrap a little more modest. I know if I do this, I'll get lots more wear out of the dress, rather than saving it for some rare (since covid, non-existent!) sexy date night occasion. I extended the front triangle 3.5 inches and drew a straight line to the shoulder, then extended the front bindings (by a totally arbitrary amount, and I just cut off the excess). I also shortened the sleeves by an inch at the shorten/lengthen line. 

The linen print was a birthday purchase from Emmaonesock several years ago. I didn't have quite enough to cut out the quite full skirt of the Elodie, so I pulled out a remnant of navy linen to complete the skirt. 

Of course I added POCKETS-- having pockets in all of my clothing is one of the great advantages of sewing my own clothes. Designers, take heed-- us busy women need options for pockets. Since this pattern didn't include any pockets, I borrowed the divinely deep pockets from the Closet Core Amy jumpsuit and added them at the side seams. 

I started out blindly following the instructions-- but after considering it, I ripped those first seams and went with my own order of construction. With this fine linen I made french seams throughout, starting with the raglan seams and doing the underarm and side seams in one fell swoop. The instructions called for an inordinate amount of basting-- who does that, and why cut the neck binding on the bias, only to interface it on the grain? I didn't bother with the interfacing, I just treated it like any other bias bound neckline. I also didn't hand- slip stitch the bindings as suggested-- I might have if this was a solid or a slick fabric, but with a pattern and toothy linen, stitching in the ditch to secure the binding worked just fine. From taping the PDF to hemming, I had it done in a day. 

It seems that the binding was meant to be shorter than the neckline to have the effect of snugging in the wrap. Since I modified the front for more coverage, I sort of missed this effect, but ended up compensating when baste-fitting the front by pulling down on the bindings until the front laid flat with no gaping. I also sewed the waistline about an inch higher in the front, and added small pleats under the bust on the bodice and on the skirt. 

In terms the quality of the pattern-- I really think McCalls missed an opportunity to impress the sewing community. The PDF was sort of baffling-- wrong pagination, and how exactly were you supposed to put it together? No instructions on this that I could find, I didn't see any scale markings to check my printer scaling-- I eventually decided by trial and error that I was supposed to line up the little diamonds that I could hardly see through opaque printer paper, and I just had to trust that my printer was not scaling inappropriately. The PDF instructions did seem somewhat improved from what I remember of old McCalls patterns, but still not the kind of considered, tested construction that many Indie designers have perfected. 

Fortunately, it is a forgiving pattern in terms of fit and I have lots of experience sewing now so I can compensate for poor instructions, and the dress turned out beautifully. The sleeves are everything I was hoping for-- voluminous and elegant in this lightweight linen. It is just so cute and comfy, and I'm ready for spring as soon as Mother Nature is!

Thursday, March 4, 2021

Belatedly loving the Burnside Bibs in Telio Silky Noil

Y'all know by now that I overalls are my fave. If there was any holding back, the quarantine did that in... why dress to please anyone but myself? 

I've made a countless number of Closet Case Jenny Overalls (at least eight!) and a very well loved pair of Helen's Closet Yanta Overalls. With spring on my mind, if not yet in the weather (it snowed again this morning!) I was thinking about making a lighter weight, more jumpsuit-y pair of overalls. Enter the Burnside Bibs by Sew House Seven!


While I have long loved all of the gorgeous Burnside Bibs sewn by the many talented makers I follow, I've been skeptical of how much I would like the clever tie system that distinguishes the Burnside Bibs. Even in the more streamlined versions, it tends to produce gathers across the bum, which I don't care for on my own body. I also have a quiet dislike of dangly ties, which tend to end up in the most inconvenient places when utilizing the facilities in a rush. After careful consideration, I decided that both of these minor flaws could be avoided with a few minor changes. 


This was my first ever Sew House 7 pattern, and any flaunt with a new pattern company is a bit risky. However, I was pleasantly surprised to discover that the large format files were made for printing on a 36 inches wide printer rather than the usual 50 inches or so. The printers I have access to are 44 inches wide, so this worked out well.


The instructions, for the most part, were very clear and a joy to follow. The only bit of confusion I encountered was in the changing seam allowances, and there was one point where I seriously could not figure out from the instructions what the seam allowance was. However I persevered in wildly guessing and it seemed to all work out fine in the end. 

I didn't toile, I just sewed up my size via the measurements and made adjustments on the fly. I made the closer fitting view, with pleats in the back. I ended up raising the crotch half an inch and trimming an inch off the top of the bib, but other than that I made no changes. The invisible zipper went in without a hitch. The method of sewing the waistband and facing was very clever and left a very clean finish on the inside. 


I left the front of the straps as intended to keep the clean lines of the front bib, but instead of long ties through belt loops in the back, I sewed buttonholes into the straps and buttons to the inside back of the waistband. This makes the straps somewhat adjustable without the use of ties or other hardware. I don't need to unbutton a strap to get the overalls in and out, so this works out very well. 


To manage the extra ease that the pattern manages with the ties, I made side straps that cinch with d-rings. This generally works well, but it made slightly more awkward than it should be in that I was lazy and used the left over straps for the cinching, and I didn't have any D-rings smaller than 1 inch. Therefore the D-rings tend to twist annoying when you cinch them. I may at some point re-sew them with either smaller D-rings or wider straps, which would solve the problem. 

My fabric is a very drapey linen-viscose noil by Telio. Since I was going for a lighter, more flowy jumpsuit look, I think this achieved that look and feel, although I think I'd also really enjoy the burnside bibs in a slightly beefier fabric, perhaps a light denim or heavy linen.  

I'm wearing them here with a fushia linen Liesl Classic Shirt, but I'm going to be enjoying trying them out with all sorts of tops in my wardrobe, which is part of the fun of overalls! I definitely think there will be more Burnside Bibs in my sewing future, it was a quick and satisfying sew. 

Thursday, June 18, 2020

Euler Bra by Sophie Hines Review

There's nothing like spending 3 months working from home to get one to reconsider the state of one's loungewear. I've never really understood the point of bralettes... but suddenly I found myself gravitating towards my one lonely RTW bralette and longing for more. 

I don't have a good track record with bras, either buying or sewing them. I generally prefer underwires, but I'm super fussy about fit and anything poke-y, bumpy, or rough bothers me. I hate buying bras because they'll feel and look fine in the store, but I'll take them home and won't be able to wear them for more than 45 minutes. I spent ages sewing an underwire bra by Makebra in 2016, including several toiles and many adjustments, and while it is lovely the fit seems fine, it is irritating to wear for long periods of time. I don't even know what would make it better, so I haven't tried again. 

It occurred to me that bralettes are potentially something that I could sew successfully, even in the distracted climate of a stay-home summer. It had to be a pattern that I could easily convert to a cross or racerback, since I have very sloped shoulders and regular straps never stay up. I prefer patterns with a lining or some kind of clean interior finish. Also, I dislike the look of foldover elastic because I can't get past the idea that it looks cheap. What can I say, I'm a tough customer.

I have wanted to make the Madalynne Barrett, and while I haven't seen anyone do it, it looks like you could cross the straps without much fuss. However when I printed it out, the cups in my size seemed very low volume and the instructions for the front cutout looked rather fussy, I just couldn't see how I would be able to sew that without it turning into a hot mess. 

Next I turned to Sophie Hine's Euler, which appealed to me since a cross back was one of the suggested options and it looked like simple but clean finish. I had passed it by at first since it looked like foldover elastic was involved. Apparently one can use foldover elastic, but she also suggests bra strapping, which is used on some of her samples.


There aren't a lot of reviews, but the more I looked at her samples and her work, the more I was intrigued. She has a unique style that is feminine but a little sporty which is very different from other companies. And... it was on sale, so I was sold. While I was at it, I also purchased the Axis tank, which seems to be loved by many on instagram, but I haven't sewed it yet.

I decided I was in between a L and XL, and sewed it up in a ikat print cotton spandex jersey with a thin black jersey lining. I had to cross the front a little more than suggested, and take about an inch off of the bottom outside of the cups. On later versions I make the side band elastic about 1/2 an inch shorter than suggested, and this helps the fit for me. I used 3/8 inch bra strapping for the outside elastic and straps, and 1 inch plush back elastic for the bottom band.


I skipped the back closure, and just sewed the ends together with a 1/2 inch seam allowance. 

Her method of sewing the cups with a sort of buritto method is very cool and efficient. I also love that this pattern isn't as specific about notions as some bra patterns... you can use many different kinds of elastics or fabrics. Amazingly, her suggestions of strap length and underbust elastic length are spot on for me (If I don't use a back closure, and I cross the back straps). 

I was instantly in love-- and promptly made 4 more. 

The fit is spot on for me. It's definitely a soft bra, but the support is decent for a casual bra. This one is designated as a swim top so that you can see fit pics. I wouldn't take it surfing, but it would be great on a lazy summer day. I made it in scraps from the Pinecrest supplex that I use to make leggings and sports bras, with a lining of a thinner supplex knit. I used Sophie's instructions to make a covered band using the thin supplex and some Dritz non-roll elastic, and this is now my favorite type of band for these, it doesn't curl at all. 


Initially this one had the very cool long-line addition that is the other view of this pattern, and it did look very cool, but it had a tendency to roll up over time. I think longline bras just may not work very well with my shape, which starts getting round right under my bust. So I removed it, and now it is much less irritating. I also removed the back hooks, since they also annoyed me, and the bra was too loose with them, but just cutting them off and sewing it together made the band of this one a touch tight. Perhaps it will stretch out, but if not I may have to add an extra piece of elastic. For this one I used cool gunmetal gray hardware.


Sophie has a blog post about making the Euler in lace, so I had to try that out with some lace that has been in my stash for ages. I followed her suggestion to size up since the lace and powernet lining aren't as stretchy as the jersey, and I only lined the side cup as she did in her post. I haven't worn this one yet, but if I like it, I can see more lacey versions in the future. 


This gray stripe version is my favorite, it's hard not to wear it all the time! 


And finally, pink. I'm not really a light pink kind of person, but I added this color of Riley Blake spandex cotton to a recent fabric.com order to make the free shipping minimum because I thought it would be good under light colored summer outfits.


This one has cool silver metal hardware.

I'm clearly addicted. It's a quick, non-fussy sew and uses scraps, so instant gratification. These are in high rotation this summer and my underwires are stacking up at the back of my drawer. 

Of course I have plans to make more. I think in future makes I'm going to move the seams to the outside... less pretty, but more comfy. Even though the seams are enclosed they still bug me a bit. I also purchased some 1/2 inch bra strap elastic and hardware which I think is what Sophie uses on some of her cool versions.


Monday, May 4, 2020

Pinstripe Linen Jenny Overalls

Yes, I have made ANOTHER pair of overalls.


And they are DIVINE.


When all this work from home is finished, I am going to wear them to work and not give *#$%^ what anyone thinks. Pinstripes make them work appropriate, no?

They are Jenny Overalls in pinstripe linen. I bought this linen when it went on sale and I had loved using it to make this dress, but I had no idea what I was going to do with it. Then came lockdown, and my overall streak, and suddenly I knew EXACTLY what I needed to make. (It was from Fabrics-store.com, but they don't seem to have it anymore)

I'm out of overall hardware, so I went with the cute front tie thing I've seen on some other overalls. I just made a couple of rouleaux loops and sewed them into the top seam of the bib. 


The only other thing I did differently was to add a couple of darts to the top of the waistband to try to get it to lay a little flatter against my back. Really I need to just use a curved waistband piece for the back I think. But in this hack version, I added two 1/4 inch darts 6 inches apart on the center back waistband, and did the same for the waistband facing.


I once again did double side button closures. I'm running low on my stash, so I had to use the ones that say VIP jeanswear on them. I'll just disregard the jeanswear bit.


So that's about all I have to say about these. Don't be surprised if the next thing I make is more overalls!

Monday, April 20, 2020

Goldenrod Yellow Denim Jenny Overalls

Overalls are my work-at-home wear of choice. Comfy for endless online meetings and presentable in a casual setting, my linen, striped, and denim Jenny's have been in constant rotation.


Seeing everyone putting their sewing skills to use as part of the civic response makes me feel slightly guilty for engaging in selfish sewing. However, I'm fortunate to be in a situation where our jobs and schools can continue online, so I'm busier than ever trying to be a full time working and homeschooling mom. Therefore I need sewing to maintain my sanity, which is definitely being put to the test!


I've been curious about Cone Mills Loomstate denim, so I looked to see what Threadbare fabrics had and immediately fell in love with Goldenrod. The fabric came at LIGHTENING fast speed! Which made me very happy, and I threw it into the wash immediately upon arrival. I've read about the theories of shaping unsanforized denim to your body, but that isn't really what I'm interested in right now, so I washed and dried it 3 times to make sure there would be no shrinkage in the finished overalls. It washed up to a lovely denim-y texture with a surprising amount of mechanical stretch for a non-stretch denim.


I used my altered Jenny Overalls pattern (Closet Case Patterns) that has tapered legs and side buttons. Since this was a non-stretch fabric, I went with the original Jenny overall pocket bags rather than the pocket stay that I had drafted. On my last pair of Jenny's that I made in stretch Cone Mills denim, I did the french seam backwards, and I'm reminded of it every time I stick my hands in my pockets and feel the seam. This time I nearly did the same thing, but I realized it before sewing the second seam and ripped and fixed it. French seaming pockets is particularly confusing because you want the right side of the fabric on the inside of the garment AND you also want the part of the french seam that is usually on the inside of the garment, on the inside of the garment.


For the pocket bags and facings I used a cotton fabric that I've had in my stash for many years. It is a fun fabric with great colors, but I haven't been able to envision wearing it as a shirt or dress... but I decided that it might make a great lining since the purple seemed to be a lovely contrast with the yellow.


This is my fourth pair of Jenny Overalls! It's funny though how each pair turns out quite different. On this one I narrowed the hips quite a bit... I am wondering if the fact that jogging is my exercise of choice lately is changing the shape of my body. I also impulsively cut 5/8 ths off of the height of the rise since I've felt that it is a bit high on my other overalls... but then I regretted it after I sewed it all together and tried it on, I think I like it better where it was. But it's probably fine, really. The biggest change was that the back waistband was gaping on these, so I had to rip everything apart and add a seam to the center back waistband to remove an inch. I also removed a wedge from the center back seam. I don't remember having this problem with any of my previous versions, but they were all stretch fabrics, and in some I added waistband elastic to the back seam... so perhaps this has always been a problem. Looks like the waistband still isn't perfect in back, but trust me it is better than it was!


I thought I had some overall hardware... but it turns out I had used it all up. I did have these super cute floral jeans buttons though from a mixed box I bought on Amazon awhile back. So I opted to add buttonholes to the straps, so that I can add hardware later if I want to. Actually I'm sort of liking the buttonhole method, the look is a bit more casual, but the overall hardware sometimes catches in my hair whereas the buttonholes are very low profile.


I'm wearing these today and loving them. I want ALL THE OVERALLS... I have more planned! I'm wearing them with my plum blossom blouse in these pics.


Tuesday, April 7, 2020

Plum blossom blouse

Lately I've been really into stripes and solids, but this print was just irresistible. As soon as the first taste of spring hit, I pulled it out and set to work.


Here is a closeup of the print of plum or apple blossoms, with a hand drawn pen-and-ink and watercolor look. It was from emmaonesock, printed on a light and floaty cotton voile.


I made a Liesl Classic shirt, with my usual modifications... no bust dart, extra ease.


I did tweak the sleeves for a slightly romantic vibe. I added lots of extra ease by slashing and spreading, then gathered it in with pleats at the binding. I left off the cuff and tower placket and added a bias bound sleeve placket and bias bound the sleeve with a loop for the button closure. 


The buttons are mother of pearl buttons that I dropped in some intense pink dye when I was dying fabric awhile ago. They might have a very slight pink tint... or that might just be my imagination!


The other change I always make with the Liesl shirt is to round the curve of the hem at the side seam so that I can bind it with one continuous piece of bias binding. I find this the easiest and cleanest way to hem my shirts.

A floral woven shirt is actually a first in my wardrobe. Can't wait for the plum trees to bloom so that I can camouflage myself in a tree ;).

Not to mention the fact that shirts are about all one gets to show off in the many zoom meetings that now comprise my life. A new one is a fun change.

My daughter broke her arm this weekend! She's a trooper... and it is probably the most exciting thing that has happened to her since the schools closed.


Friday, February 7, 2020

Classic Comfy Overalls: Cone Mills Denim S-Gene Jenny Overalls

I've been planning to make some basic denim Jenny Overalls since I made my first pair. Recently I came across the 3 yards of Cone Mills denim I'd bought for this purpose, and started washing it up. 


I got it cut and started sewing, then life happened. It languished in piles around my sewing machine, taunting me. I'd sneak in a little sew here and there, and finally, 3 weeks later, they were done!


I used Cone Mills S-Gene Denim, probably 9 oz. This is a pattern that calls for non-stretch, but I was going for comfort, so I figured it would be fine. I did end up taking in the side seams a bit more than I would have for a non-stretch.

I also narrowed the legs, using Heather's tutorial for a tapered leg Jenny, and also her tutorial for side seam buttons, since I'm sort of obsessed with this look.

I used these buckles and these buttons, the ones with the tiny stars in a circle, both in antique brass finish.


The topstitching and bar tacks are done with Mara 70 thread in color 448. I think this tip originally came from Lladybird. It sort of saved me since my machine doesn't much care for topstitching thread that is any thicker than this. When I first started making jeans I bought Mara 30 in a bunch of colors but it is a battle to use it, and forget about trying to sew a buttonhole with it. 


Since I was using stretch denim, I decided to do a front pocket stay, such as the one on Ginger Jeans. I drafted the pieces using the Jenny pattern, and sewed them up in a cute clouds quilting cotton that I picked up on super sale at Hobby Lobby. 


I also made the bib facing out of my cute cloud cotton! The inside waistband is also this quilting cotton, although I didn't get any pics of it.


This is the first time I followed the directions for the straps and just turned over the edges .25 twice. I thought it would be fine with denim, but they are floppier than I'd like. Next time I'll go back to cutting double the strap pieces and sewing them together as a faced strap, it makes them much more sturdy and they hold their shape better.


They are super comfy, the denim is soft on the inside and the stretch makes movement effortless. I imagine they'll be a favorite for weekend tasks like gardening and housework and hanging with the kids. I'll probably also wear them to work on occasion, for more casual days, although I think they'd also make a statement with a pair of shiny boots and a great blazer. 


Bonus pictures of our cat Dala, preening and dozing on our Eames chair (look alike).