Showing posts with label #gingerjeans. Show all posts

Monday, February 10, 2020

Stretch Persephone Jeans, with a little help from Ginger

It's taken me awhile to warm to the high-waisted silhouette. My body and mind are adjusting, as slow as ever, to the inevitable creep of fashion. 


The Persephone by Anna Allen is the most high-waisted silhouette in my pattern library. My first pair, made over a year ago in linen, languished because they would stretch out during the course of a day and end up sagging. I fixed that recently with a length of buttonhole elastic, and now that they stay up, I love wearing them. So I decided to make another pair.


This pair is made in Cone Mills 12 oz S-gene denim. Or at least, that's what I think it is... I got it as part of a kit back when Closet Case Patterns was selling Cone Mill kits, which was a long time ago! The kit came with 9 oz and a 12 oz jeans-sized pre cut pieces, and I used the 9 oz and have reordered it multiple times. But the 12 oz has just sat in my stash, until now. Very satisfying to reclaim this stash space!


The Persephone pants pattern calls for non-stretch, and has a note that testers have used up to 5% stretch. If I'm not mistaken, Cone Mills denim usually is said to have at least 10% stretch. I thought it might work just fine for me. I've never been one for non-stretch pants... I have no tolerance for things that squish my midsection, they make me cranky. And, it worked for isewthereforeiam, and I LOVE everything she makes, so I thought it might work for me too. 


I made them one size smaller than my non-stretch linen pants. If I recall correctly, that would be a 12 graded to between a 14 and 16 at the waist. Then I sewed them up in an order that allowed the most efficient path towards fitting: Sew the inseam on each pant leg, then baste the crotch seam and back darts. Gotta love pants with no side seam! Then, try on, which allowed me to determine that an extra 3 inches removed from the waist would be ideal. I distributed that 3 inches across 2 darts and the back seam, removing 1 inch at each location. Re-tryon-- perfect!


As before, I substituted the Ginger Jeans zip fly for the button fly. I just don't see the point of a hidden button fly, somebody enlighten me on why I should go through the trouble? To use the Ginger Jeans zip fly, all that is needed is to add the fly extension onto both sides when cutting (I just held up my ginger jeans pattern to the Persephone and traced it on, extending for the longer waist of the Persephone). I used the fly extension piece from the Ginger Jeans, also lengthened. Then I followed the trusty Ginger Jeans sew along that never lets me down. 


Since I had my Ginger Jeans pattern out already, I went with the Ginger Jeans curved waistband. I'm not sure it matters, but anything that might help keep my pants up is worthwhile in my book. I cut it in the stretchy direction of the Cone Mills denim, and faced it with quilting cotton. I also added my favorite medium weight interfacing. This interfacing is mildly stretchy in one direction, and I cut the waistband interfacing in the stretchy direction which I then fused to the Cone Mills. 

When it came time to add the waistband, I basted it in first. Sometimes I find that tugging slightly on the waistband helps the fit of the jeans and keeps the waistband on a stretch jean from bagging out... not so here, my first basted version messed up all of the good fit previously obtained. So I ripped it off and tried again with no attempt at easing any of the waist in... and the fit was perfect. 

I went with the cute and barely useful pockets that come with the Persephone. I'm not in love with them, but having a pocket is better than no pocket, and it do love the minimalism of the look. They also sew up very quickly, with minimum fuss!


I hemmed them up 4 inches for a fashionably cropped look. I'm 5'4" and I think Anna Allen drafts for 5'7", so I guess I should have thought about using the shorten lines. 

All in all I think this might have been the quickest pair of pants I've ever made. I cut them out one weekend morning in about an hour, and sewed them up over the course of another weekend day, and with lots of interruptions for kids, housework, napping, etc, I still managed to finish. 

I loving them so far. Might even require the creation of truly cropped top... that would also be a first for me... 


Wearing them today with my plaid long sleeve Cielo top, Black linen Wiksten Haori, and a silk-wool black checkered scarf (just a square of fabric with fringed edges).


Saturday, August 24, 2019

Jasika Blazer by Closet Case Patterns in Herringbone Linen: A Pattern Review

I'm so happy to share my finished...


... Jasika Blazer!

When Closet Case Patterns released their blazer this winter, I'm couldn't get my copy fast enough! I had the pattern and all the notions in tidily in hand before the sew along started... and then I realized there was no way I was going to be able to immerse myself in a jacket sewing experience at that time of the year. Far too many things going on between family and my artistic/academic career. All good, but... I was sort of disappointed to fall off and then have to sit aside and watch longingly.

However, at the end of this summer, I decided that it was time to finally realize my blazer dreams of glory! The anxiety of the new academic year always has me wanting just a few fantastic new wardrobe items.

I've been wanting a linen blazer for years now. Well, at least since I became aware that linen and blazers were a thing. I have never found one in the store even worth considering purchasing within my meagre wardrobe budget. Even if I found one, it would have been very unlikely to fit since blazers almost never fit comfortably around my quite significant armpits and biceps, and in order to get a comfortable fit in the arms I have to size up until the shoulders look ridiculous. I got into blazer sewing early in my sewing career largely because my arms are such a fitting problem in RTW.

Over the 8 years or so that I've been sewing intensively I've made a number of blazers and coats using both traditional and "fast" tailoring methods. I'm entirely self-taught, from books and online resources. Almost all of these makes have been patterns from Simplicity, Burda and Vogue. In every one, fitting has been a total nightmare-- I've done multiple muslins and re-drafted parts of the patterns to get them to fit the way I want them to. Worse, the directions in these patterns are, as I've said before, worse than useless. There's always a number of points where the sewist is left in the dark, problem-solving some sewing quandary with a mix of ingenuity and internet searching. I always appreciate a good challenge!


It is probably no surprise that sewing the Jasika blazer was nothing like these past experiences. 

First of all, the pattern itself is drafted to fit the dimensions of a real female body. At least, one like mine! My first muslin, based on my dimensions, was a 16 bust graded to an 18 waist/hip. The overall fit was quite close to being correct. However... it wasn't quite perfect...!

The biggest problem was that I was quite far from being able to button it (3 inches) which is pretty much entirely due to the fact that I now carry extra weight in front. Thank you babies! Everything else was pretty close... the darts were angled correctly and ended in the right place and produced an acceptable amount of volume for my chest. I didn't want to just add to the side seams, since this would have meant messing with the bust and pockets. I ended up doing a "full tummy" adjustment. My one tiny disappointment was that this issue was not addressed in the "fitting ebook." Certainly I'm not the only woman out there with a tummy? Anyhow, the internet provided a solution. For some reason I only found it in reference to men's suits and shirts, for example, in Seamwork's guide of "common pattern adjustments for men." The illustrations below show what I ended up doing. I don't know if this was the right or wrong thing to do, but it seemed to work because I could now button my jacket, and the bust darts still looked right. 


I also was concerned with the tightness of the armhole. I tried a full-bicep adjustment which is often necessary for me, but this in this pattern it added volume that didn't seem to be necessary. I also tried scooping out the bottom of the armhole by .5 inches, and this didn't seem to help and it made mobility worse. I ended up adding .25 inches to the back side seam, starting below the armpit and ending near the hip, to take a bit of tightness out of the back, and this also seemed to help shoulder mobility. So I decided that maybe it would be okay? Spoiler alert-- it was not okay, and I ended up altering late in the process, which sucked!


The fabric I decided to use was a herringbone linen that I've had in my stash for about 6 years from Marcy Tilton's online store, just waiting for the right blazer to come along! It is a gorgeous weave with sky blue threads in one direction and beige in the other, giving the surface an almost silver-y look. Back when I had been considering starting a Jasika with the sew-along in the winter I had selected a tweedy wool that was less "precious" to me than this linen, but in the moment I decided to just go for it. This linen is *mostly* opaque, but perhaps just a bit of light comes through if you hold it up to the sun... so I was left scrambling to switch out my dark interfacings and notions for lighter ones, both color and weight. Fortunately I had the perfect light-weight, light colored weft interfacing in my stash. I could not find my light colored knit interfacing, so I decided to just skip it! I hate not doing anything Heather suggests, but I thought I might get away with this.


I love to immerse myself in projects... so I sewed this mostly over the course of a single week, with cutting done on the big tables at work and most of the sewing crammed into a single weekend. I might have ignored such mundane tasks as cleaning my house and laundry!

Mostly, things went very smoothly. The thought put into the pattern, direction booklet, and online course was incredible, and all of this was clearly visible in how cleanly and smoothly things came together. I loved how I could watch a video, then just follow the steps in the instruction book and the two would match up, step for step. I did totally screw up the first double welt pocket... in the future I'll measure rather than rely on the pattern pieces since the welts have to be exactly .5 inches, so that when you sew them down the middle, you end up with two .25 inch welts taking up the opening. I think mine were a touch too wide, throwing off the entire pocket. I unpicked and the second try came out acceptably.


The collar and collar stand came together so incredibly beautifully. The shape of the collar stand is genius. The very precise sewing instructions made all the seam allowances press perfectly. This all added up to the most gorgeous collar I've ever sewn, with almost zero frustration. 


I also had another "duh" moment as I was attaching my front facing to the jacket front. I couldn't figure out why things weren't matching up... then I realized I had forgotten to make the full-tummy adjustment that I had made on the front jacket piece on the front facing (palm slap to forehead!). Rather than unpick my whole collar, I ended up adding a wedge of fabric to my front facing. Let's just call this an impromptu design line! 

Another area where this pattern really stands out from the rest is in its very precise and thoughtful instructions on interfacing and support. This is such a vague area on other blazer and jacket patterns I've sewn, with decisions on this very important area left up to a sewist who was probably hoping for a bit of guidance. I loved that there was a very clear interfacing guide in the instructions and significant time devoted to the subject in the online course. 

I also really appreciated having Heather demonstrate proper pressing techniques. Can you believe that I've never really known the correct usage of the seam roll that I've owned for years? 

The back vent was another area that was just so thoughtfully worked out, and it came together beautifully. In every other jacket I've made, the back vent has been a stumbling point for me, I always struggle to get it to lie correctly, and connecting the lining is generally problematic. This vent was so well thought out and explained that it went as smooth as butter. 


I LOVE that patterns were included for shaped sleeve heads and shoulder pads. I made my shoulder pads out of flannel and lambswool, and I made the sleeve heads out of a double layer of flannel. The shaped sleeve head is such an elegant solution, I can't believe I've never seen one before. 

I added the lining and tried it on... and the armholes were even tighter than they were on my muslin. It was just a touch too tight through the armhole, sleeve, and back. It occurred to me that I'd never be able to get it on comfortably over a long sleeve shirt. So I went back in and took out the back side seam and the back arm seam 3/8inch. Unfortunately, doing this after the armhole was already graded meant I had to add little wedges of fabric to the seam allowances. Totally time consuming and annoying. But in the end, it did the trick. When I put it all back together again the fit was perfect, with room to layer a long sleeve shirt. 


I also changed up my sleeve lining. My lining fabric is a gorgeous rust-orange linen, but this clearly wasn't working in the sleeves-- it was causing too much bulk and the friction between the two linens was causing the sleeve to rumple in an unflattering way. I solved this by re-cutting the sleeve lining in rayon bemberg, and making a cuff-facing out of the rust linen so that the linen would show when I rolled the sleeves. 

After these changes, the finishing touches came together quickly. I made a corded buttonhole for the first time, and the final press did wonders for wrinkle-prone linen. 

In looking back over the experience, I really enjoyed making this blazer... the incredible attention to detail in the creation of the pattern, instructions and course made it a very rewarding process to sew. It was also gratifying to see that many of the self-taught techniques that I use are right on track, and I learned things that helped to fill in gaps in my knowledge. I wish this pattern and course had been available years ago, it would have saved me so much frustration and trial and error. 

Having a new blazer has me waiting impatiently for fall to set in! 


My new Jasika is worn in these photos with my white Ginger Jeans, a short sleeved Liesl and Co Classic Shirt, and my Hasbeen sandals. 

Wednesday, June 13, 2018

Sewing for Summer in Cool Blues and Whites

I've been dreaming about summer sewing since the first hints of warmness came in on the wind this spring. The color palette was embedded in my mind... cool blues, whites, and stripes, all in linen. Blues the color of the Atlantic ocean-- just a bit moody, tending towards gray. A classic summer palette.


Interestingly enough, I have never owned a pair of white pants. NEVER. Always seemed a bit too risky. Khaki yes, but pure white, never. Adding white shirts to my wardrobe has made me bold... 6 months and counting, and I haven't ruined one yet. Maybe, just maybe, I can manage to keep a pair of white pants respectable for at least awhile.


I've had a rather large piece of natural colored Cone Mills denim in my stash for ages now... I had thoughts of dyeing it, but that hasn't happened. So, I made some of it up into a pair of Ginger Jeans. 

This is my now TNT jeans pattern, and it will be the 5th pair I've made. The first two had significant flaws, but the next two were pretty darn awesome, and I think the fit on this one may be the best yet. The toughest thing about jeans is that darn break-in period. If they're too small and they don't break in... that's the end of it. Lately I've been making them just a bit big, then having to go back in and take them in when they break in and end up too loose (which is a tedious task with jeans). So with this pair, I made them just a tiny touch tight. We'll see how that goes. 

You can read my other jeans posts here and here, but to summarize I've modified my pattern with a full bum adjustment, deepened the back crotch curve for additional butt fitting, and done a HUGE sway back adjustment. I interface the waistband with weft interfacing cut in the stretchy direction, which creates a nice firm but malleable waistband. 


New for this pair... I created a bit more space for my calves. I just widened the side seam a bit where I needed the space, but I might try a full calf adjustment next time, because I totally love the effect. I think that tightness in the calves might be encouraging my jeans to ride down over the course of the day.

I decorated these with copper hardware and gold bar-tacks. I added a little striped "label" over one pocket for a faux designer touch. 


I hemmed these jeans just a bit on the short side. I sort of hate the trend towards cropped pants because I hate having cold ankles for the 9 months of the year that it is chilly here, but I suppose white jeans are really summer pants, and I can wear boots in the winter. 

I made the pocket stays with striped linen left over from making the shirts. In certain lights, you can see the stripes right through the denim, yikes! I didn't think that was going to be a problem with denim, I would have expected it to be completely opaque. Next time I'd be more careful to use a light solid for the part of the pocket stay that is in contact with the denim. I also used the striped linen to do a bias tape finish on the waistband, borrowed shamelessly from the Sasha Trousers pattern. 


The shirts are all from the Liesl Classic Shirt pattern, you can read my post about the pattern here. I made these shirts with extra ease, for summer breezy-ness. The pattern only comes with long sleeves, but I'm experimenting with making a short cuffed sleeve. I think the sleeve on the 1/2 inch striped shirt is a bit long, but it can easily be rolled.


The blue striped shirts are both made from linen from the fabrics-store.com. The light blue long sleeve one is made from a finer grade linen that is just dreamy, and I used real shell buttons that I bought in Italy. It has a wonderful casual, luxurious feel. I love the menswear vibe of the blue and white stripe, especially when glammed up with the white denim and a red lip.


I was noticing that some of the collars on the linen shirts I was wearing constantly all winter had puckered a bit. Not so much as to make them unwearable, especially since I usually wear them un-ironed with a bit of linen rumple. But it bothers me. I was using Fashion Sewing Supply's Pro-sheer Elegance Medium fusible interfacing, which they swear doesn't shrink, and I pre-wash all linen fabrics 3 times on hot with 3 times in the hot dryer. After sewing they are always hung to dry. Something has obviously shrunk though, because I can't think what else would cause a pucker like that on only the interfaced portions of the shirt. 

What to do-- use sew in interfacing! So these new linen shirts use sew in interfacing in the collars and cuffs-- Fashion Sewing Supply's Lightly Crisp sew-in. We'll see how that holds up. Using the glue-stick baste method, it is even easier to use than the fusible. I still use the fusible on the plackets though. I could probably switch there too, come to think of it...


I finish the hems with handmade bias tape. I just love the bias finish with the stripes!


The beige and blue shirt is made from a double gauze that I brought back from Rome. I'm not totally convinced on double gauze for summer, it seems rather clingy to me, but it is wonderfully soft. The buttons that I used are super-thin shell buttons and I'm sort of regretting using them, they pop open all the time. I guess I should have made the button holes just a touch smaller. I guess I could replace the buttons... but sewing on all those buttons all over again is not an enticing task. 


I actually made a second pair of white pants. These are 7.1 oz linen, with a knit waistband. My own pattern, so comfy. These will definitely be my go-to pants for lounging about this summer. I need a few more pairs!


Is anyone else in love with cool blues and stripes this summer?

Tuesday, March 13, 2018

A handmade 10x10 wardrobe... for 7 weeks and counting!

Hello from Rome! I apologize for not posting for ages, but my excuse is that I've been a bit preoccupied with the joys and trials of living abroad. 

Since the focus of this blog is sewing and DIY projects, I don't talk very much about my daily life. However, you may have picked up on the fact that I'm an artist and a professor, and I primarily teach photography and video. This semester I'm teaching abroad in Rome, Italy. I'm about halfway through my four month stay. 

And that brings me to the topic of this post, a winter 10x10 wardrobe challenge. The 10x10 wardrobe challenge was the idea of Lee Vosburgh of Stylebee, and it's gotten a lot of attention in the sewing community. The idea behind the 10x10 challenge is to really take a close look at your wardrobe and to choose 10 pieces to live with for 10 days. In a commodity culture with easy cheap fashion all around us, the 10x10 is an exercise in minimalism and an opportunity to slow down.

Those of us that sew often invest an incredible amount of time, energy, and money into the pieces we make. There are many reasons to sew wardrobe items, but many of us are interested in sustainability and in creating pieces that fit our bodies and our personal style in ways that mass produced fashion is unable to do. 

This time I decided to really hone down my packing... I really wanted all of my clothes to fit into one carry-on size suitcase. And I had to pack for two seasons! That means I pretty much was unable to take more than 10 winter items. So far, I've been living with these 10 winter items for about 7 weeks!


Here are my 10 items. Most of these are unblogged... admittedly, I had a huge sewing spree right before I left!

Black merino wool cardigan

The Lisbon Cardigan by Itch to Stitch in midweight merino wool from The Fabric Store. I love the Lisbon pattern, it is such a classic design, and it is beautifully drafted. You can seem my review and another version here.

I finally decided to try merino wool from The Fabric Store this fall-- it is of the highest quality, and sustainably produced. However, I can't wear it against my skin comfortably. I made a long sleeve t-shirt from the 180gsm Premium and it didn't make the cut because I'm just too sensitive to wear it without a silk undershirt. But it makes a lovely cardigan.

Gray cashmere asymmetric cardigan

This piece has been in my collection for at least 5 or 6 years, I think I probably made it in my first year of sewing for my wardrobe, before I started blogging regularly. It was a very long, drapey cardigan, but I refashioned it this fall to be a little more practical. The fabric is just incredible, I purchased it from Marcy Tilton and I've never seen anything like it since. It is a double-layer knit, with the two layers loosely sewn together. It is the warmest, softest fabric I've ever seen or felt.

Black fine linen shirt

My favorite shirt ever. Made with the Liesl Classic Shirt pattern in fine linen from The Fabrics-store, with jet black corozo buttons. My review of the Liesl Classic Shirt pattern is here. This is their "IC64" linen which is a medium weight but has a higher thread count. It is just a bit classier and has a lovely feel.

White fine linen shirt

The fact that I can in fact wear white is a revelation-- I always thought I would just spoil a white shirt on the first wearing. As it turns out, I wear this shirt once, sometimes twice a week and it has been just fine. I do try to avoid wearing it on days when there is a high likelihood of staining (like when I'm cooking, or when I'm with the kids all day). I also avoid anti-perspirant deodorants when wearing white to prevent yellowing- either I go with a natural brand or I go without.

There is just nothing like a crisp white shirt. As above, this is the Liesl Classic Shirt pattern in IC64 linen from The Fabrics-store, with extra thick shell buttons.

Black stretch twill Sasha Trouser/Ginger Jeans hybrid

These are my favorite pants ever. I like the classiness of the Sasha Trouser, but quite honestly, I hate those slash pockets, they just bag out on me in the dorkiest way no matter what I do. And I guess the reversed fly is classic, but I can't get used to it. So I used the front of the Ginger Jeans pattern for the curved pockets that lie nice and flat against my body and the unfussy fly, and the back of the Sasha Trouser pattern for the classy welt pockets and darts. If you are interested, this is my review of the Sasha Trouser and the Ginger Jeans (both by Closet Case Files). Since they are both drafted on the same block, they are pretty interchangable!

The stretch twill is from Elegant Fabrics in New York. I couldn't find a truly wonderful black stretch twill at any of my usual online shops, and that wasn't for any lack of trying (swatching, even ordering a few pieces). When I had to be in New York City to obtain my visa, I dropped into Elegant Fabrics and fingered their twills until I found this one. It is lovely-- beautifully stretchy, weighty but not heavy, and velvety soft. There was just enough on the roll to make one pair of pants!

Black tencel twill shirt

Same pattern- Liesl's Classic Shirt, in a gorgeous tencel twill from Threadbare Fabrics. This is the same fabric that I made my long sleeve Kalle in, but the fit on the Kalle is not quite right somehow. So glad I had another piece of this twill (it has sold out!), and in the Liesl pattern this shirt is amazing.

Cream tencel twill shirt

Yes, another Liesl Classic Shirt, in a creamy tencel twill from Emmaonesock. I love subtle color and the silk-like texture, but it is much easier to wear and wash than silk.

Black Ginger Jeans

Another new make! This is a denim from Mood Fabrics. I can't tell you much about it, I just went and fingered all of the denims until I found one that felt right, and since it was a classic off-black denim, I overdyed it with RIT. I added red bar tacks, just for fun. Ginger Jeans by Closet Case Files review here.

Black Dansko Aurora Boots

These are oddly perfect boots for my feet. I can't even wear the famous Dansko clogs-- I have a pair at home that I need to just sell, since they are basically unworn and I find them too stiff to wear. I can't really explain it, but I can walk miles in these boots, unlike any other shoe or boot I've tried. In Rome, where transportation can be spotty, one does literally end up walking miles. I think it might have to do with the toe box being unusually roomy, my feet love that, and the soles have just the right amount of stiffness and flexibility.  I don't love the slouchy style, but I can bear it if my feet are happy. I wore the first pair into the ground, this is my second pair, purchased on Ebay.

Brown Dansko Scout Boots

These are my back up boots. When I first got them I thought they were terribly uncomfortable, but they've broken in well and are my favorite boots when not in Rome. I love the warm reddish brown color. However, on days when I know I'll be hiking it, I wear the Auroras! Purchased like new on Ebay.

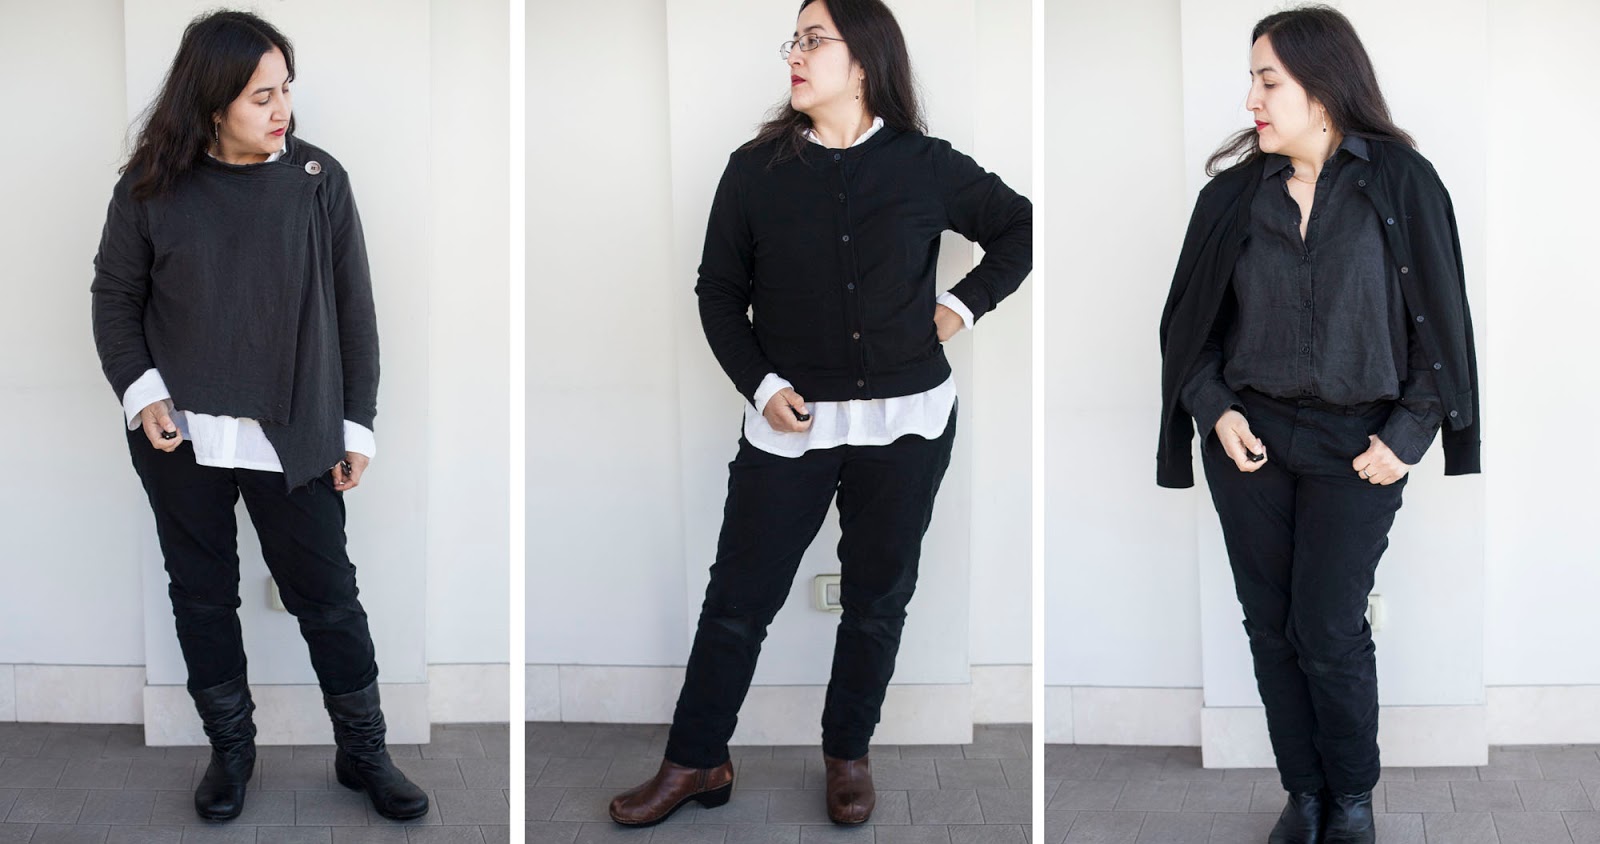
10 pieces, 10 looks


Style Notes

I love the simplicity of dressing with these 10 pieces. Everything goes with everything... really and truly. There is only one one real decision-- white shirt or black? If I'm spending the day with the kids, or it is that time of the month... black! If the sun is shining and there might be an opportunity to strut in a piazza with my jacket thrown over my shoulder-- white! Otherwise, it really doesn't matter.

Also, doing laundry is also incredibly simple. White wash, black wash. No special care needed, just wash cold and hang to dry, on hangers. The linen and tencel shirts mostly dry overnight. I keep oxyclean on hand for any accidents on the white shirts, and I have had to use it, to excellent effect.

Keeping the wash simple is especially important here since there are no DRYERS. Which is totally fine for my clothes, which I never dry anyway. However, this totally sucks for endless loads of kids clothes, towels, sheets, etc. I understand the energy savings of a city without dryers, etc, but was the person who decided on this policy a working mom?

In the interest of full disclosure, I do have two black linen shirts with me (both the same pattern), and two pairs black Ginger Jeans. This is does help make laundry a bit less stressful, especially since the jeans can take 2-3 days to dry completely. Also, I've had to alter one pair... the waistband on the newer pair of jeans stretched too much and I had to take it in an inch, by hand. That pair was out of commission for a good two weeks. (I miss my sewing machine-- I even considered talking it somewhere and having someone do it for me, but I couldn't quite bring myself to do that with my handmade jeans!) I also have a pair of cargos and a blue denim Kalle that I wear on weekends or evenings, for hanging out around the house or running errands in the neighborhood.

I am a total fan of the button down shirt. I love its versatility-- it looks great dressed up or down. I totally feel appropriate every day, whether I'm lecturing, chilling at a bar, or splurging on an aperativo in a classy location. I love that its cuffs and plackets allow for easy styling of totally different looks, and also provide instant temperature control.

I also think linen is the perfect fabric, summer and winter. Linen dries fast and stains come out with very little effort. The shirts have wonderful texture when hung to dry, but can also be pressed with steam for a crisp look. Linen is so incredibly cool in the heat, and I've found it to be surprisingly insulating in the winter, especially when paired with a wool cardigan or sweater. In really cold weather, I wear a silk undershirt for extra coziness. I do want to try making some shirts in a really lovely cotton which I might end up loving also, but I didn't quite get to that before I left.

I know for many people, my palette of white, black and gray would be too plain. For me, though, while I love looking at bright colors and patterns, I don't always feel the need to wear them. When I have a lot of patterns and colors in my wardrobe, I tire of them and want new colors and patterns. Also, I worry that people will notice if I wear the same pattern over and over again-- but if you wear a button down shirt every day, no one thinks you don't do your laundry. Oddly enough, I'm much LESS bored with my wardrobe this time than I was the last time I was abroad for a semester when I brought lots of patterned t-shirts.

My white/black shirts and black pants are a personal uniform, and at this time and place in my life, this is sort of liberating. It is sort of like a blank canvas, over which I can be myself.

Lately, if I feel the need for color or pattern, my favorite way to express myself is to wear a bright lipstick. I thought perhaps if I was bored I would buy some fun scarves or jewelry, but I haven't felt the need.

I love living with this smaller, simpler wardrobe... and now I'm wondering if I'll be able to translate that into reducing my wardrobe when I return home.


Tuesday, August 29, 2017

Summer of basics: Final three!

For the Summer of Basics Make-Along at Fringe Association, I need to choose my favorite 3. So here they are, being worn together!


It was a hard choice because I ended up making so many great basics this summer, but if I have to pick, it would be my rust charmeuse cami, my black ginger jeans, and my black rayon twill Kalle shirtdress. (Click on the links to see the posts on each of these)


I love the cami because I drafted it myself to fit over my beloved racerback bras, and I can make it out of a luxurious slippery fabric like silk and the racerback will NEVER creep off my slopey shoulders. It is also a nice, thick, sturdy silk that is not likely to tear and has been pre-washed so that it won't require any special care.


The black Ginger Jeans are an obvious pick. These are the most comfortable jeans I've ever made! Black jeans are great for dressing up and down, and I'm sort of in love with the black-on black topstitching and matte black rivets and jeans button.


The black Kalle shirt dress is a wardrobe staple that I'm not exactly sure how I've been without for so long. It is just such a versatile piece.


The drapey rayon twill is really lovely to wear, and I love all of the fun shirt details, like the scrap of silk I used on the inner yoke and the smoke gray real shell buttons. 


I also love how I can change the look by adding a belt, or wearing it unbuttoned over a cami or tee.


So those are my pics for #summerofbasics, #sob17finisher, #sob17bestcombo. 

I think I'm not done with basics, quite honestly... fall is approaching, and I'm thinking about making a button-down shirt with sleeves, such as the Grainline Archer or the Liesl Classic Shirt. 

What are your favorite basics for summer/fall?

Monday, August 28, 2017

Black Ginger Jeans-- Summer of Basics

One of the most worn items in my closet are my jeans, especially my black ones. There is a pair of black jeans in my wardrobe that is so comfortable that it might be endowed with a trace of supernatural powers. It's been my favorite pair for 5 years, and there are periods where I have worn them almost every day. They've fit me through some pretty dramatic body changes-- I haven't worn them when I was pregnant or directly postpartum, but they are they first jeans to fit when things start to fit again. 

I bought another pair of jeans at the same time I bought the "magical" pair, in a slightly different colorway, and they just aren't as magical. I've tried to buy the same ones, but I can't find the exact same ones, and similar cuts of the same brand just don't fit the same. (If you are curious, the original two pairs were NYDJ, bought at a somewhat unbelievable price on Amazon... so I'm not even completely sure they are NYDJ, or they could have been seconds or something.)


Of course the first thing I did when I got my Ginger Jeans pattern was compare it to my favorite jeans, and the cut is remarkably similar. However, when trying to reproduce a favorite pair of jeans, it seams like finding, or making, a good pattern is only part of the problem. 

One of the big problems is the HUGE variation in denims. The thickness and the amount of stretch and recovery varies widely. My "magical" pair is made of a denim that is quite thick, has lots of stretch, and has incredible recovery. I've never found any denim on the market that is quite like it. I've also sampled lots of twills, since the "magical" pair is a black-black shade which means it is either an overdyed denim or a twill, but the stretch twills I've sampled are even farther from the mark, even the ones that are marketed as particularly pants-worthy. Cone Mills denim is widely cited as some of the best out there, but it is not a super-stretchy denim. My first pair of jeans was from Cone Mills denim, and while there are lots of improvements I can make in fit, I'm not altogether convinced that I'll ever make a pair that are super-comfy from Cone Mills. 


These are made from the Black Turkish Denim from Threadbare Fabrics. This denim is thick without being too thick, and definitely stretchier than Cone Mills. I have high hopes. 


I also made the fit more relaxed. The fact is, my "magical" pair are not skinny-skinnies, which is probably why they are my favorite pair. In the Ginger jeans pattern, I cut a straight 14, which is pretty much my size by the numbers right now. 

I did a 1/4 inch full belly adjustment, but I think that might have been somewhat of a mistake, because when I baste-fit them, there was too much fabric in the front crotch. I ended up taking material away from the front crotch curve to correct this. 


In baste-fitting, I decided that a full bum adjustment might be helpful, since it felt like the back waistband was being tugged down. Using Heather's suggestions for a quick and dirty full bum adjustment, I added 3/8 at the top and bottom of the back crotch curve, making the seam allowances there a scant 1/4 inch. I also deepened the J of the back crotch curve. These changes seemed to really improve the fit for me. Next time I will definitely factor this in when cutting.

I made was to make the waistband facing out of the same stretch denim. Previously I've gone with quilting cotton for the waistband facing. Since I'm going for comfort, I decided that stretchy was the way to go. 

With all these changes plus the stretchier Turkish denim, I ended up taking the side seams in an extra 1/4 inch on both sides, from the waistband to mid thigh. 


I went with black topstitching on this pair, and I didn't even bother switching to topstitching thread. It made things go soooo much faster to not be switching thread all the time. These were by far the fastest jeans I've made, they went together in record time.


The rivets and jeans button are the lovely matte black ones that Angela Wolf carries on her website. I found these rivets harder to install than other rivets, the posts seemed to blow out through the caps half of the time, but I could just be out of practice. I blew through nearly the whole packet of 10, but ended up with 5 decent ones in the appropriate places. 

I've entirely given hope that my machine will sew an automatic buttonhole on a jeans waistband so I didn't waste time trying this time. I sewed the buttonhole with the zigzag stitch on my machine, following a hand drawn guideline. 


The weather is just now getting cool enough to be true jeans-wearing weather, so we'll have to see how these hold up. I have high hopes that they'll be a hit this fall! I would really like a black-black pair, so I have some more of this same denim on order, as well as some black dye!


Do you have a favorite pair of jeans? Have you tried to replicate them, either through buying or making a similar pair, and have you had success?