Saturday, March 31, 2018

Flower Print Eggs: A Natural Egg Dyeing Tutorial

Flower Print Eggs with Easy Natural Dye
using ingredients you'll find in the kitchen and pantry


---------------------
Dyeing Eggs in Rome, Italy, Spring 2018

When I was growing up, we always used those supermarket kits with little tablets that dissolve in water and give brilliant colors. But after having kids, trying to do things in a way more inspired by natural materials and processes became really important to me, and dying eggs with chemical dyes just wasn't appealing. 

So, I first made nature print eggs using natural dyes two years ago, when my daughter Lily was 4. She's now 6, and I have a son who is 3... and we're still using natural dyes to do our annual egg coloring! 

This year we're in spending the spring in Rome, Italy... and we dyed eggs using our favorite methods here! It worked beautifully.


The cheapest pantyhose I could find was 2 euros a pair. I could only find brown eggs at the supermarket! After the fact I've seen white eggs in other stores, but the brown eggs came out quite lovely. 


Unwrapping is the best part.


The original post from 2016 follows... read on for the photo tutorial!

----------------------


I've been a bit obsessed with decorating eggs with natural materials and dyes this year. It's great to do with my four year old daughter. I also love how they capture some of the ephemeral beauty of spring!


The most beautiful results have been with flowers. I had no idea they would turn out so beautifully!

Here's how you do it. It's very easy, a great project for kids or adults.


You need:
--Nylon pantyhose
--String
--Eggs (You can use blown eggs or raw eggs)
--Flowers
--Natural dye plants-- this year I used red cabbage (1/2 head), yellow onion skins (from 3 lbs of onions), and powdered tumeric (about 2 tablespoons).
--White vinegar

Where to get flowers in early spring? This year in the Finger Lakes we found hellebores, crocuses, and snowdrops in the garden and in the nearby woods. If you are gathering wild flowers, make sure to only pick a few so that there are lots left to make seeds. You can also use store bought flowers-- supermarket bouquets that are a bit past their prime (and on sale) would be perfect.


Position a flower on your egg. Use water to moisten the petals and help them to stay in place.


Wrap the egg with a piece of nylon pantyhose. Pull it tight around your egg, holding the flower flat against the surface. Tie with a piece of string.


Prepare your natural materials. For the onions, peel off the outer papery layer. For the cabbage, tear the leaves into chunks, or roughly chop.

Purple cabbage and the nylon wrapped eggs in the stock pot. Those blown eggs want to float!


Place the dye material in a large stock pot, and fill with cold water so that the eggs are covered. Bring to a boil. Allow to simmer for at least 1 hour. After one hour, turn off the heat, add 2 tbsp of vinegar per pot and allow the eggs to sit in the colored water until the desired color is reached. If you want a dark color, you might need to let it sit overnight.

The added benefit of this method is that your raw eggs will be hard boiled without an extra step. If you are dying blown eggs, you might need to put something on top to keep the eggs submerged-- a lid from a smaller pot might work.

Then, cut the nylon and peel off the flower to see your beautiful results!

Alternate method (or a method to keep the dying fun going): Boil the dye materials in the stockpot until reduced to about 1 quart of liquid. Strain and reserve the liquid. To dye your eggs, submerge for a couple hours or overnight, depending on how concentrated the liquid is and how dark you want your eggs.

Dying eggs in canning jars with the strained liquid. Left to right: onion peels, tumeric, purple cabbage.
Here are some results to give you an idea of how your eggs will turn out.


Above: Crocuses with purple cabbage, Crocus on an egg dipped in the onion skin dye then soaked in tumeric, snowdrows on an egg soaked in onion skin dye, hellebores on a egg simmered in onion skin dye. 


Above Left: grass in red cabbage dye, Above Center: leaves in tumeric dye, Above Right: Crocus in red cabbage dye.

Other natural materials work well too! The left egg is myrtle, the other two are weeds in our yard. All of these eggs were simmered in onion skin dye.

It is fun to experiement! This was a very unexpected result... we soaked some eggs in cranberry juice, and they came out not at all red, but etched, looking almost like fossils. Must be some kind of reaction at work, anyone know the chemistry of this? I can't really recommend it thought... the eggs in that batch are very fragile, three have broken already!


Another lovely flower egg: Hellebores in red cabbage dye.


Have fun! I would love to see your results, post them at instagram and tag @unlikelynest, #flowerprintegg.


Friday, March 30, 2018

Bunny Loveys made by you!

It's bunny season! My sewing machine is a thousand miles away, so I'm sewing vicariously with all of you who are making the Bunny Lovey pattern this spring. There are so many lovely variations, from classic to creative!

I'm just loving these Bunny Loveys made in Sherpa, they just look so snuggly soft! These are from Cedar Bee Made and Martin N. Mae.
A post shared by Cedar Bee (@cedarbeemade) on
A post shared by martin.n.mae (@martin.n.mae) on

Is there anything so sweet as a white white bunny? So classic and adorable. These are by Sunday Design Studio and Bethany Wells (Mama Sew Colorful).


What fun prints! Just loving these bunnies in fun prints by Lil Things by Aimee and Lori Sapp.

And, take a look at these designs that incorporate fun colors, fabrics, and textures by Charity Sue Design and Brandi Henderson (SixThirtyStitch).


Here are a few more designs by Melissa Barnett of martin.n.mae. She chooses such wonderful prints.

A post shared by martin.n.mae (@martin.n.mae) on
And here are a couple of designs by Sunday Design Studio. I love how they have such a distinctive modern style.

Aren't these sets by Rainbow Hill Designs just lovely? What an incredible present for a new tiny person.
Are you inspired yet? There's still time to make a Bunny Lovey, you can get the pattern here.

Tuesday, March 13, 2018

A handmade 10x10 wardrobe... for 7 weeks and counting!

Hello from Rome! I apologize for not posting for ages, but my excuse is that I've been a bit preoccupied with the joys and trials of living abroad. 

Since the focus of this blog is sewing and DIY projects, I don't talk very much about my daily life. However, you may have picked up on the fact that I'm an artist and a professor, and I primarily teach photography and video. This semester I'm teaching abroad in Rome, Italy. I'm about halfway through my four month stay. 

And that brings me to the topic of this post, a winter 10x10 wardrobe challenge. The 10x10 wardrobe challenge was the idea of Lee Vosburgh of Stylebee, and it's gotten a lot of attention in the sewing community. The idea behind the 10x10 challenge is to really take a close look at your wardrobe and to choose 10 pieces to live with for 10 days. In a commodity culture with easy cheap fashion all around us, the 10x10 is an exercise in minimalism and an opportunity to slow down.

Those of us that sew often invest an incredible amount of time, energy, and money into the pieces we make. There are many reasons to sew wardrobe items, but many of us are interested in sustainability and in creating pieces that fit our bodies and our personal style in ways that mass produced fashion is unable to do. 

This time I decided to really hone down my packing... I really wanted all of my clothes to fit into one carry-on size suitcase. And I had to pack for two seasons! That means I pretty much was unable to take more than 10 winter items. So far, I've been living with these 10 winter items for about 7 weeks!


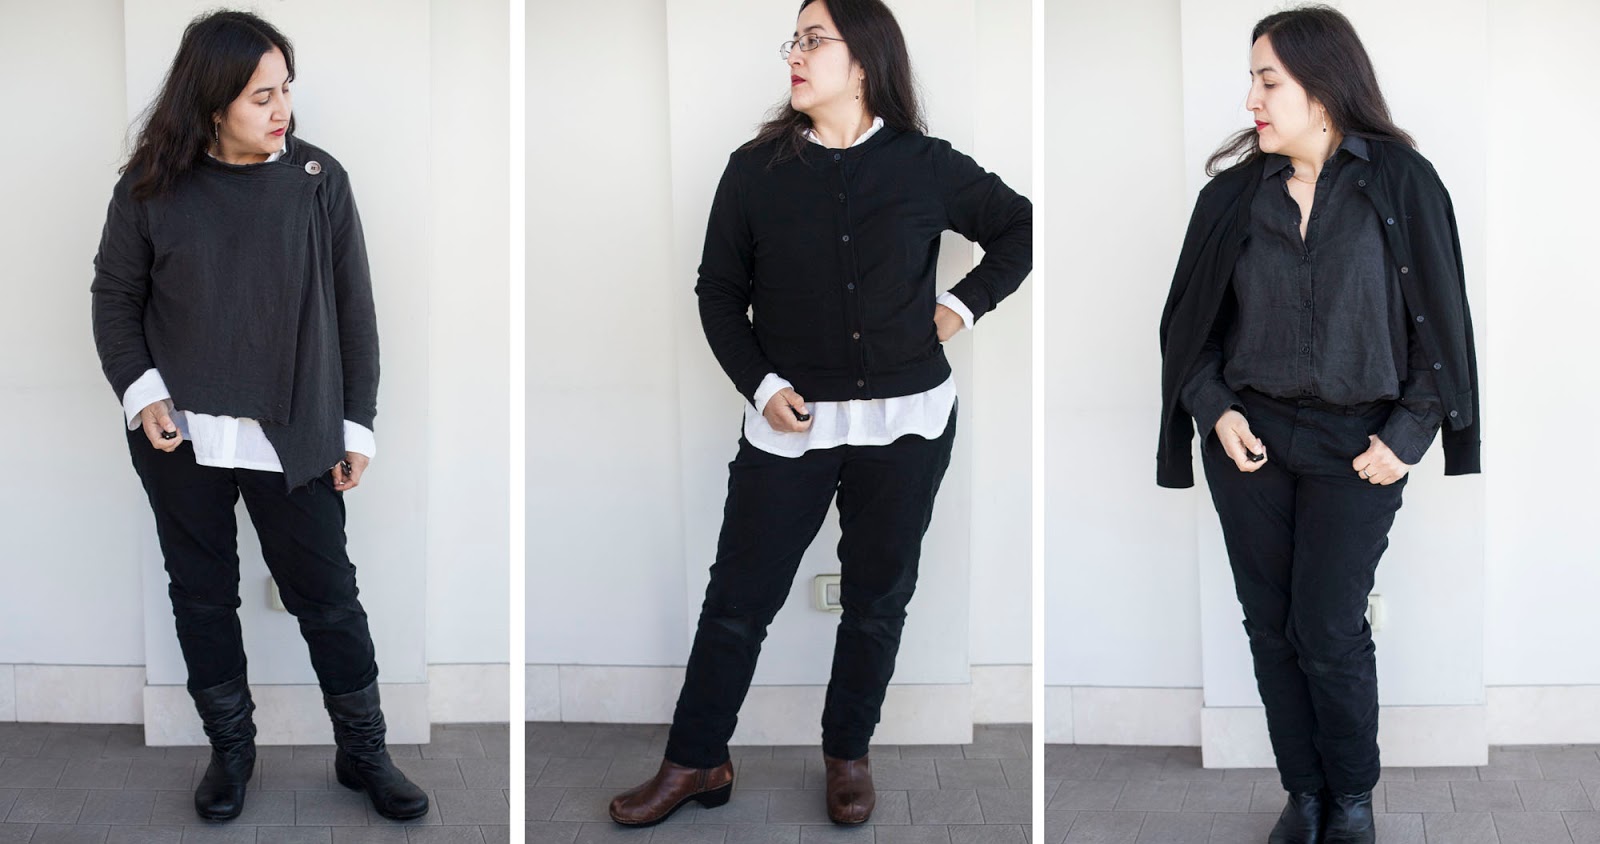
Here are my 10 items. Most of these are unblogged... admittedly, I had a huge sewing spree right before I left!

Black merino wool cardigan

The Lisbon Cardigan by Itch to Stitch in midweight merino wool from The Fabric Store. I love the Lisbon pattern, it is such a classic design, and it is beautifully drafted. You can seem my review and another version here.

I finally decided to try merino wool from The Fabric Store this fall-- it is of the highest quality, and sustainably produced. However, I can't wear it against my skin comfortably. I made a long sleeve t-shirt from the 180gsm Premium and it didn't make the cut because I'm just too sensitive to wear it without a silk undershirt. But it makes a lovely cardigan.

Gray cashmere asymmetric cardigan

This piece has been in my collection for at least 5 or 6 years, I think I probably made it in my first year of sewing for my wardrobe, before I started blogging regularly. It was a very long, drapey cardigan, but I refashioned it this fall to be a little more practical. The fabric is just incredible, I purchased it from Marcy Tilton and I've never seen anything like it since. It is a double-layer knit, with the two layers loosely sewn together. It is the warmest, softest fabric I've ever seen or felt.

Black fine linen shirt

My favorite shirt ever. Made with the Liesl Classic Shirt pattern in fine linen from The Fabrics-store, with jet black corozo buttons. My review of the Liesl Classic Shirt pattern is here. This is their "IC64" linen which is a medium weight but has a higher thread count. It is just a bit classier and has a lovely feel.

White fine linen shirt

The fact that I can in fact wear white is a revelation-- I always thought I would just spoil a white shirt on the first wearing. As it turns out, I wear this shirt once, sometimes twice a week and it has been just fine. I do try to avoid wearing it on days when there is a high likelihood of staining (like when I'm cooking, or when I'm with the kids all day). I also avoid anti-perspirant deodorants when wearing white to prevent yellowing- either I go with a natural brand or I go without.

There is just nothing like a crisp white shirt. As above, this is the Liesl Classic Shirt pattern in IC64 linen from The Fabrics-store, with extra thick shell buttons.

Black stretch twill Sasha Trouser/Ginger Jeans hybrid

These are my favorite pants ever. I like the classiness of the Sasha Trouser, but quite honestly, I hate those slash pockets, they just bag out on me in the dorkiest way no matter what I do. And I guess the reversed fly is classic, but I can't get used to it. So I used the front of the Ginger Jeans pattern for the curved pockets that lie nice and flat against my body and the unfussy fly, and the back of the Sasha Trouser pattern for the classy welt pockets and darts. If you are interested, this is my review of the Sasha Trouser and the Ginger Jeans (both by Closet Case Files). Since they are both drafted on the same block, they are pretty interchangable!

The stretch twill is from Elegant Fabrics in New York. I couldn't find a truly wonderful black stretch twill at any of my usual online shops, and that wasn't for any lack of trying (swatching, even ordering a few pieces). When I had to be in New York City to obtain my visa, I dropped into Elegant Fabrics and fingered their twills until I found this one. It is lovely-- beautifully stretchy, weighty but not heavy, and velvety soft. There was just enough on the roll to make one pair of pants!

Black tencel twill shirt

Same pattern- Liesl's Classic Shirt, in a gorgeous tencel twill from Threadbare Fabrics. This is the same fabric that I made my long sleeve Kalle in, but the fit on the Kalle is not quite right somehow. So glad I had another piece of this twill (it has sold out!), and in the Liesl pattern this shirt is amazing.

Cream tencel twill shirt

Yes, another Liesl Classic Shirt, in a creamy tencel twill from Emmaonesock. I love subtle color and the silk-like texture, but it is much easier to wear and wash than silk.

Black Ginger Jeans

Another new make! This is a denim from Mood Fabrics. I can't tell you much about it, I just went and fingered all of the denims until I found one that felt right, and since it was a classic off-black denim, I overdyed it with RIT. I added red bar tacks, just for fun. Ginger Jeans by Closet Case Files review here.

Black Dansko Aurora Boots

These are oddly perfect boots for my feet. I can't even wear the famous Dansko clogs-- I have a pair at home that I need to just sell, since they are basically unworn and I find them too stiff to wear. I can't really explain it, but I can walk miles in these boots, unlike any other shoe or boot I've tried. In Rome, where transportation can be spotty, one does literally end up walking miles. I think it might have to do with the toe box being unusually roomy, my feet love that, and the soles have just the right amount of stiffness and flexibility.  I don't love the slouchy style, but I can bear it if my feet are happy. I wore the first pair into the ground, this is my second pair, purchased on Ebay.

Brown Dansko Scout Boots

These are my back up boots. When I first got them I thought they were terribly uncomfortable, but they've broken in well and are my favorite boots when not in Rome. I love the warm reddish brown color. However, on days when I know I'll be hiking it, I wear the Auroras! Purchased like new on Ebay.

10 pieces, 10 looks


Style Notes

I love the simplicity of dressing with these 10 pieces. Everything goes with everything... really and truly. There is only one one real decision-- white shirt or black? If I'm spending the day with the kids, or it is that time of the month... black! If the sun is shining and there might be an opportunity to strut in a piazza with my jacket thrown over my shoulder-- white! Otherwise, it really doesn't matter.

Also, doing laundry is also incredibly simple. White wash, black wash. No special care needed, just wash cold and hang to dry, on hangers. The linen and tencel shirts mostly dry overnight. I keep oxyclean on hand for any accidents on the white shirts, and I have had to use it, to excellent effect.

Keeping the wash simple is especially important here since there are no DRYERS. Which is totally fine for my clothes, which I never dry anyway. However, this totally sucks for endless loads of kids clothes, towels, sheets, etc. I understand the energy savings of a city without dryers, etc, but was the person who decided on this policy a working mom?

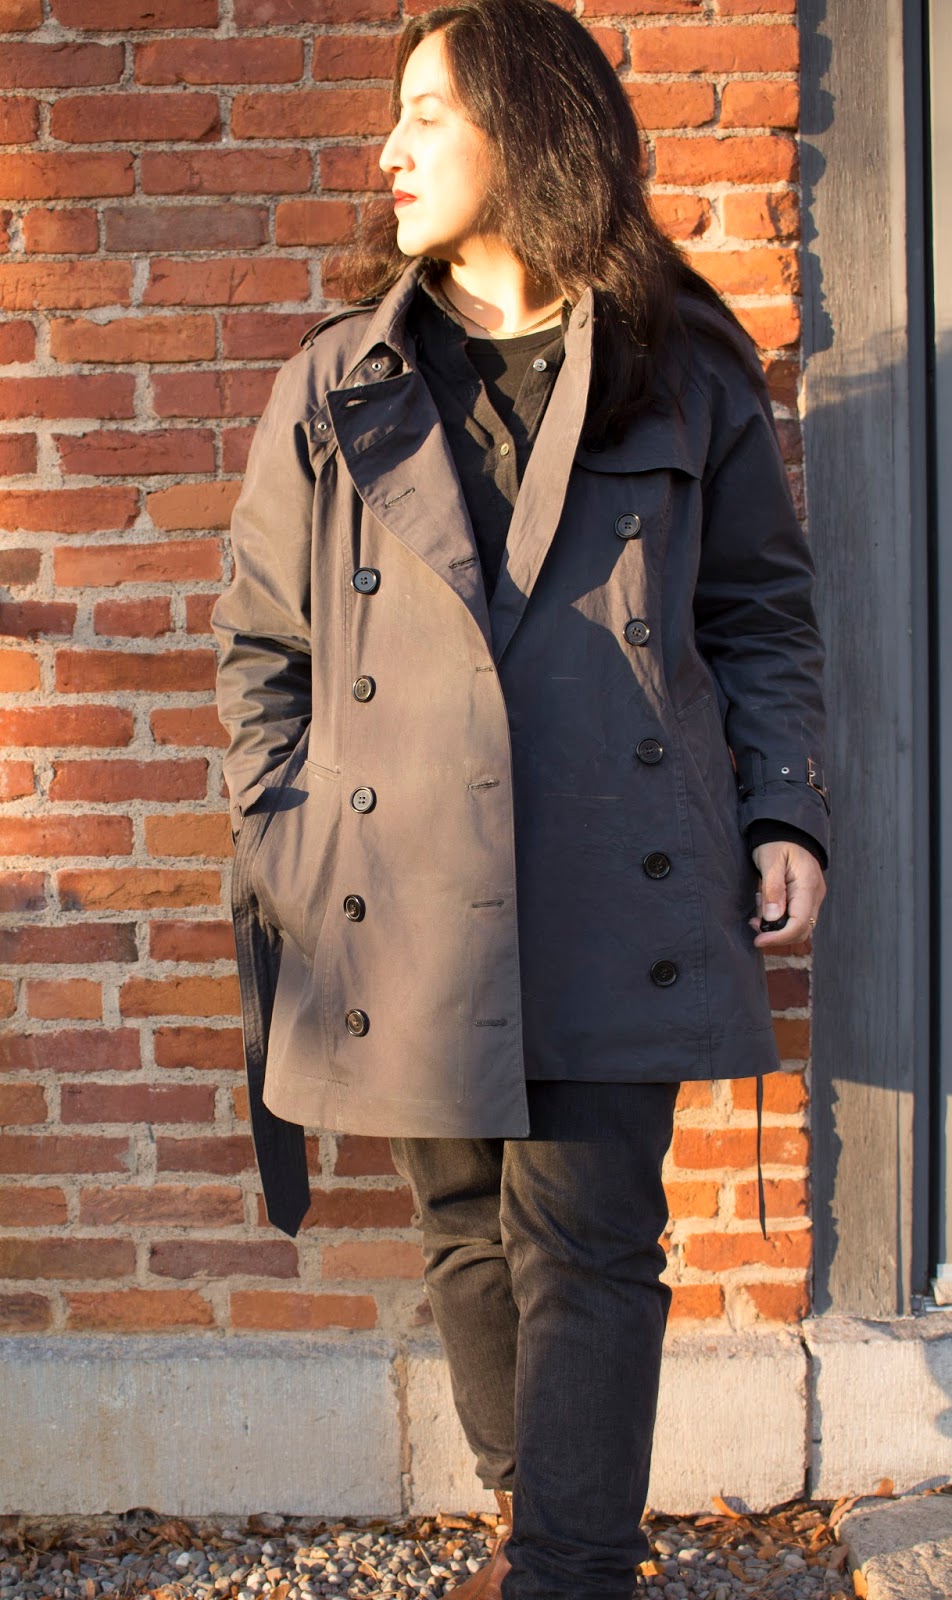
In the interest of full disclosure, I do have two black linen shirts with me (both the same pattern), and two pairs black Ginger Jeans. This is does help make laundry a bit less stressful, especially since the jeans can take 2-3 days to dry completely. Also, I've had to alter one pair... the waistband on the newer pair of jeans stretched too much and I had to take it in an inch, by hand. That pair was out of commission for a good two weeks. (I miss my sewing machine-- I even considered talking it somewhere and having someone do it for me, but I couldn't quite bring myself to do that with my handmade jeans!) I also have a pair of cargos and a blue denim Kalle that I wear on weekends or evenings, for hanging out around the house or running errands in the neighborhood.

I am a total fan of the button down shirt. I love its versatility-- it looks great dressed up or down. I totally feel appropriate every day, whether I'm lecturing, chilling at a bar, or splurging on an aperativo in a classy location. I love that its cuffs and plackets allow for easy styling of totally different looks, and also provide instant temperature control.

I also think linen is the perfect fabric, summer and winter. Linen dries fast and stains come out with very little effort. The shirts have wonderful texture when hung to dry, but can also be pressed with steam for a crisp look. Linen is so incredibly cool in the heat, and I've found it to be surprisingly insulating in the winter, especially when paired with a wool cardigan or sweater. In really cold weather, I wear a silk undershirt for extra coziness. I do want to try making some shirts in a really lovely cotton which I might end up loving also, but I didn't quite get to that before I left.

I know for many people, my palette of white, black and gray would be too plain. For me, though, while I love looking at bright colors and patterns, I don't always feel the need to wear them. When I have a lot of patterns and colors in my wardrobe, I tire of them and want new colors and patterns. Also, I worry that people will notice if I wear the same pattern over and over again-- but if you wear a button down shirt every day, no one thinks you don't do your laundry. Oddly enough, I'm much LESS bored with my wardrobe this time than I was the last time I was abroad for a semester when I brought lots of patterned t-shirts.

My white/black shirts and black pants are a personal uniform, and at this time and place in my life, this is sort of liberating. It is sort of like a blank canvas, over which I can be myself.

Lately, if I feel the need for color or pattern, my favorite way to express myself is to wear a bright lipstick. I thought perhaps if I was bored I would buy some fun scarves or jewelry, but I haven't felt the need.

I love living with this smaller, simpler wardrobe... and now I'm wondering if I'll be able to translate that into reducing my wardrobe when I return home.


Friday, December 15, 2017

Classic Khaki Sasha Trousers: A Pattern Review

I made trousers! Or, as us vulgar Americans would call them, PANTS. Classic and khaki.


These are, of course, the Sasha Trousers from Closet Case Patterns. I haven't owned a trouser for ages. I have a terrible track record trying to buy them... I'd try on a pair in the store, it would feel acceptable, then I'd wear it for a day and then it would never be worn again. I've perused various pants patterns, but the thought of going through fitting them was never very inviting. 


When Heather from Closet Case Patterns released a trouser pattern based on the Ginger Jeans block, I knew this was the one for me, since I already have a customized Ginger Jeans pattern. It took me three tries to get my Ginger Jeans just how I like them, but my latest ones are the best fitting jeans I've ever owned. Soooo.... I just transferred over my changes to the Sasha Trousers pattern. BRILLIANT!

Just for the sake of all of you out there fitting pants or jeans, I'll just go through what has worked for me. First off, I took a HUGE wedge out of the center back top of the pant. This is, I think, basically a sway back adjustment, but might also be a bit of a large bum adjustment. I took out 2 inches. On my ginger jeans pattern, this comes mostly out of the yoke. On the Sasha Trousers pattern, I split the adjustment between the darts in the back and the center back. 


I also scoop out the back crotch curve into a sharper J. Heather calls this her "low bum" adjustment. 

To further make room for the bum, I add 1/2 inch to the back crotch curve, at the crotch. I also added 1/2 inch of height to the back of the pant... which also makes space for the bum. 

I took 1/2 inch off of the front crotch curve, at the crotch. 


I used the side seams to adjust the fit based on the stretch of the pant. My grand plan was to have 1 inch seams to play with, but I forgot to add extra to the front pocket pieces! So when I needed a bit of extra space for my hips, I had to steal it from the existing 5/8 inch seam allowance, making my side seams, at the hips, a scant 1/4 inch. 

And that's it! I made no muslin, and went on faith, making all of the pockets, fly, etc, to get to the basting step. When I basted it all together, the fit on the bum was perfect, and there were only minor adjustments needed to the side seams. 


Heather JUST posted a sewalong for the welt pockets, so lucky for all of you who are making the pattern now. While I do love sewalongs, I have to say her directions and diagrams were quite good, and they got me through the steps of the welts, front pockets, and fly with no frustration or unpicking to speak of. None of this is entirely new to me, though... although her welt pocket construction method was rather novel, I've never sewn one like it before. It all came together beautifully. 


The interior finish on these is gorgeous... Heather has you french seam the pockets and put the good side out, so it all looks lovely. The twill tape waistband is really a lovely finish, and so easy to sew. 

Do women's trousers really open the opposite of jeans? It feels wrong to me... but as I've said, it's been a loooong time since I've owned a pair of trousers. And even those weren't so nice.

I used a no-sew hook and eye... I like the clean look of it. I'm not sure why only the sew-on type is mentioned in the instructions, maybe there is some reason not to use the no sew type, but it hasn't posed a problem so far. Sewing the buttonhole on my machine was a bit dicey since my machine's automatic buttonhole feature like to just hang up if the surface isn't completely flat, but I've learned lately that I can sometimes aid it over the rough spots by pulling the fabric manually, and I just managed to squeak out an acceptable buttonhole. The button is just a plastic one from my stash.


I interfaced the waistband with Pro Weft Supreme Medium from Fashion Sewing Supply. It doesn't say this anywhere, but this interfacing is actually stretchy in one dimension, and I placed the interfacing in the direction of greatest stretch. I can't stand a constricting waistband, but at the same time, I hate it when the waistband stretches out by the end of the day. 

I LOVE this fabric. It is the J. Crew Twill from Imaginegnats. I've been looking all over for great stretch twills, now that I have a trouser pattern, and this is some of the best stuff out there. I'm only telling you this because I already purchased more. 


The fit is sort of relaxed on these... I think I prefer them that way, but I might have to take them in a bit if they stretch out too much with wear. So far so good though. 

Having trousers that fit just like your favorite jeans is WONDERFUL. So if the Ginger Jeans pattern is your go-to jean pattern, you'll probably love the Sasha Trousers. If you don't have a favorite pants pattern yet, this wouldn't be a bad place to start since the directions are fantastic, and Heather's fitting guides are pretty comprehensive.


What's up next...? I actually thought I'd make another pair of Ginger Jeans, since I'm wearing my latest and greatest pair non-stop lately. I'd already be well into them, except that I had a bit of a sewing snafu. The denim I bought for them was narrow, and I didn't notice, so I only bought 2 yards. Lovely black Turkish denim from Threadbare fabrics, out of stock with no hope that there will ever be more. AND.... I even did a custom dye job on the fabric, making an off-black denim a true black, because I LOVE true black jeans. 

So, I thought I'd just cut them out anyway, off-grain, and I did it. 

Then clarity hit. What a stupid decision! Chances are, I'll spend hours and hours sewing jeans only to have twisty-legged jeans that will annoy me whenever I wear them. 

Luckily, I just happened to be in NYC this week, so I picked myself up some pretty awesome denim, and some more dye. With a little luck, I'll be able to recut them this weekend, and do a proper job of it. 


Monday, December 11, 2017

Towards a Truly Showerproof Trench: Modified McCalls 5525 in Anthracite Etaproof Cotton

I am in love with trench coats... this is my second one this year!

I'm not sure how I managed without a trench coat all of these years, it is just such a versatile garment. As a maker, I am enamored with all of the functional, beautiful details. 


That isn't to say that I don't LOVE my first trench, the Burberry Inspired Trench. I was wearing it constantly this fall, and enjoying it immensely. 

However, the Burberry-esque trench doesn't quite satisfy all of my trench desires. For one, it is rather heavy due to all of the tailoring details, the quality of the twill, the full lining, and the length. This isn't really a problem... in fact, it gives it a sense of substantiality that feels luxurious. It is also warm, which is great for the cool climate that I live in. I noticed this sense of weight with my handmade winter coat too, and I think that in an age of fast fashion, we just aren't used to the weight of a garment made with quality materials and traditional tailoring. However, I was thinking about how wonderful it would be to have a trench on my trip to Italy this spring, and the thought of taking such a weighty coat to a mediterranean climate seemed like a poor match. Hence began the dream of an unlined, shorter trench.

Also, I wasn't truly happy with the "showerproofing" situation. I have to say the Nixwax Cotton Proof on the first trench is doing its job and water beads up on the Burberry Inspired Trench, but a proper trench should be truly showerproof. The gold standard for trenches seems to be very tightly woven cottons that expand when exposed to wet weather, becoming impermeable to water. 

Ventile is the brandname of one such fabric, but calls to the UK mills and retailers of Ventile were fruitless... the manufacturer wouldn't acknowledge me, probably because they could tell I wasn't interested in wholesale, and UK retailers wouldn't ship to the US or wanted totally crazy shipping fees. Then I discovered Etaproof, which is is another very tightly woven cotton fabric with claims of weatherproofing. Extremetextile.de was more than happy to ship overseas. I had my 3 meters of Anthracite Ventile 2nds in about a week. It was beautifully boxed and they included care tags and "Etaproof" labels.

I took the summer off from coatmaking, but when the weather started to cool off, I started muslining up a new trench coat. I used McCalls 5525 for the front and the trench details, then pulled out Simplicity 2508 for the raglan sleeves. Raglan sleeves are common on early trench models, and I love the look. I also was inspired by the trenches designed by urban-outdoor brand W'lfg'ng that have all the classic trench details and are made with cotton showerproof fabrics.

My trench on the left, a trench by W'lf'g'ng on the right.

I added a third seam down the back of the raglan sleeve to allow the sleeve to hang better with the natural shape of the arm. I also narrowed the collars, and tried to make sure the lapels were shaped to allow the coat to be buttoned all the way to the top.


I made 4-5 muslins... I can't remember how many now. But I really wanted to work out all of the details before I started cutting and sewing.

Cutting was nerve wracking. I can't find my McCalls 5525 pattern envelope, but it must call for significantly more than 3 meters. It was a squeeze to get all of the pieces out of the fabric I had, and there was no way I was ordering more. The front facing is pieced together (down at the bottom, where it wouldn't show. The length was also somewhat determined by the fabric I had-- if I wasn't constrained, I probably could have gone with another inch or two. At the end of the project, all of the tiny scraps I have left wouldn't add up to a square foot.

Following the suggestions from the manufacturer, I sewed all of the major seams with a true flat fell seam and cotton wrapped poly core thread. A true flat fell seam is NOT the flat fell seam that we sewists commonly use as a seam finish on jeans and collared shirts. A true flat fell seam interlocks the two edges of the fabric, and each line of stitching goes through all 4 layers of fabric. It is hard to describe, but here is a good video demonstrating it:


It gets used a lot by people who work with outdoor fabrics or places where a seam needs superior strength, and I ended up using a technique demonstrated on the Men Who Sew blog. Following their suggestions, I used clear Elmers glue which worked surprisingly well and was much more cost effective than using something like washaway wonder tape. The only downside was that the coat looked terrible with bits of glue all over the place, but it all washed out without any trouble.

The thread I used was Coats and Clarks Dual Duty, which is a cotton coated poly core thread with a weight of Tex 40, which I ordered from Wawak. Excuse my language, but it was a total bitch. NOTHING I did made this stuff sew reliably, it would make little birdsnests on the bobbin side at totally unpredictable intervals. I tried all sorts of tension combinations in both the bobbin and top thread, tried switching needles, and wound and rewound bobbins to make sure I wasn't adding additional twists. My fights with the thread made me put the project away multiple times-- it just sucks to be sewing along and hear the machine snag-- there goes your perfect seam.  In addition, on my machine, the top of the seam always looks a bit more perfect than the bobbin side, and this was exacerbated by this thread. I never truly solved the problem, I just ended up just muddling through. I sewed all major seams from the front side, which was a bit of a trick sometimes. I would cringe when I heard a snag but I would keep going, and after the seam was done I would fix the snags by pulling them straight and tying the ends. So the inside of the coat is just less perfect than I had hoped. On less major seams where watertightness wasn't a problem, I put regular poly in the bobbin and used the Dual Duty on top, which reduced but did not eliminate the problem. And for some seams where it didn't matter, I just used my usual thread.

If anyone has any insight into this, I'd be curious to figure it out. I've had some trouble with Guttermans Tex 40 topstitching thread-- the occasional snag-- but nothing like this. Unless someone has some really bright ideas, I'm probably NEVER going to use this thread again, at least in my Janome.

Inside of coat. It is unlined... the flat felled seams make it very clean looking!

Anyhow. So, while I'm getting things off of my chest, the other HUGE problem was that when I went to try on the mostly put together coat, the collar wouldn't close in front. How could this happen, after all of those muslins? I'm not sure what went wrong, but I ended up adding a piece to the collar and collar stand... I did it at the center back. I also ended up adding a piece to the tops of both lapel pieces (you can that piece clearly in the very first picture). I'm just going to call those spontaneous design details. In the picture below, you can also see the one piece I didn't manage to fit on my cutting layout. Instead, I used a piece of goretex left over from another project.

Inside showing facing and hanging chain.

After a lot of unpicking and re-sewing, my adjustments mostly fixed the problem.. here it is, buttoned up, and it isn't perfect, but it does the job of creating a respectable closure around the neck area.

All buttoned up.

So, another fun fact about designing with tightly woven showerproof cottons is that they are most waterproof when they have two layers. Having a full-on two layer garment would have gone against my desire for a lightweight garment, so I settled for an extension of the facings into areas that were most in need of rain protection... the shoulders. Fortunately, other areas of a trench already have multiple layers thoughtfully built in-- the little cape on the back, the gunflap, and the double breasted front.

Inside of the coat, showing the extended facing that adds additional rain protection to the shoulders.

I was a little unsure what to do for structure in an unlined trench made with cotton weatherproof fabric,  and couldn't find much guidance out there on the issue, so I tested out a few options. Fusible horse hair canvas seemed to adhere okay, but I sort of don't trust it after struggling with the bond on my last trench coat. Pad stitching was totally visible. So I threw out both of those options! The collar stand and collar contain a layer of sew-in horse hair canvas. On the collar, I did my best to shape the layers together before basting them into place, but there is no pad stitching, the hair canvas is just held in place by the seams. After much debate, I decided to leave out any kind of interfacing in the lapels since I was afraid fusible would affect the performance of the fabric and the fabric seemed to have plenty of structure on its own. 

Back strorm flap.

The back vent is a symmetrical pleat, to allow movement while still providing a bit of wetness protection.

Center back pleat, from the inside.


I also added all of the usual trench details: epaulettes, sleeve buckles. I debated adding a hook and eye as a throat latch, but decided instead to do a sewn on buckle. The hardware (buckles, metal eyelets and chain for hanging) are from pacific trimming. The buttons are genuine horn from Ebay.


The hand-warmer pockets are deep angled welt pockets. I think these are the most comfortable pockets on coats!


On the inside of the coat, the pocket bags of the welt pockets are somewhat hidden in the facing. However, all raw edges are finished with bias tape, and since I was short on fabric, there is a bit more of that gortex waterproof fabric for the inside pocket bag. I also added inside zippers, so the handwarmer pockets can function as pass-through pockets that allow access to the interior of the coat. The main thing I've used them for so far is to access the warm pockets on an inner layer. Also, the inside zippered pocket is wide enough to stash an ipad, kindle, or moleskine-style notebook.

Inside of welt pockets, also showing the etaproof tags and spare button.

As you can see, I went all secret-agent with the pockets. There are also four zippered lapel pockets, two on each side. The top left one is designed for my giant wallet, the bottom left one for a cell phone or glasses, the top right one is designed as a document pocket, and the right bottom one is another one sized for a cell phone or glasses case. That is, when they are not filled with high tech spy gear.

Zippered interior pockets in the front facing.

Inside out, front of coat.

The belt buckle on my previous trench was always clanging against things so I just removed it. I suppose a leather-wrapped buckle would have been wiser. Anyhow, on this one, I just did away with the buckle altogether, since it really is pretty impractical, and made this belt double pointed, channel stitched, and sized for tying.


The hem and sleeves are finished with facings. At first I tried just turning them up and stitching them, but it looked sort of cheap. The facing gives it a bit more structure, I think.

Sleeve detail. 

I think I should have left off the last button near the hem, it feels a bit awkward there. Just today on Couture and Tricot Tany was talking about the placement of buttons on her self-drafted shirt and mentioned that "the last button should be more distant from the hem than the distance between buttons along the front, for a better visual effect." She is so right, I never really considered this before.


I tried to size this trench to allow layers underneath. Before it got super chilly, I was wearing it with a down vest. I was considering putting a zipper into to the trench to zip the vest in, but the Patagonia vest that I own uses a YKK 4VS zipper, which I can't find anywhere! Lots of 5s, no 4s in a plastic tooth. But just wearing the vest with the trench over it works too... in fact, I often take the trench off and huddle in the vest when my office is frosty (which is all the time in the winter!) At some point I'd love to get a long sleeve down sweater or make a quilted wool sweater, I think that would make this coat an option in even farther into the cold season. 


Am I planning my next trench? I can't say I haven't given it some thought (but no, I haven't bought any fabric!) Don't you think a wool trench would be luscious? Either in a drapey wool twill, or a thin but dense lightweight coating. 

However, I think my next coat project will be making a replacement for my gore-tex ski jacket. I think it is almost 20 years old! That makes me feel old. Anyhow, I was thinking about making a Kelly Anorak in 3-layer Goretex. I probably won't get to that project until this summer or next fall.