Showing posts with label burberry. Show all posts

Monday, December 11, 2017

Towards a Truly Showerproof Trench: Modified McCalls 5525 in Anthracite Etaproof Cotton

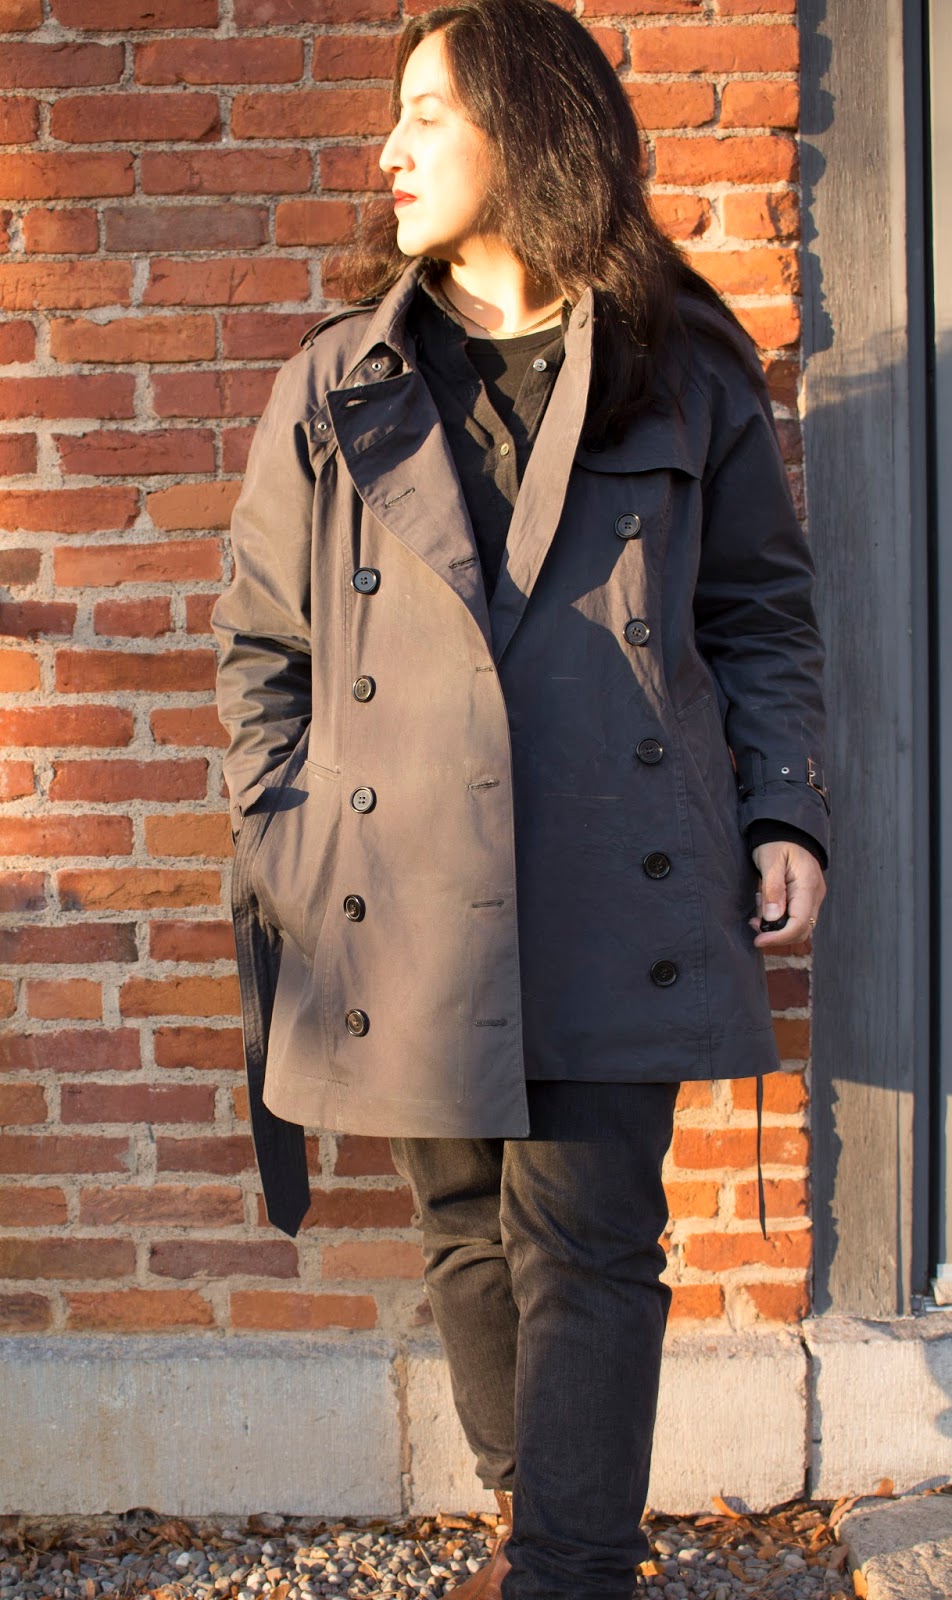
I am in love with trench coats... this is my second one this year!

I'm not sure how I managed without a trench coat all of these years, it is just such a versatile garment. As a maker, I am enamored with all of the functional, beautiful details. 


That isn't to say that I don't LOVE my first trench, the Burberry Inspired Trench. I was wearing it constantly this fall, and enjoying it immensely. 

However, the Burberry-esque trench doesn't quite satisfy all of my trench desires. For one, it is rather heavy due to all of the tailoring details, the quality of the twill, the full lining, and the length. This isn't really a problem... in fact, it gives it a sense of substantiality that feels luxurious. It is also warm, which is great for the cool climate that I live in. I noticed this sense of weight with my handmade winter coat too, and I think that in an age of fast fashion, we just aren't used to the weight of a garment made with quality materials and traditional tailoring. However, I was thinking about how wonderful it would be to have a trench on my trip to Italy this spring, and the thought of taking such a weighty coat to a mediterranean climate seemed like a poor match. Hence began the dream of an unlined, shorter trench.

Also, I wasn't truly happy with the "showerproofing" situation. I have to say the Nixwax Cotton Proof on the first trench is doing its job and water beads up on the Burberry Inspired Trench, but a proper trench should be truly showerproof. The gold standard for trenches seems to be very tightly woven cottons that expand when exposed to wet weather, becoming impermeable to water. 

Ventile is the brandname of one such fabric, but calls to the UK mills and retailers of Ventile were fruitless... the manufacturer wouldn't acknowledge me, probably because they could tell I wasn't interested in wholesale, and UK retailers wouldn't ship to the US or wanted totally crazy shipping fees. Then I discovered Etaproof, which is is another very tightly woven cotton fabric with claims of weatherproofing. Extremetextile.de was more than happy to ship overseas. I had my 3 meters of Anthracite Ventile 2nds in about a week. It was beautifully boxed and they included care tags and "Etaproof" labels.

I took the summer off from coatmaking, but when the weather started to cool off, I started muslining up a new trench coat. I used McCalls 5525 for the front and the trench details, then pulled out Simplicity 2508 for the raglan sleeves. Raglan sleeves are common on early trench models, and I love the look. I also was inspired by the trenches designed by urban-outdoor brand W'lfg'ng that have all the classic trench details and are made with cotton showerproof fabrics.

My trench on the left, a trench by W'lf'g'ng on the right.

I added a third seam down the back of the raglan sleeve to allow the sleeve to hang better with the natural shape of the arm. I also narrowed the collars, and tried to make sure the lapels were shaped to allow the coat to be buttoned all the way to the top.


I made 4-5 muslins... I can't remember how many now. But I really wanted to work out all of the details before I started cutting and sewing.

Cutting was nerve wracking. I can't find my McCalls 5525 pattern envelope, but it must call for significantly more than 3 meters. It was a squeeze to get all of the pieces out of the fabric I had, and there was no way I was ordering more. The front facing is pieced together (down at the bottom, where it wouldn't show. The length was also somewhat determined by the fabric I had-- if I wasn't constrained, I probably could have gone with another inch or two. At the end of the project, all of the tiny scraps I have left wouldn't add up to a square foot.

Following the suggestions from the manufacturer, I sewed all of the major seams with a true flat fell seam and cotton wrapped poly core thread. A true flat fell seam is NOT the flat fell seam that we sewists commonly use as a seam finish on jeans and collared shirts. A true flat fell seam interlocks the two edges of the fabric, and each line of stitching goes through all 4 layers of fabric. It is hard to describe, but here is a good video demonstrating it:


It gets used a lot by people who work with outdoor fabrics or places where a seam needs superior strength, and I ended up using a technique demonstrated on the Men Who Sew blog. Following their suggestions, I used clear Elmers glue which worked surprisingly well and was much more cost effective than using something like washaway wonder tape. The only downside was that the coat looked terrible with bits of glue all over the place, but it all washed out without any trouble.

The thread I used was Coats and Clarks Dual Duty, which is a cotton coated poly core thread with a weight of Tex 40, which I ordered from Wawak. Excuse my language, but it was a total bitch. NOTHING I did made this stuff sew reliably, it would make little birdsnests on the bobbin side at totally unpredictable intervals. I tried all sorts of tension combinations in both the bobbin and top thread, tried switching needles, and wound and rewound bobbins to make sure I wasn't adding additional twists. My fights with the thread made me put the project away multiple times-- it just sucks to be sewing along and hear the machine snag-- there goes your perfect seam.  In addition, on my machine, the top of the seam always looks a bit more perfect than the bobbin side, and this was exacerbated by this thread. I never truly solved the problem, I just ended up just muddling through. I sewed all major seams from the front side, which was a bit of a trick sometimes. I would cringe when I heard a snag but I would keep going, and after the seam was done I would fix the snags by pulling them straight and tying the ends. So the inside of the coat is just less perfect than I had hoped. On less major seams where watertightness wasn't a problem, I put regular poly in the bobbin and used the Dual Duty on top, which reduced but did not eliminate the problem. And for some seams where it didn't matter, I just used my usual thread.

If anyone has any insight into this, I'd be curious to figure it out. I've had some trouble with Guttermans Tex 40 topstitching thread-- the occasional snag-- but nothing like this. Unless someone has some really bright ideas, I'm probably NEVER going to use this thread again, at least in my Janome.

Inside of coat. It is unlined... the flat felled seams make it very clean looking!

Anyhow. So, while I'm getting things off of my chest, the other HUGE problem was that when I went to try on the mostly put together coat, the collar wouldn't close in front. How could this happen, after all of those muslins? I'm not sure what went wrong, but I ended up adding a piece to the collar and collar stand... I did it at the center back. I also ended up adding a piece to the tops of both lapel pieces (you can that piece clearly in the very first picture). I'm just going to call those spontaneous design details. In the picture below, you can also see the one piece I didn't manage to fit on my cutting layout. Instead, I used a piece of goretex left over from another project.

Inside showing facing and hanging chain.

After a lot of unpicking and re-sewing, my adjustments mostly fixed the problem.. here it is, buttoned up, and it isn't perfect, but it does the job of creating a respectable closure around the neck area.

All buttoned up.

So, another fun fact about designing with tightly woven showerproof cottons is that they are most waterproof when they have two layers. Having a full-on two layer garment would have gone against my desire for a lightweight garment, so I settled for an extension of the facings into areas that were most in need of rain protection... the shoulders. Fortunately, other areas of a trench already have multiple layers thoughtfully built in-- the little cape on the back, the gunflap, and the double breasted front.

Inside of the coat, showing the extended facing that adds additional rain protection to the shoulders.

I was a little unsure what to do for structure in an unlined trench made with cotton weatherproof fabric,  and couldn't find much guidance out there on the issue, so I tested out a few options. Fusible horse hair canvas seemed to adhere okay, but I sort of don't trust it after struggling with the bond on my last trench coat. Pad stitching was totally visible. So I threw out both of those options! The collar stand and collar contain a layer of sew-in horse hair canvas. On the collar, I did my best to shape the layers together before basting them into place, but there is no pad stitching, the hair canvas is just held in place by the seams. After much debate, I decided to leave out any kind of interfacing in the lapels since I was afraid fusible would affect the performance of the fabric and the fabric seemed to have plenty of structure on its own. 

Back strorm flap.

The back vent is a symmetrical pleat, to allow movement while still providing a bit of wetness protection.

Center back pleat, from the inside.


I also added all of the usual trench details: epaulettes, sleeve buckles. I debated adding a hook and eye as a throat latch, but decided instead to do a sewn on buckle. The hardware (buckles, metal eyelets and chain for hanging) are from pacific trimming. The buttons are genuine horn from Ebay.


The hand-warmer pockets are deep angled welt pockets. I think these are the most comfortable pockets on coats!


On the inside of the coat, the pocket bags of the welt pockets are somewhat hidden in the facing. However, all raw edges are finished with bias tape, and since I was short on fabric, there is a bit more of that gortex waterproof fabric for the inside pocket bag. I also added inside zippers, so the handwarmer pockets can function as pass-through pockets that allow access to the interior of the coat. The main thing I've used them for so far is to access the warm pockets on an inner layer. Also, the inside zippered pocket is wide enough to stash an ipad, kindle, or moleskine-style notebook.

Inside of welt pockets, also showing the etaproof tags and spare button.

As you can see, I went all secret-agent with the pockets. There are also four zippered lapel pockets, two on each side. The top left one is designed for my giant wallet, the bottom left one for a cell phone or glasses, the top right one is designed as a document pocket, and the right bottom one is another one sized for a cell phone or glasses case. That is, when they are not filled with high tech spy gear.

Zippered interior pockets in the front facing.

Inside out, front of coat.

The belt buckle on my previous trench was always clanging against things so I just removed it. I suppose a leather-wrapped buckle would have been wiser. Anyhow, on this one, I just did away with the buckle altogether, since it really is pretty impractical, and made this belt double pointed, channel stitched, and sized for tying.


The hem and sleeves are finished with facings. At first I tried just turning them up and stitching them, but it looked sort of cheap. The facing gives it a bit more structure, I think.

Sleeve detail. 

I think I should have left off the last button near the hem, it feels a bit awkward there. Just today on Couture and Tricot Tany was talking about the placement of buttons on her self-drafted shirt and mentioned that "the last button should be more distant from the hem than the distance between buttons along the front, for a better visual effect." She is so right, I never really considered this before.


I tried to size this trench to allow layers underneath. Before it got super chilly, I was wearing it with a down vest. I was considering putting a zipper into to the trench to zip the vest in, but the Patagonia vest that I own uses a YKK 4VS zipper, which I can't find anywhere! Lots of 5s, no 4s in a plastic tooth. But just wearing the vest with the trench over it works too... in fact, I often take the trench off and huddle in the vest when my office is frosty (which is all the time in the winter!) At some point I'd love to get a long sleeve down sweater or make a quilted wool sweater, I think that would make this coat an option in even farther into the cold season. 


Am I planning my next trench? I can't say I haven't given it some thought (but no, I haven't bought any fabric!) Don't you think a wool trench would be luscious? Either in a drapey wool twill, or a thin but dense lightweight coating. 

However, I think my next coat project will be making a replacement for my gore-tex ski jacket. I think it is almost 20 years old! That makes me feel old. Anyhow, I was thinking about making a Kelly Anorak in 3-layer Goretex. I probably won't get to that project until this summer or next fall. 

Friday, May 19, 2017

Burberry Inspired Trench: McCalls 5525

One big wardrobe hole has been the complete lack of a light spring/fall coat. I've been making do with cardigans or blazers until it's cold enough to huddle under a wool coat. I considered using one of my already adjusted patterns and making it in a twill or very light coating weight fabric, but really the classic thing to fill this space in the wardrobe would be a trench coat. 

If I look grumpy in these pics, it isn't about the trench. Apparently this location is popular with the Pokemon crowd, and the current pair are deep in conversation about their concealed carry permits. Grrrrr.....!
Once I decided that it had to be a trench coat, I went about figuring out what really makes a trench coat a trench coat. The internet was quite happy to supply information about the trench's military origins, and how Burberry and Aquascatum created the first waterproof versions. 

For my first trench, I decided to go totally traditional. Khaki, double-breasted, plaid-lined. All-the-way on the details... epaulettes, storm flaps, self-fabric belt, wrist straps, button pockets, etc. I also decided that I wanted a very traditional fit... not the skin-tight fit that seems to be very fashionable in women's trenches right now, and not the billowing oversized look from the 80s.


As I sorted through the available patterns, I had my usual problem... none of them was quite right for my vision of the classic trench. I definitely prefer indie patterns, and there are a number of attractive indie trench patterns. For example, the Named trench, which is absolutely lovely, has a more relaxed fit. The Sewaholic Robson strikes me as very feminine, with rounded lapels and no separate collar stand. The Deer and Doe Luzerne has a waist seam so it almost looks skirted, just adorable. The designers have each done a lovely job of making the trench their own... but I want a BORING, basic trench pattern!

Patternreview turned up with the answer... McCalls 5525, which has an astounding 69 reviews. This might not be remarkable for a dress pattern, but for a relatively complicated coat pattern, this seems to be quite a number. It is almost perfect. Double-breasted, princess seamed, separate collar stand, and all the trench details. There was the small detail of the pattern being out-of-print, but I was able to turn up a copy on Ebay with relative ease. 

Trying out the back tie look.


After the issue of pattern choice was settled, then I had to find the perfect fabric. Traditionally, the trench is made of "showerproof" cotton gabardine. Supposedly this magical gabardine is woven so tightly that it repels rain. Burberry has said that they use waxed cotton thread to produce their proprietary gabardine fabric, increasing its water-repellency. Well, there is NOTHING on the US market that even tries to fit these claims. I only ended up with one sample of cotton gabardine in my search, and this sample was totally unremarkable. 

I considered using some other kind of water-repellent fabric... but these plastic-based coated or membrane based fabrics don't really seem true to the idea of a classic trench. I'm also highly suspicious of the supposed "showerproof" fabrics available on the fashion fabric marketplace-- they rarely come with any details on what exactly creates the water-repellancy, and I definitely don't want a coat that will be damp from the inside out. I am tempted to make a Gore Tex trench just to prove it can be done, but I don't imagine this will be a pleasant exercise, and it definitely doesn't fit the stated goal of the "classic" trench.

Alas, I ended up settling on cotton twill. I ordered samples from anyone who had anything in a proper khaki cotton, and ended up with one from Mood. As of now, they still have it. No, they don't pay me anything!


As for the twill... it is okay. It sewed up nicely, it is a nice mid-weight. One side is a plain weave, the other had a longer weave... I used the plain weave side. I actually had a bit of a panic when cutting my fabric that I'd chosen the back side of the fabric, but it turned out fine, and I was careful to keep the same face consistently throughout the project. I had to be very careful to use a press cloth or keep the temperature of the iron down, there are a couple of little places where I forgot where the surface of the fabric is a bit damaged. Honestly I couldn't even find them to take a picture, so probably not worth worrying over.


In terms of fit, I think I misjudged the amount of ease in the pattern-- I usually expect Big 4 patterns to include MASSIVE amounts of ease. However, I think the ease on this one is actually quite reasonable, as I should have guessed from reading the reviews-- so I actually ended up adding quite a bit to my chosen size 16. The shoulders fit beautifully, but I ended up making just about everything else a bit larger. The 16 is, unfortunately, the largest of the smaller sizes, so I just had to guess what the grade to the 18 hip would have been.  I deepened the armholes a bit, and added .5 inches to the side seams, increasing out to 1 inch at the hips. When I sewed it up in my fabric, things still ended up being a bit tighter than I wanted, so I decreased the seam allowances to .25 in the center back and at the side seams. 

I did end up making quite a few changes. The biggest change was converting the sleeves to a two-piece sleeve. I used the an article from Threads magazine to make the change, in addition to comparing my altered sleeve to some other two piece sleeves from coats in my pattern collection. A two piece sleeve just makes sense to me-- our arms are not straight cylinders! The sleeves are set in like a traditional coat sleeve with a sleeve head (I used a piece of poly fleece this time, since I wanted to make sure it wouldn't shrink). I did not put in a shoulder pad... a very slim one would probably be a good idea and further help the shoulder hold its shape, but I didn't bother.


I also redrafted the back storm flap to be longer and have a bit more volume. I re-drew the front storm flap piece so that the storm flaps would meet under the arms, and I made two front storm flaps for symmetry. The storm flaps are sewn together at the shoulders and the underarm seam, and are only joined to the coat at the neck and armhole, supposedly offering another layer of storm protection.


The belt is channel stitched, and has the classic trench D-rings. Supposedly they weren't actually for grenades, as is usually suggested, but for the more practical purpose of carrying map-cases and canteens. They also serve to hold the belt in place!

I made a full epaulette with a carrier, rather than a half-epaulette that is sewn into the shoulder seam. I simply doubled the length of the McCalls 5525 pattern piece. I also made the wrist strap a full wrap-around strap with carriers and a buckle, rather than a half-strap sewn into a seam. To make the full wrist strap, I just used the McCalls 5525 pattern piece, which reviewers note is notoriously long for its intended purpose. These little details just seem a bit more authentic to me.


Are these buckles on backwards? I think they are... 

One thing that I did not notice until the coat was nearly done was that the collar on the pattern does not button all the way up. There are three pairs of buttons that hold the double breasted coat closed over the midsection, and that is it. My practical nature rebels against this... why make a coat with storm flaps if you can't actually button the collar up under the storm flap? Fashionable ladies, those storm flaps are just for decoration, apparently. I made mine button all the way up, with a full complement of 12 buttons. 


However, the fact that I didn't realize this until late in the game shows that I really should have paid more attention to button placement on my muslin. I have the bad habit of winging such details... it always seems like I end up changing button placements to suit my body, so I hardly ever look at the suggested ones. For example, when deciding on the placement of buttons, I very carefully avoided having a pair in horizontal alignment across the most prominent part of the chest. If you know what I mean...


I also narrowed the lapel just slightly, which, in retrospect, definitely contributed to my button problems! I also made the lapels and the collar less rounded than is drafted in the pattern, I think the soft point is a more classic look.


So, months into the project when I actually decided to figure out button placement, I discovered that if I put the buttons where they needed to go to achieve a good seal around the neck, the coat was dramatically too tight over the chest. It looked like I needed a giant full-bust adjustment. In order to have the coat fit properly, I had to move the buttons more towards the center that I would have liked. This means that the storm flaps don't cover the top buttons completely like they should, and when the neck clasp is not fastened, there is a little bubble of fabric. Ah well! If I were to make this again, I would add length to the collar so that it will close when the coat is buttoned, and I might even add a small FBA to give a more room over the chest. It's unclear to me whether I had these problems because I should have sized up, or because the pattern wasn't designed to button closed.


Pretty much all of the versions made by other bloggers that I truly admire mentioned liberal use of fusible interfacing-- block-fusing large portions of the coat. I went with this, and the entire coat is block fused with a high quality lightweight interfacing from Fashion Sewing Supply. The front panels are fused with light weft interfacing, and the collar, collar stand, and lapels are tailored with fusible horsehair canvas using this technique which I previously made a tutorial for.


My biggest disappointment is that my interfacing seems not to like this fabric. There are places on the coat where the interfacing is "bubbling." This is caused by the interfacing separating from the fabric, and this is sometimes visible on the surface. I've gone back to some of the places and tried to get the interfacing to adhere better with plenty of steam and pressure, but it doesn't seem to work. Either I didn't do a good job when I first applied the interfacing, or it just doesn't stick as well to this fabric as it has to past coating projects.

Using fusible might have been a mistake in this project, in retrospect. The pattern did say to use a sew-in interfacing, and of course I ignored this advice. A well-loved trench coat has to take a certain amount of abuse... theoretically it will get wet on a regular basis, and the light color will require more frequent washing. Hopefully the lack of adhesion doesn't get so bad that it ruins the look of the coat.

I couldn't find anyone who talked about pad-stitching a lapel on a smooth surface fabric like twill, but actually, I think I probably could have done it after working with this fabric, it is surprisingly forgiving. Next time I sew a trench, I might give this a try rather than risking the fusible. But I do really like the drape the fusible gives the fabric, so I'm a bit torn on this point.


Anyway, I also added lots of other fun details. The throat latch is attached with rivets. The collar stand and the belt are supported with channel stitching. There's a gold hanging chain. The buttons are real horn (ebay!), and the button holes are keyhole buttonholes. Thankfully my sewing machine LOVED sewing buttonholes on this twill, since I had to make 16 of them!


The lining is a Burberry-esque cotton plaid from an Etsy shop in the UK. I looked at SO MANY plaids, but the fact is, the Burberry design is sort of brilliant for a khaki color palette, really-- black and white with a touch of red, on a khaki base. I figure people can wonder... is it, or is it not a Burberry? The sleeve lining is beige rayon bemberg, to allow the coat to slip on and off easily.


And to avoid any confusion, I've made a special Unlikely tag for this coat. The tag is printed on my Etsy printer, a Canon Pixma, and it uses pigment ink for its black ink. I used the freezer-paper method to print the design on plain muslin. Much cooler than the Burberry knight, IMHO.

Another huge feature of the trench coat is its pockets. McCalls 5525 has an absurdly small pocket tucked into the front princess seam.  I ignored this pocket arrangement, and made single welt pockets with a button closure, which is the most common pocket used in Burberry trenches. I really like this type of pocket on a coat because it can be placed in the most comfortable place, at just the right angle, and there is plenty of room to make the pocket bags as big as is desired.


My pockets are HUGE. Funny story-- for a recent event I had to attend, I had forgotten the garnish for the dessert I had contributed. I walked past everyone in the reception hall with a giant can of whipped cream in my pocket. That's how big these pockets are! They have also proved to be vastly useful when out with the kids since I regularly end up carrying all sorts of random things like sneakers, wads of tissues, and the odd rock. I'm sure that's what the makers of the trench coat had in mind.


Not only are they huge, they are also pass-through pockets... there is a welt opening inside of the pocket that leads to the interior pocket. The interior pocket is also huge... I made it large enough to hold an iPad or a sketch book (two common things I'm often found carrying...). There are button closures so that it doesn't gape open when it is empty.


This trench has an absurd number of interior pockets. I sort of went a bit crazy- I guess I had secret agents on my mind. There are two zippered chest pockets (one on each side) and two zippered pockets in the lining, one at an angle and one horizontal. I'm REALLY good at making zippered pockets by now!


The back kick pleat was a bit of a struggle for me. I avoid hand sewing whenever possible, so I sought out directions on finishing a lined pleat by machine, and I thought I had it all worked out. It might have been just a bit wonky. Then I waterproofed the coat and let it hang dry, and after that it was just horrible looking, it looked like I was hiding a tail! I'm guessing the weight of being wet caused the twill to stretch more than the lining. I had to undo it all, and re-do it by hand so that it hung properly. Unfortunately I didn't manage to miter the pleat corners... can't win them all!


I went for a real belt buckle and grommets. I'm glad I went with the grommets... I actually looked into sewing eyelets, and apparently this is one thing my machine just doesn't do! I'm sort of shocked about that, it seems like a simple function for a machine that sews automatic buttonholes, and more useful than all those fancy stitches I never use. Seriously, if any of you know of a way to make a Janome 8077 sew an eyelet, I want to know, I've researched it and tried all sorts of hacks and I haven't come up with anything other than doing it manually, which is rather difficult. But the grommets are super simple once you get the hang of it. I ordered the grommets from Pacific Trimming, and the grommet setting tool from Ebay.

After wearing the coat for awhile now, I sort of see why everyone ties their trenches rather than actually make use of the buckle-- it is faster and more adjustable than buckling a buckle. And... if you belt is long enough to tie, you have to pull all that excess through the buckle, which is even more annoying. So the buckle mostly just hangs around, occasionally banging on things that I walk past. As much as I love the polished look of the belt buckle, I might skip it on future trenches!


I just had to do the classic tartan-on-the-bias under collar. The under collar and collar stand are supported by horse hair canvas so that they won't get floppy with time. Or at least, I hope so.


When the trench was totally done, I waterproofed it in Nikwax Cotton Proof. I just measured out the right proportions in a big tub (actually, an empty fabric storage bin!), and dumped my coat in. I followed the directions for soaking and hand-agitation. Since it was so incredibly heavy when wet, I put it in the washer for a spin cycle to wring it out, then hung it to dry. It seems to have worked, water beads on the surface! But it is really only "shower" proof, the water will sink in if left for any length of time. Better than nothing though.


Well, that's about it! It took me SO LONG to finish this project. I've been at this for months. I didn't take it very seriously when other bloggers talked about what a big project their trenches were, but now I have to agree! The project was also dragged out by the fact that I was doing this during a very busy time and I was snatching an hour here and 30 minutes there. But I think it is well worth it, I love wearing it, it makes me smile at a nice cool rainy day!

Can you imagine, I'm already planning my next trench? Yes I am! I'm in the collecting materials phase of the project. While I love this trench, it is a bit dramatic... it is very heavy and sort of on the long side, and I feel very conspicuous wearing such a light color. My next trench will be lighter weight-- I'll lay off the interfacing, probably leave it unlined, and shorter (mid thigh). It will definitely be a darker color. I also really want the classic raglan sleeve trench... and that will require some pattern alteration!

Speaking of material gathering... I have FINALLY found a true showerproof cotton fabric. After much searching, I came across Ventile and Etaproof fabrics. I was unable to obtain Ventile (the UK outfitter refused to ship to the US, and the UK manufacturer didn't respond to my inquiries) but a German outdoor store, Extremtextile in Dresden, was perfectly willing to ship 3 yards of EtaProof, which is made in Sweden. I'm excited about my EtaProof, but it might be years before this project actually happens!

Until then, expect to see lots of khaki around here!