The Bunny Lovey is a sweet little blanket doll. It would be a lovely gift for a newborn! And it is quick to make if you have a sewing machine and some basic sewing skills.
The pattern is FREE... just sign up for our mailing list on the sidebar. After you confirm your subscription, you will be sent a "Welcome" email that has a link to the pattern.
UPDATE August 2016... the PAID version on Etsy now includes downloadable, illustrated instructions. But once again, you can totally make this for free by subscribing to the newsletter and using the instructions here on the website.
If you sign up for the newsletter and you don't see the "Welcome" email, be sure to check your spam folder or the "Promotions" tab if you use Gmail.
Materials:
--1/4 yard or a fat quarter of your main fabric. I used an organic cotton fleece, but this could could be any fabric that is soft and snuggly. It would be lovely in a french terry or a velour!
--A very small amount of contrast fabric. I used colorful quilting cottons.
--The Bunny Lovey pattern. It is free-- just sign up for our newsletter on the sidebar. After you confirm your subscription to the email list, you will be sent another email with a link to the pattern. It is just two pages, and no taping necessary.
--Embroidery floss for the eye.
--Stuffing for the head and tail. I use wool batting or roving, but you could also use cotton batting or poly fill.
Instructions:
Sew all seams with a 1/4 inch seam allowance.
Print out the PDF pattern on letter sized paper. Make sure the printer resize the page, I always set scaling to 100% on my printer.
Cut out the paper pattern pieces,and lay them out on your fabric. Make sure the arrows on the pattern pieces align with the grain of your fabric. If you are using napped fabric like velour, the arrow should point in the direction that the fibers naturally lay down. Cut your pieces from your fabrics, as indicated by the directions on the pattern pieces. Transfer markings for the placement of the ears, eye, and tail.
Sew together the two tail pieces, right sides together. Leave an opening at the base of the tail for turning and stuffing. Sew together the ears with each ear having one piece of main fabric and one piece of contrast fabric, right sides together.
Clip the point of the ear straight across, close to but not touching the stitching.
Turn the ears and the tail right sides out. If you have hemostats, use them to grab the tip from the inside and pull it through. Otherwise, use your fingers and a stick (like a chopstick). Press them flat.
Put the head pieces right sides together. Sew around the head leaving the neck open. Clip the curves, being careful not to cut your stitching.
Cut a slit in the head for the ears, where indicated by the pattern. Cut through both layers of the head.
Fold the ears in half, with the contrast fabric on the inside.
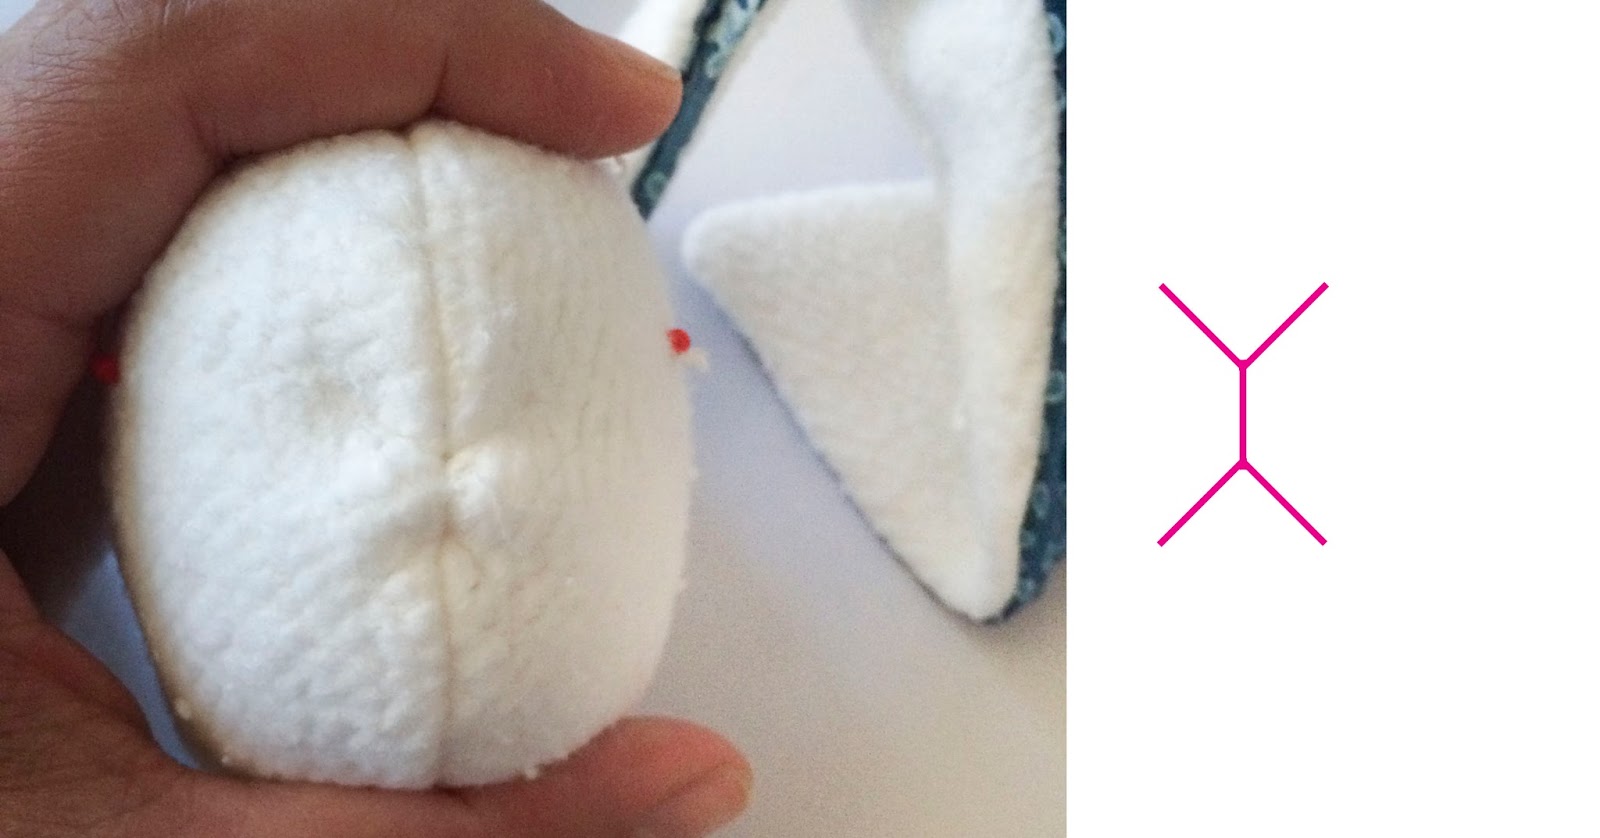
Stick the ears up through the neck into the head and through the holes you made. The fold should be to the back of the head.
Arrange the head so that the seam allowance is in the center, and the ears sit flat. The folds of the ears should point towards each other. Sew across the top of the head from ear to ear, catching the raw edges of the slits you made.
Pull the ears to turn the head right side out. Smooth the seams flat with your fingers. Stuff softly with wool (or your choice of stuffing).
Sew the bunny nose and mouth. I used a double strand of white sewing thread to give just the shape of bunny cheeks and nose. You could also use pink embroidery thread to give a stronger impression of the face. Hide your knots inside the head.
Decide where you want the eyes. Use the markings on the pattern as a guide, but make sure it looks right for your bunny, with the personality you want to give it. I use a pin with a colored head to make sure I like the placement.
Sew the eyes with embroidery thread. I used blue on this bunny, but I also use brown or pink (albino bunny!). You could also just leave the eyes off to make a super minimal bunny.
Hide the knots inside the head. Here I have knotted my strands, then threaded both ends through the needle and pulled them back through the head. I'll clip the strands close to the head and the ends will disappear into the stuffing.
Attach the tail to the body. Cut a slit where indicated on the pattern, about two inches from the bottom of the bunny. Stuff the tail.
Slip the tail through the slit, with the tail of the tail on the inside. Sew across the base of the tail from the inside, catching the raw edges of the slit. Taper to nothing on either side of the tail.
Sew the body together. Leave about two inches open at the center of the neck for turning and inserting the head. Clip curves.
Insert the head into the body. Push the stuffing up into the head so that the neck is as flat as possible. Make sure that the raw edges of the body pieces are turned to the inside.
Starting about 1/2 inches before the opening in the neck, sew cross the base of the neck, catching the turned under edges of the body and the neck. Sew past the opening by 1/2 inch. I use a zipper foot on my machine to get as close to the head as possible.
And you are done! You now have a beautiful toy that you can feel totally good about giving to some little person you love.
Oh, and please send me pics if you make one, I would really enjoy seeing your creations! You can send me an image, or post on Instagram #bunnylovey